Lesson 2 - Script of Unity3D
Introduction to Script of Unity3D
1. Create a new folder on Desktop and give it a name, say “Lab2”.
2. Create a new project at the position of “Lab2”
3. In this lab, we start to make your game move and have more functions. This needs to use the scripts in Unity3D, which requires you to do some coding.
Set Up Your Game
4. This time, we will do a “Roll a Ball” game first to learn how to use script in Unity.
5. To start building your game, you should create a new scene. Click the right button at the Project Panel and click Create > Scene. You can name it as “MyFirstGame”.

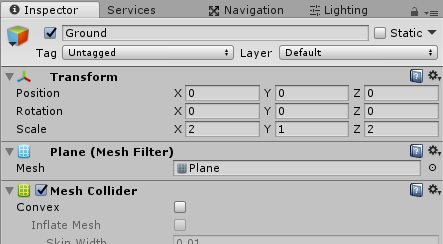
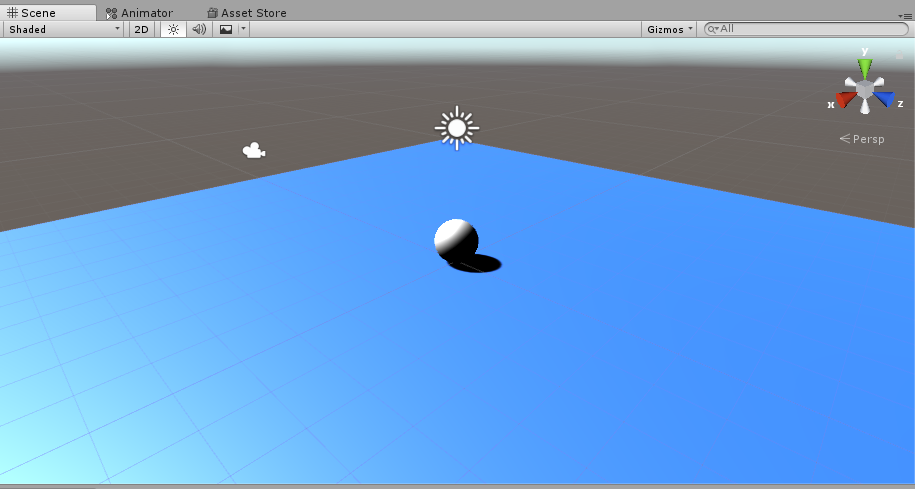
6. Now we need to create a plane as the ground of this game. Click GameObject > 3D Object > Plane to create a plane in your scene. You can rename it as “Ground”.
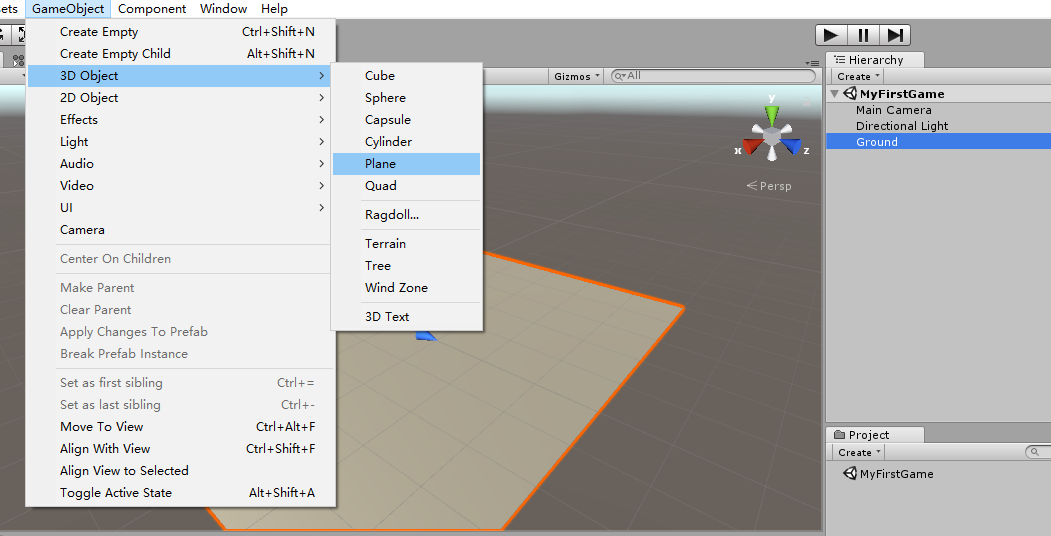
7. Set its position as (0, 0, 0) and its scale as (2, 1, 2).
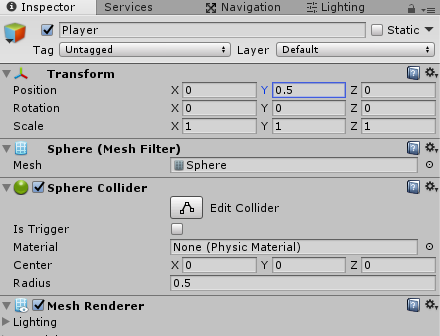
8. Then, we need to create our player, a ball. You can click GameObject > 3D Object > Sphere to create a ball in your scene and rename it as “Player”.
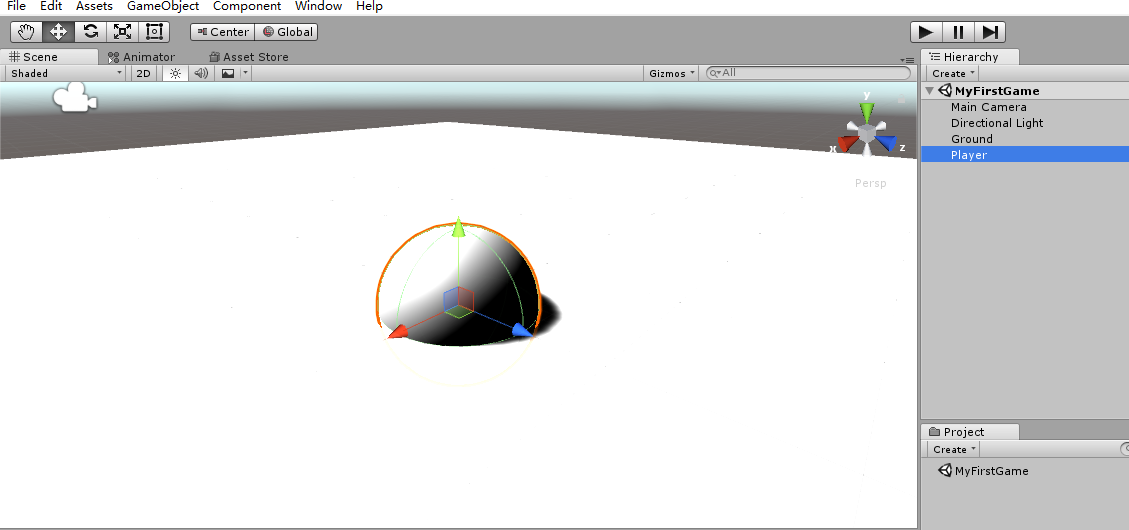
9. You should set the position of this ball as (0, 0.5, 0) to make this ball perfectly stand on the plane.
10. At Project panel, right click and choose Create > Folder. You can name this folder as “Material”. Then right click this folder and choose Create > Material to create a new material, named as “Background”. You can choose your favorite color at Albedo to set this material color.

11. Drag the material from the Project Panel to Ground in the Scene. It will have the color of your material.
Add Scripts for Your Player
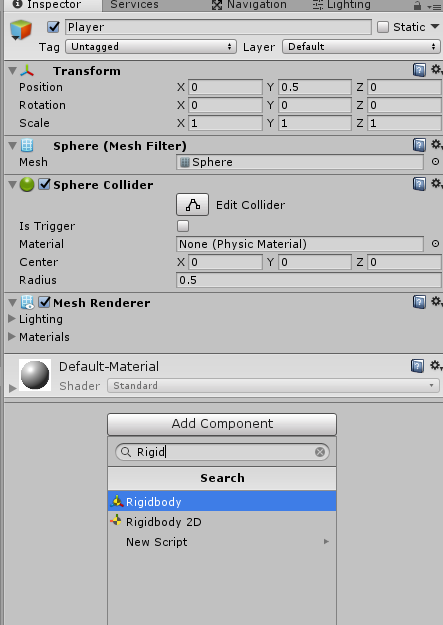
12. To add physical properties to this ball and make it be able to move, we need to add Rigidbody to it. You need to choose Player at Hierarchy panel and click Add Component at Inspector panel. Search for Ridigbody and click it to add it to your Player.
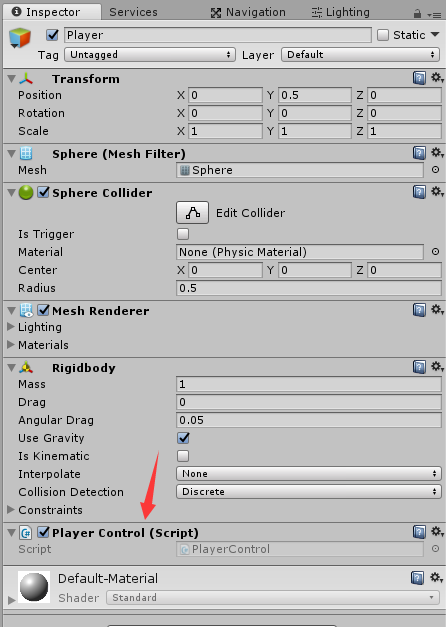
13. This time, we need to create a script to add force to this ball and make it move by your controls. We create a new folder named as “Script” and right click it. You should choose Create > C# Script and name it as “PlayerControl”. Then, drag it onto your Player in Hierarchy panel. That’s also how you can attach a script onto a game object. You will see this in your Inspector panel.
There are both C# and JS Script in Unity3D. Here we only introduce how to write C# Script.
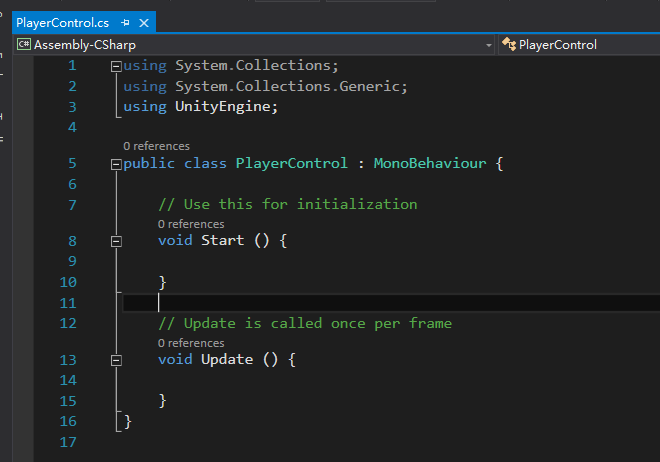
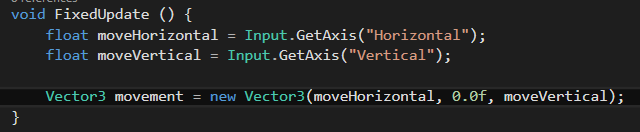
14. Double Click PlayerControl, and you can open this script. You can see two empty function in this script. Start() is used for initialization of this object. It will run at the start of your game. Update() is used for the action updating, and it will run at each frame of your game. However, this time we need to do some physical movement, so we’d better to change Update() as FixedUpdate() which is suitable for physical action updating.
15. We need to catch your input to this game, so we need Input.GetAxis() to get it. In default setting, Horizontal is mapped to A, D, ←, → and Vertical is mapped to W, S, ↑, ↓. Then we can create a vector to record to movement.
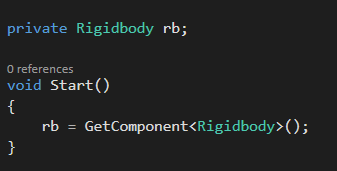
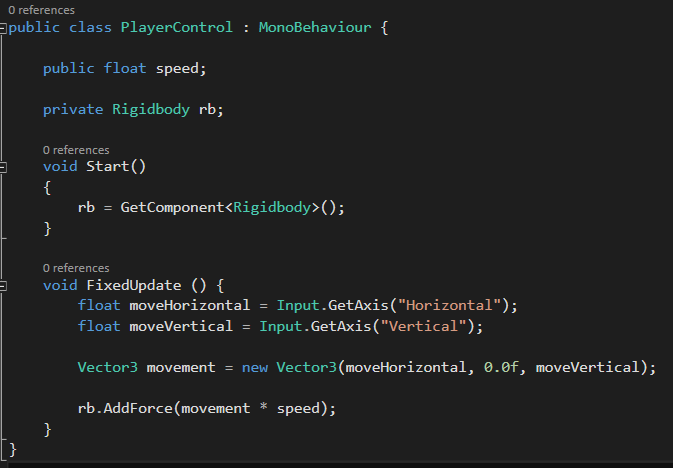
16. To add this movement to your ball, you need to get the Rigidbody of this ball because a force only works on the Rigidbody. To get the reference of the rigidbody, you need to create a private variable Rigidbody rd, and initialize it in the Start(). The function GetComponent<>() is used to get specific component of your game object. In <>, you need to write the data type.
17. Then, to add the movement to the ball, you need to write one more line in FixedUpdate(). AddForce() is used to add a force vector to a Rigidbody.

18. To make this force more flexible, you can add one more public variable speed. As it is written as public, it will be shown in your Inspector panel.
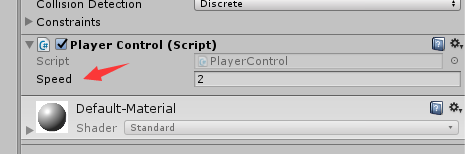
19. Now, you can set a value to the speed and test playing your ball. You will see it can move!
Set Up Your Camera
20. To make this game more user-friendly, we need to make the camera follow your Player. To achieve this, we need to tie our camera to the Player.
- First, click your Main Camera in Hierarchy panel. We need to set its position as (0, 10, -10) and its rotation as (45, 0, 0). Now it is a third-player view to your Player.
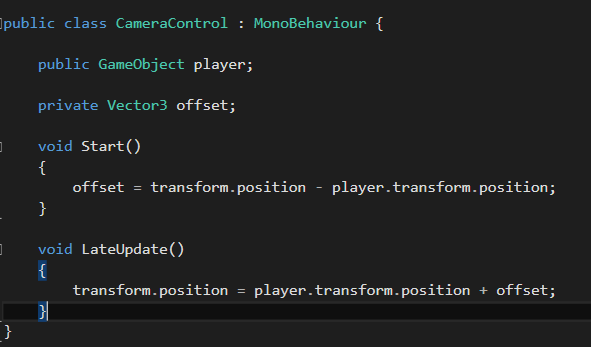
- Then, we need to add some scripts to make our camera move following the Player. We need to create a new script “CameraControl” and attach it onto the Main Camera. The LateUpdate() is to guarantee that all the update has been done in each frame and then this function is called.
- After completing this script, you need to drag the Player in the Hierarchy panel onto the player in Inspector of CameraControl.
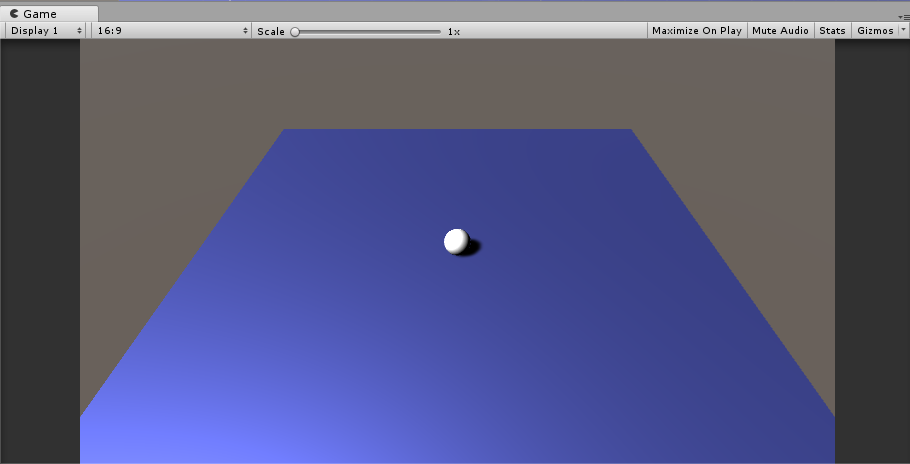

21. Then, you can play your game, and you will find your camera is moving following your ball!
Create Pick-Up Items
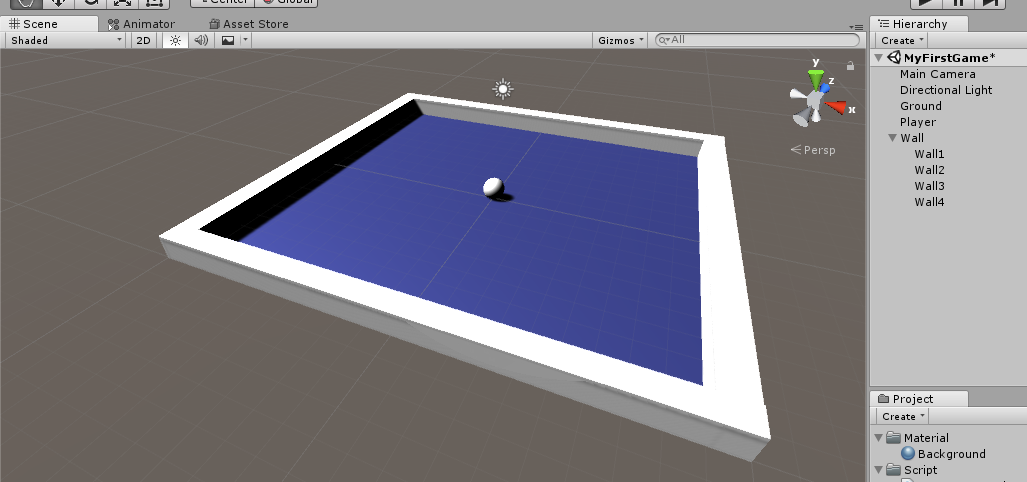
22. As you play with your ball, you will find it will drop off from the plane. We need to add some walls to this plane. You need to create an empty object first and rename it as “Wall”. Then add 4 Cubes as the children of this Wall object. It should look like this.
23. Now we will start to add some pick-up items to this game.
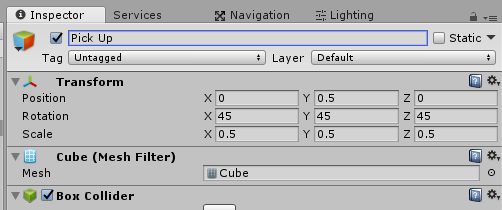
- Firstly, we create a cube with these properties.
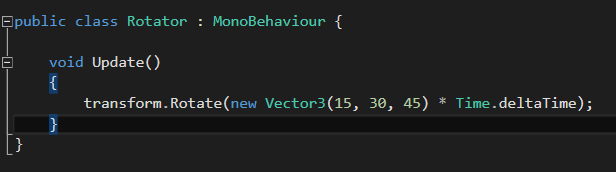
- Then, we add a script named “Rotator” to it to make it rotate all the time.
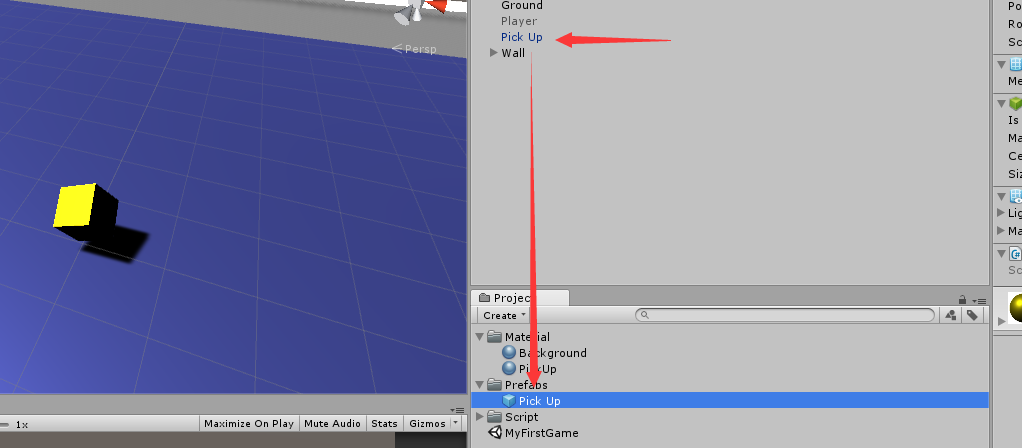
- Now, we create a new folder named “Prefabs”. We need to create a new material for the Pick Up and I choose yellow as the color. Then, you can drag your Pick Up object from Hierarchy to the Prefabs folder to save it as a prefab. A prefab is a object which you can reuse in your game next time.
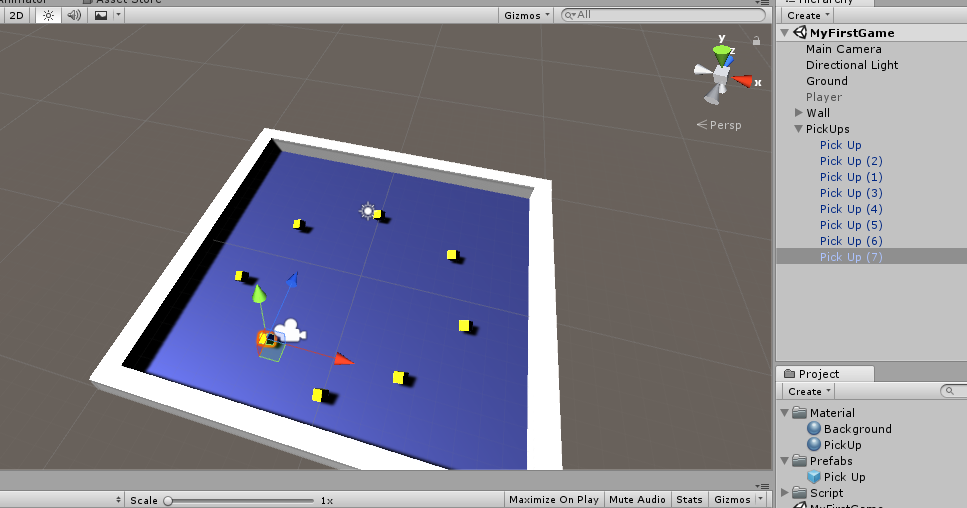
- After creating the prefab, you need to add a few more pick-up items in your scene.
24. Now, we need to make our ball be able to collect the items. To start, I have to introduce the Collider. You will find that there are colliders on both Player and Pick Up. They are used for judging whether this object has collision with other objects which have collider. Now your Player cannot enter Pick Up, but after you mark the IsTrigger. Your Player is able to enter Pick Up, and then we can detect this collision in our following steps.
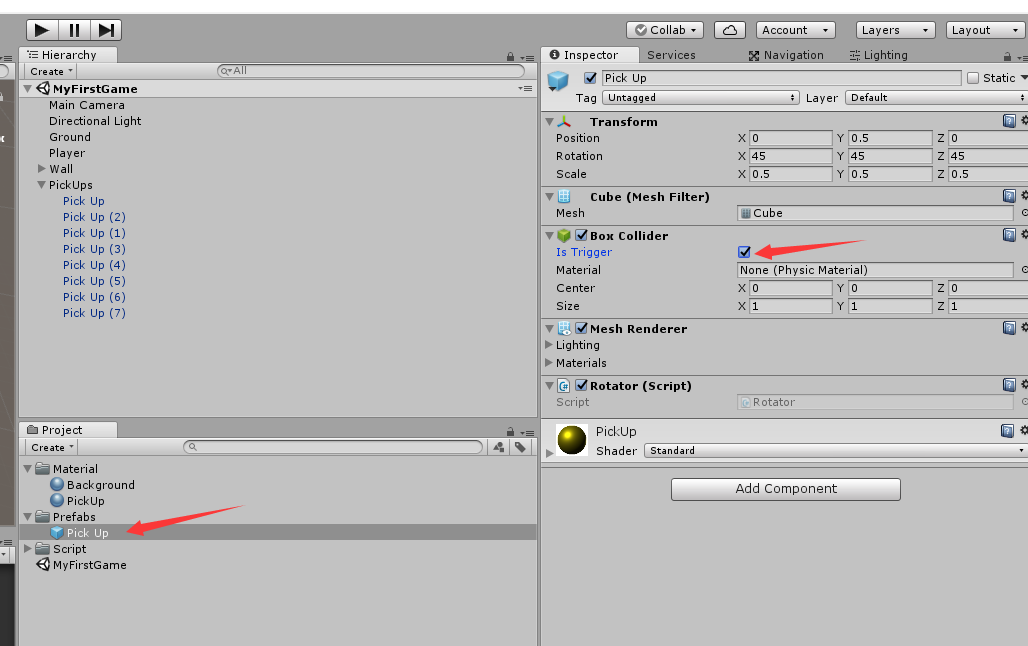
You must change the prefab, or you need to change the objects in Hierarchy one by one.
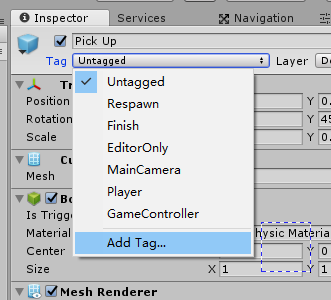
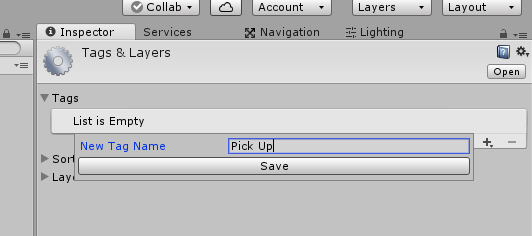
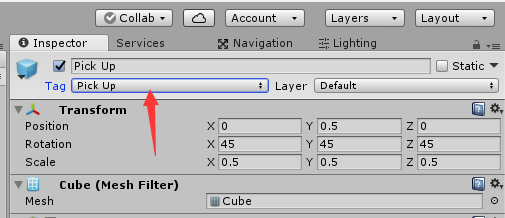
- The one more thing we need to do is to add a tag to this object. You need to click tag and add a new tag named “Pick Up”.
25. Now we need to edit the PlayerControl script to detect the collision and make some actions. We need to add one more function in this script.
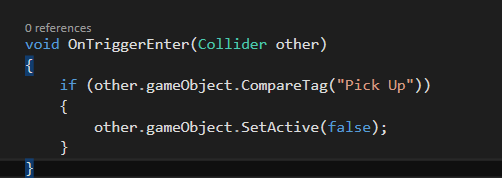
OnTriggerEnter is the default function of Unity3D to detect the collision between objects. What we need to do is to set the pick-up item invisible as our ball hit them. Therefore, we need to check whether the object entering is “Pick Up”, and if it is Pick Up, we need to set SetActive as false and it will become invisible.
26. Until now, you have completed a simple Roll a Ball game! Test and play with it!
Proceed with next step if you have a VR headset [or After Your Team Get VR headset]
Otherwise, skip next section and go to Assignment 1 Section
View Your Game In VR
27. Now let’s try to view your game in VR. If you want to run VR software in your computer, your GPU must be higher than NVIDIA GTX960.
28. You need to set up your Quest first.
- Firstly, you need to download Meta Quest Link from its website.
- Secondly, install the software and plug-in the link cable of Quest.
After installing the software, you’d better close it and restart your own computer. That will make the VR software works better.
29. Now go back to Unity3D. Click File > Build Setting. You will see the Build Setting panel.
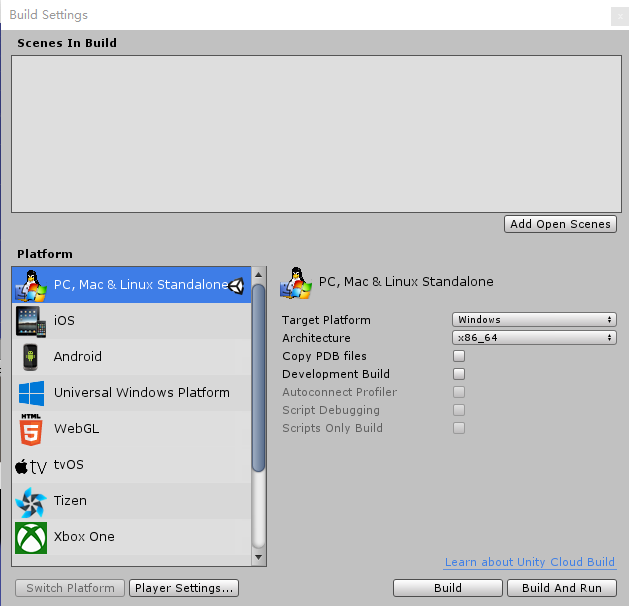
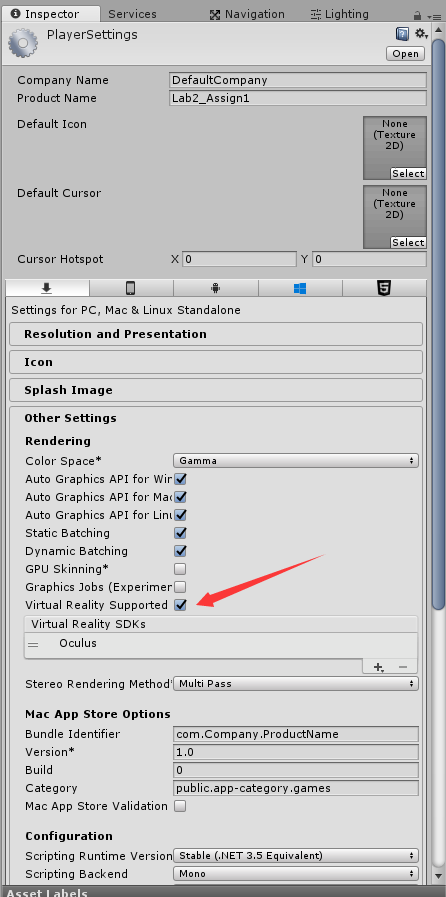
Then click Player Setting. Mark the Virtual Reality Supported and delete the OpenVR. You should only leave the Oculus.
30. Now click Play, and Unity3D will automatically run the driver software of Oculus and you can view your game in VR world now!
Tips: if you still cannot see your game in VR, try to close the Oculus software and Unity3D. Then, restart Unity3D and click Play directly. (Do not run the Oculus software!!!)
View Your Game In VR (For Unity 6)
31. You need to set up your Quest first.
- Firstly, you need to download Meta Quest Link from its website.
- Secondly, install the software and follow the guide here To link your quest to Meta Horizon Link on your PC.
Ensure both your PC and Quest are on the same Wi-Fi network (preferably 5GHz) for Air Link.
32. Now that we have Linked our computer to our headset. We need to add Android Build Support to our Unity Project as Quest devices run on Android and require these components to build and deploy your VR
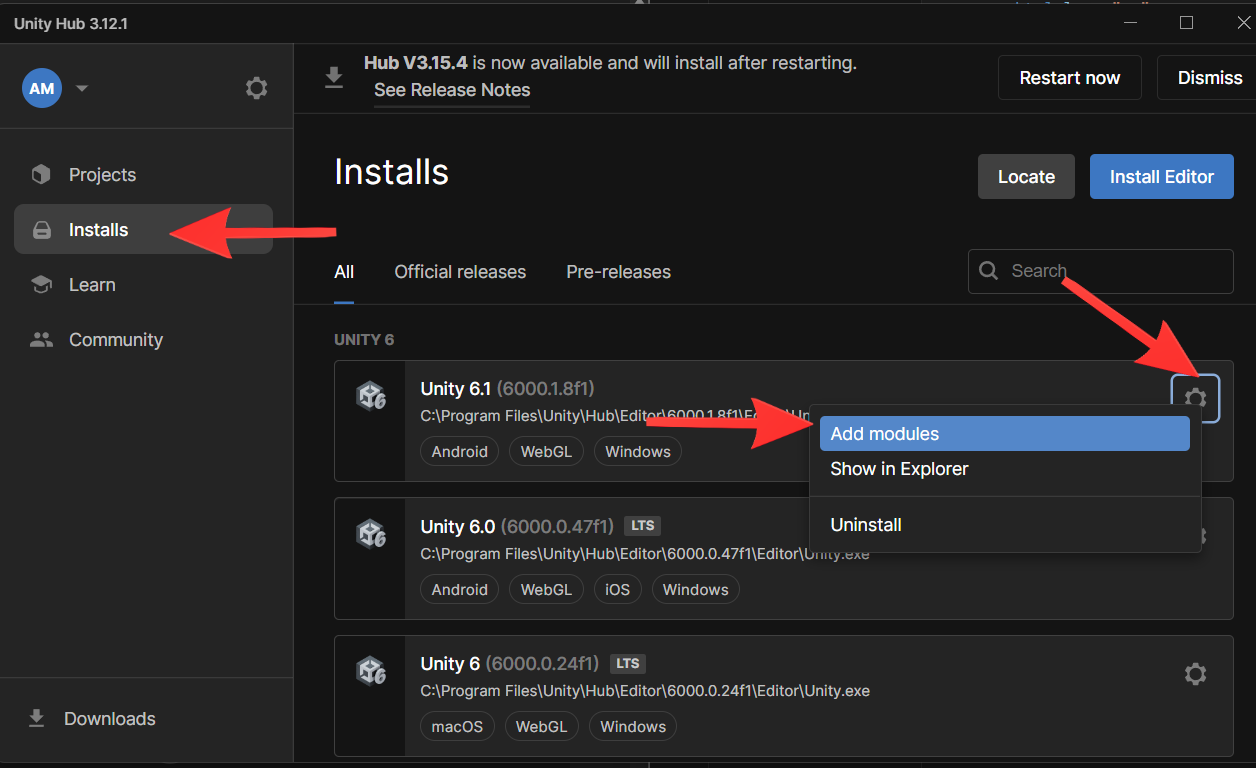
- Firstly, you need to open Unity hub and go to the installs tab.
- Now click on the setting button on the editor version you want to download Android support for (in my case its Unity 6.1). Then click on Add Modules
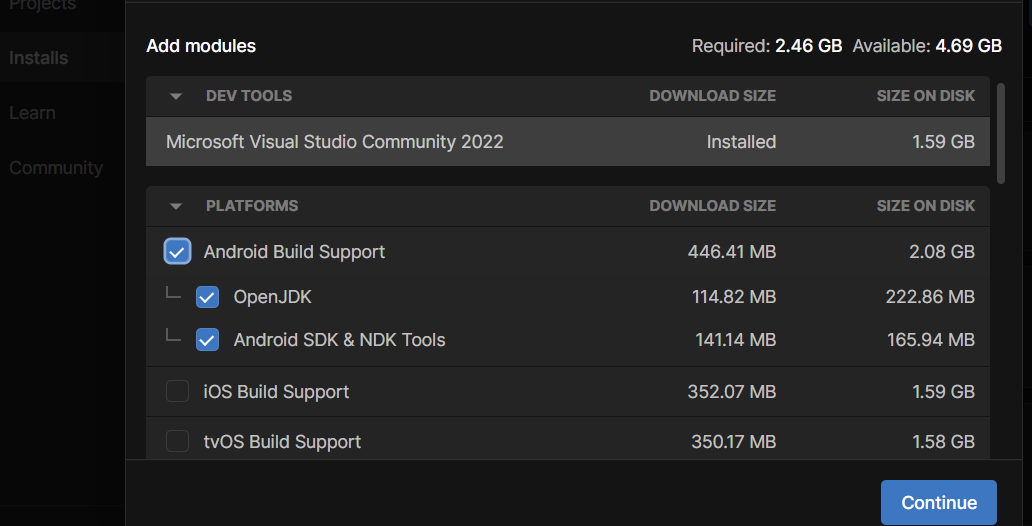
- Now select android build Support and all options under it and click Install/Continue. This should install the necessary tools.
33. Now we need to enable XR Plugin to be able to play our scene in our headset
- Open your Unity project. In the menu bar, go to:
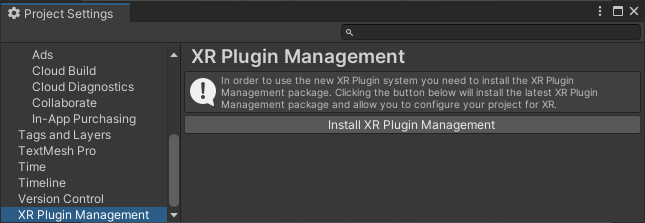
- Now Click on Install XR Plug-In Management if prompted to.
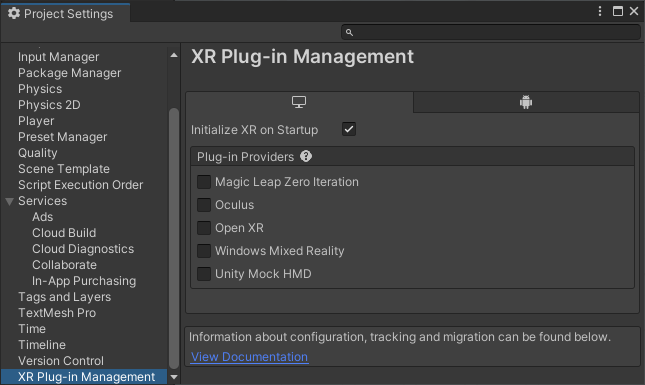
- Now you should see something like this:
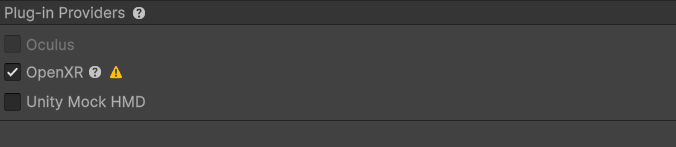
- Select OpenXR, unity will now download the necessary packages. You will see there are some errors that appear. We will try to fix some of them.
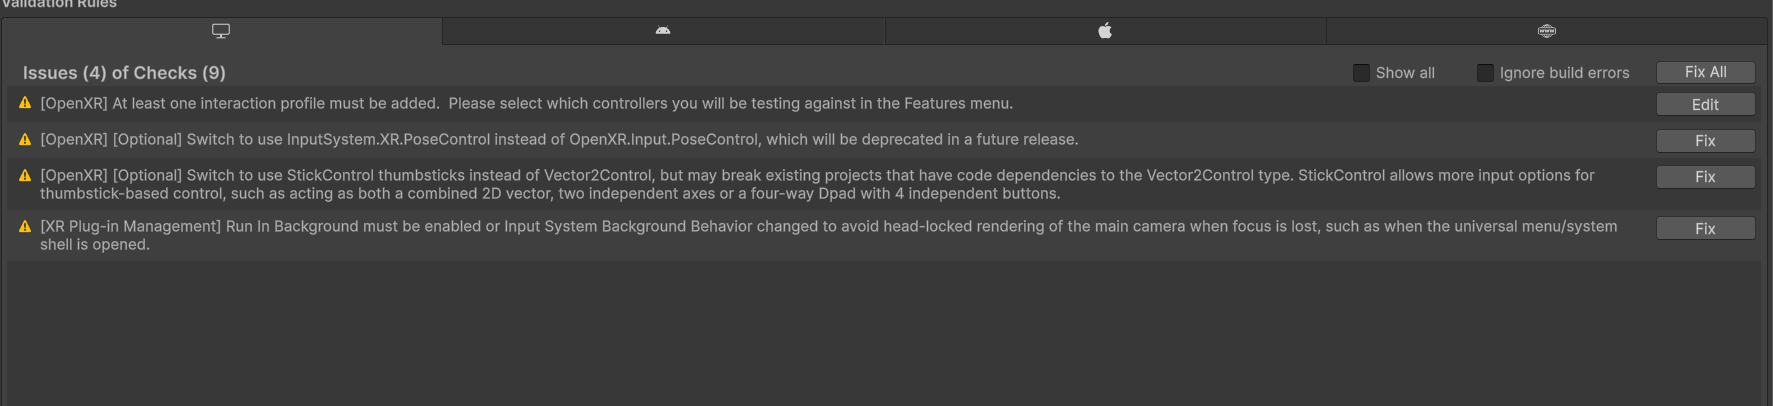
- Now tap on the small error icon next to open XR. It Should open a new window which looks like this
- Now you can Press Fix-All. This should get rid of most of it. Getting rid of all the errors requires you to create a build profile. But we can skip that as it doesnt stop us from playing
Edit > Project Settings > XR Plug-In Management
Unity will automatically download and configure the required OpenXR packages.
34. Now we can play the game. We should see the the scene in our headset
If VR does not start, close Unity and the Meta Quest Link app, restart Unity, ensure Air Link is enabled, and press Play again.
Assignment 1
Assignment 1
This assignment 1 is to check what you have learned from Lab 1 and Lab 2. It covers two parts.
-
Part 1:
You need to build a complete scene with Terrain tools. It needs to contain some different objects to form a meaningful and complex scene. You can also download some assets from the Unity Store, but you should not use the default scene in the package you download.
-
Part 2:
In your scene, there should be some objects that can be controlled by player to interact with some other objects. There also should be some objects that can move automatically. These objects should be meaningful in your scene. Do note that your player doesn't need to be a ball. Get creative!
Grading Criteria
| Terrain (30%) | Enough editing is performed so that it looks like in the real world. |
| Environment (25%) | Enough trees and grass are added, or a meaningful lake/river is added. |
| Lighting (25%) | The directional light is correctly set; the fog makes part of the scene invisible when the camera is distant. |
| Extra (20%) | There's any specific meaning of the scene, or the scene is aesthetically enjoyable, or there's any extra stuff learned by yourself. |
| Player (20%) | The player can move. The speed is modifiable. |
| Camera (20%) | The camera can follow the player and keep a fixed offset. |
| Scene (20%) | Walls can block the ball (player), even under relatively high speed of movement. |
| Pick-ups (20%) | Pick-ups rotate correctly, won't block player's movement, and will disappear when the player "collects" them. |
| Extra (20%) | Any aesthetic creativity or any extra stuff learned by yourself. |
Submission Guidelines
After completing your project, you need to select all your objects in Project panel and click Assets > Export Package to export what you used in your project.
Project groups can loan out VR Headsets from Mr Dennis SIN (send email to check his availability) . Date of collection will be announced through Canvas after project groups are finalised. You should share the hardware for this assignment. You can work together in lab, help-each other (within the group), but each one should implement a unique VR scene/ideas/objects.
What to submit:
XXX. unitypackage (Your game package)
README.txt (You need to write how to play your game and what downloaded packages or objects you have used in your project)
Zip these files into Your_Student_Number.zip and upload it to Canvas->Assignments->mini-Project1/Lab Assignment 1 Submission
Due date: Refer to Canvas->Syllabus->Schedule