Lesson 4 - AR Interaction Development in Unity3D
AR Foundation - Prepare For AR Foundation Development
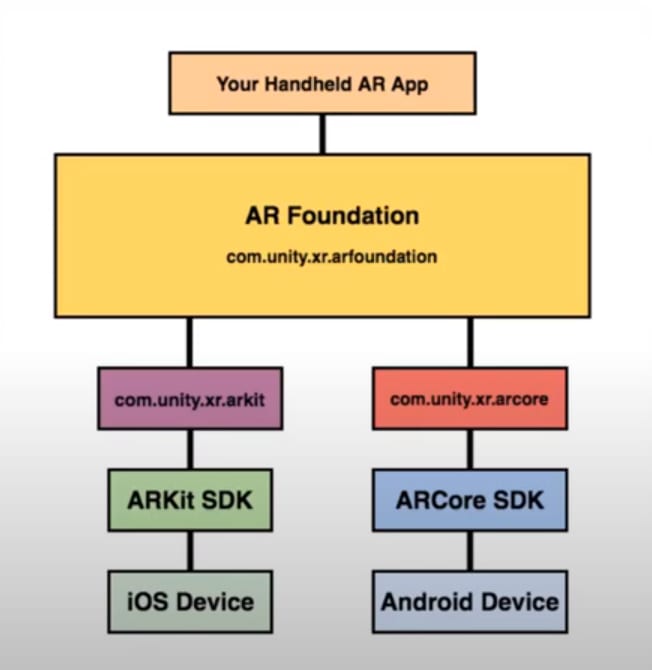
1. In this lab, we start to introduce how to develop AR software/game with Unity3D, and for that purpose, we will use AR Foundation. It is a multi-platform API that allows developers to develop AR apps on Unity for both iOS (which uses the AR Kit plugin) and Android (which uses the AR Core plugin). Below is a graphical representation of the relationship between AR Foundation, AR Kit and AR Core.
2. Create a new folder on Desktop and give it a name, say “Lab3”. Create a new project at the position of “Lab3”.
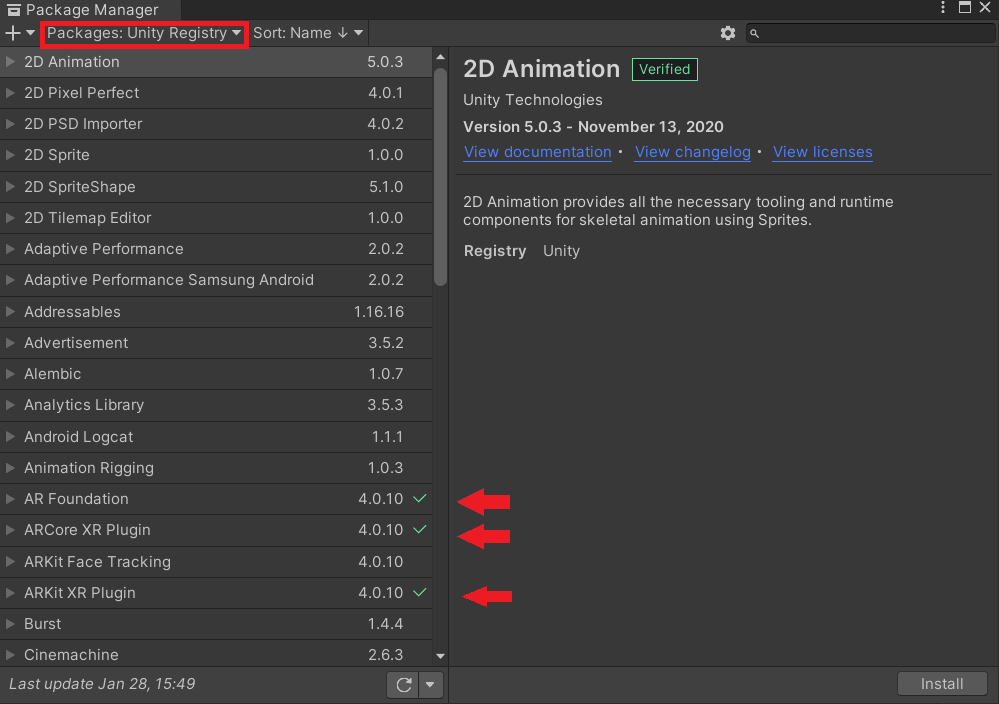
3. For everything to work, we need to download the AR Foundation, AR Kit and AR Core plugins. Go to Window > Package Manager. Make sure that there is Packages: Unity Registry at the top bar. If not, change it using the drop down menu. You will now see a long list of packages. Search for AR Foundation, ARCore XR Plugin and ARKit XR Plugin. Install all of these packages.
Settings for iOS
4. Later on, we will be building the project to test it on a mobile device. If you plan to build on an Android device, ignore this section and skip to the next section. If not, continue reading and follow the steps.
Note that you need the iOS Build Support module installed in your version of Unity. Also, you need at least a MacBook (Mac), as well as an iPhone 6S and above or iPad Pro. If you do not have a MacBook, you can use the Mac in the Mac Lab in SOC (PL1) or the study room of UTown. Also, you need to download XCode in your MacBook/Mac. You need an Apple account as well (do not need to be developer account, a common account is enough).
5. Go to Edit > Project Settings > Player. Click on the iOS tab, then click on Other Settings. Look for Bundle Identifier, and write something unique in that field, in the form "com.company.name".

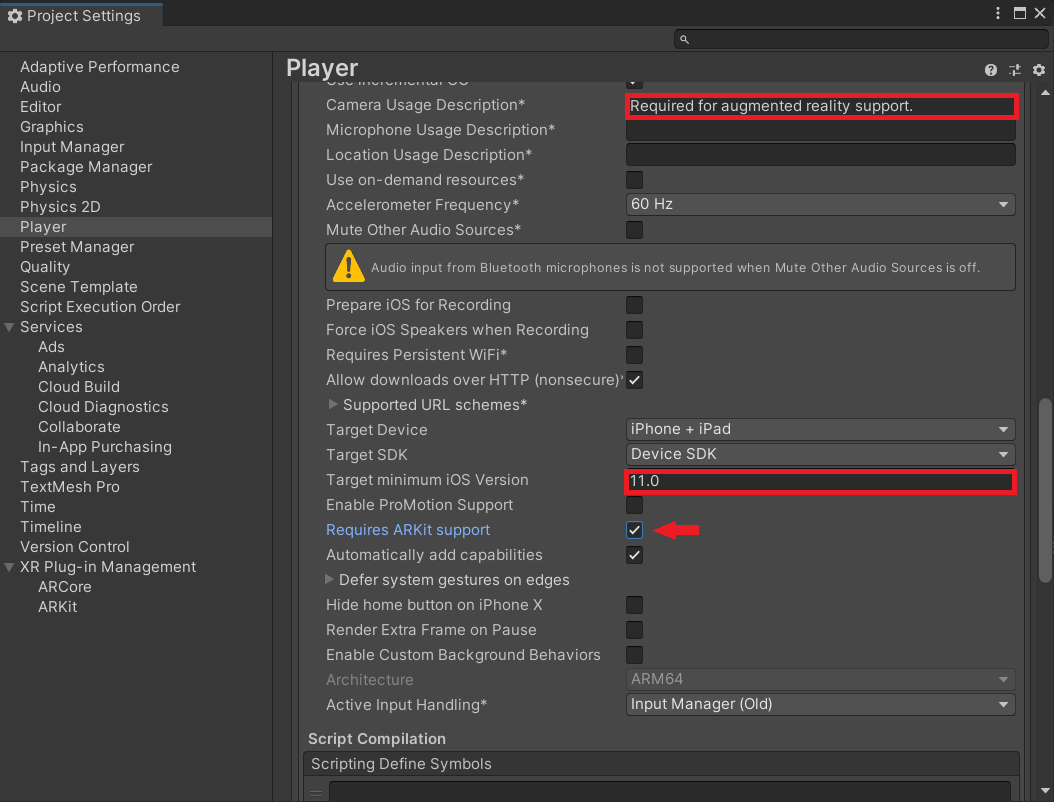
Next, look for Camera Usage Description, and type something inside it, say "Required for Augmented Reality Support". Then, go to ARKit Support, and tick the box next to it. Set Target Minimum iOS Version to at least 11.0. Ensure that Architecture is set to ARM64.
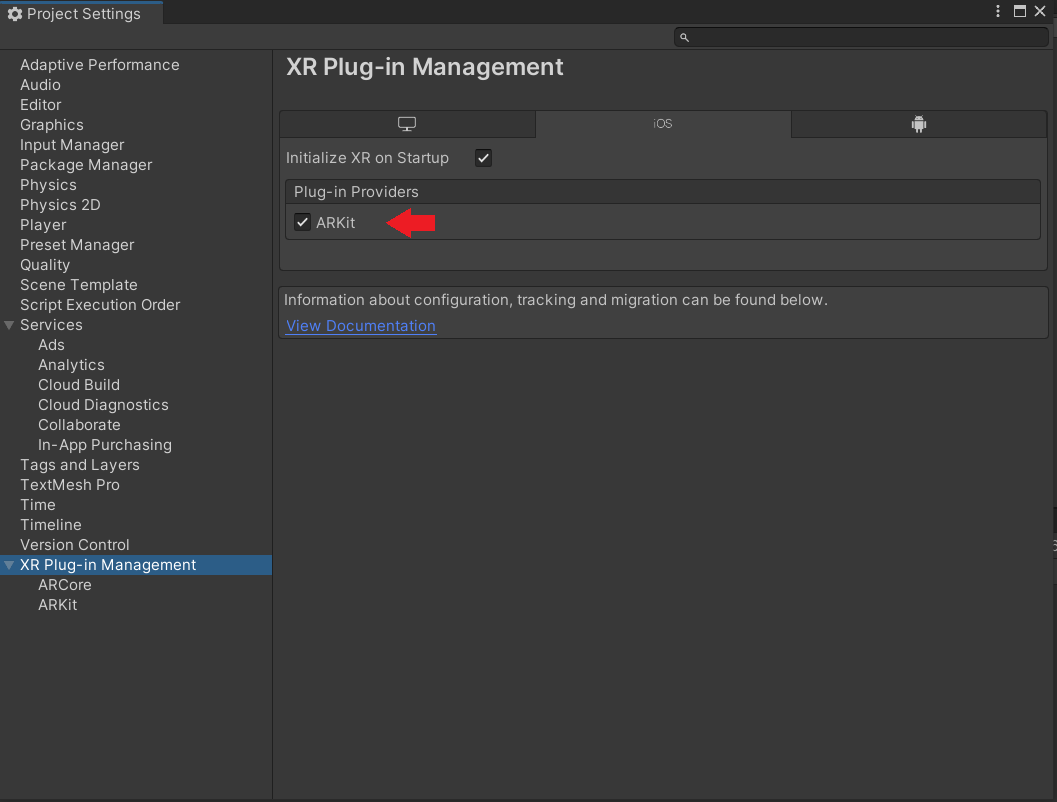
6. Finally, go to Project Settings > XR Plug-in Management. Under the iOS tab, make sure that the checkbox next to ARKit is ticked.
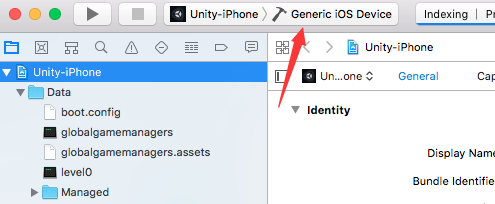
7. To preview the app, go to File > Build Settings. If the Unity icon is not already next to iOS, select iOS and click Switch Platform on the bottom right.
Then click the Build button and choose a position for your XCode project. Then copy this XCode project to a MacBook/Mac.
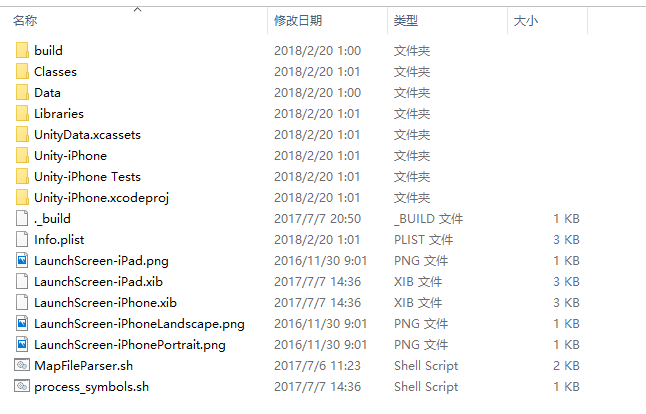
Open your XCode project in your MacBook. You will see a scene like this.
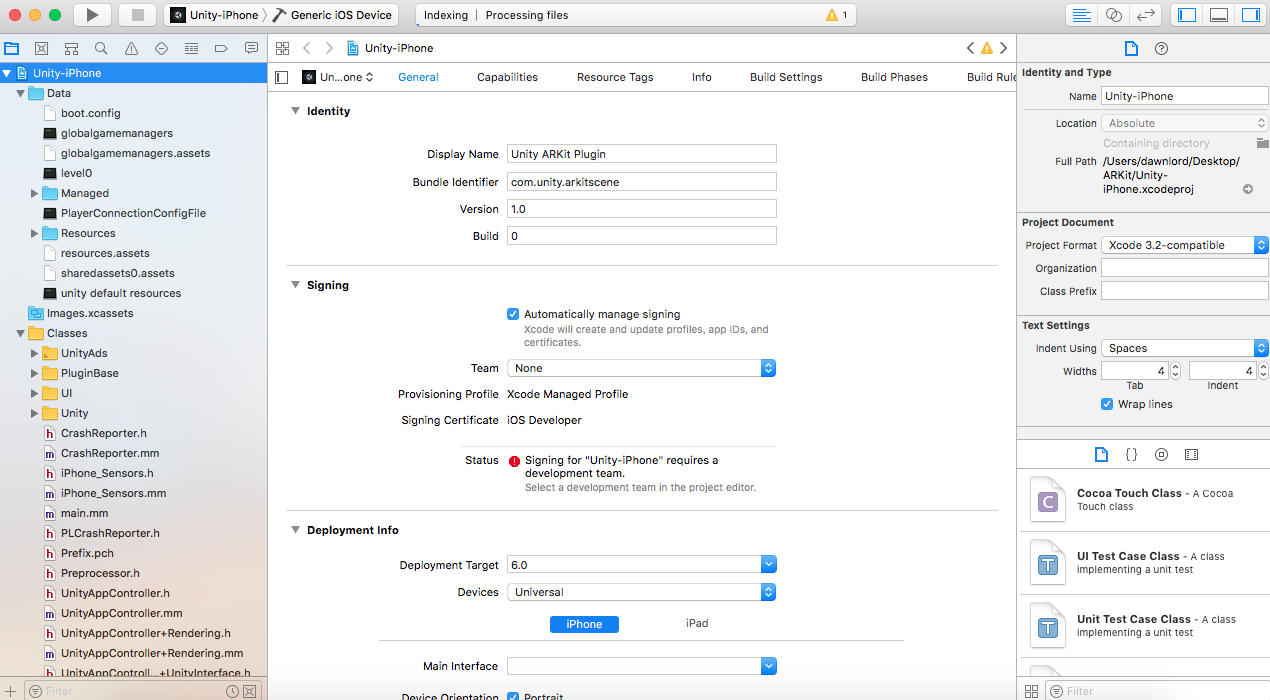
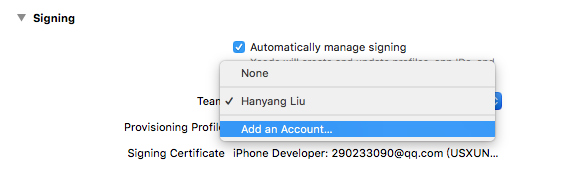
To copy this project to your device, you need to sign for this project first. Click the Team and add an Apple account for it. If you are unable to add an account, check the "automatically manage signing" checkbox. The option should now appear.
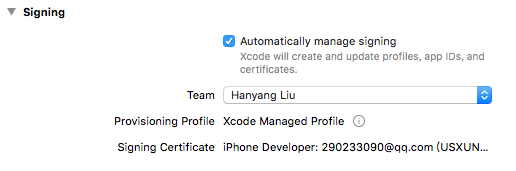
After adding an account, you need to choose your own account, and this application will be signed automatically.
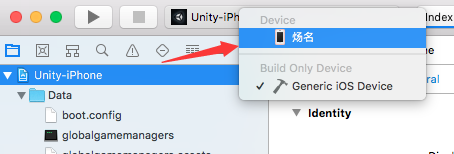
Then, you should connect your device to your MacBook, and you will see your device from here.
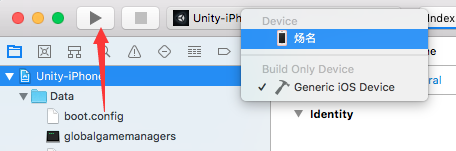
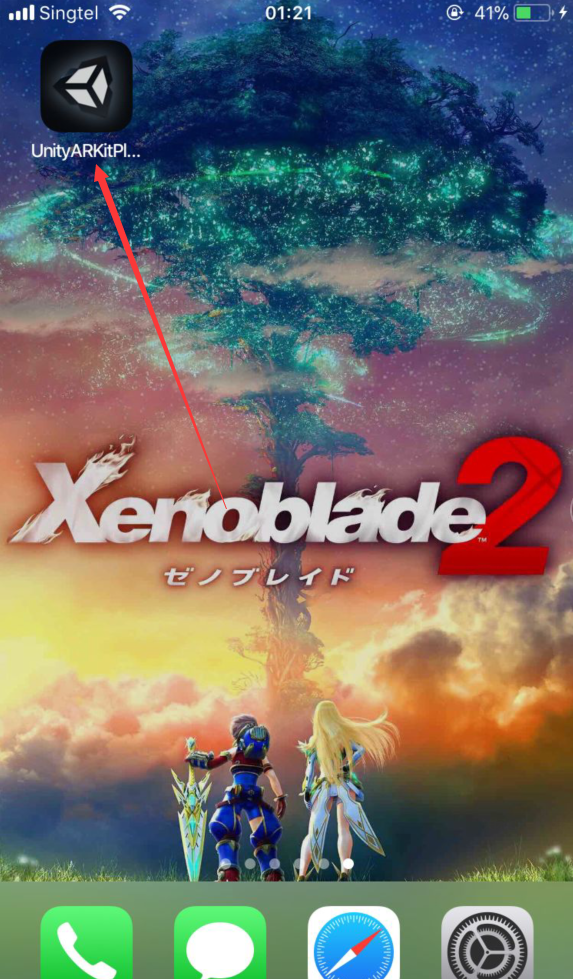
Then, you should click the Play button, and the project will be complied as well as copied to your device. You should see an app with Unity Icon on your device.
Now, skip to Using AR Foundation.
Settings for Android
8. Later on, we will be building the project to test it on a mobile device. If you plan to build on an iOS device, ignore this section and go back to the previous section. If not, continue reading and follow the steps.
Note that you need the Android Build Support module installed in your version of Unity, as well as an Android device that supports AR Core.
9. Go to Edit > Project Settings > Player. Click on the Android tab, then click on Other Settings. Search for Multithreaded Rendering, and untick the box next to it. Look for Bundle Identifier, and write something unique in that field, in the form "com.company.name". Also, set Minimum API Level to 26.
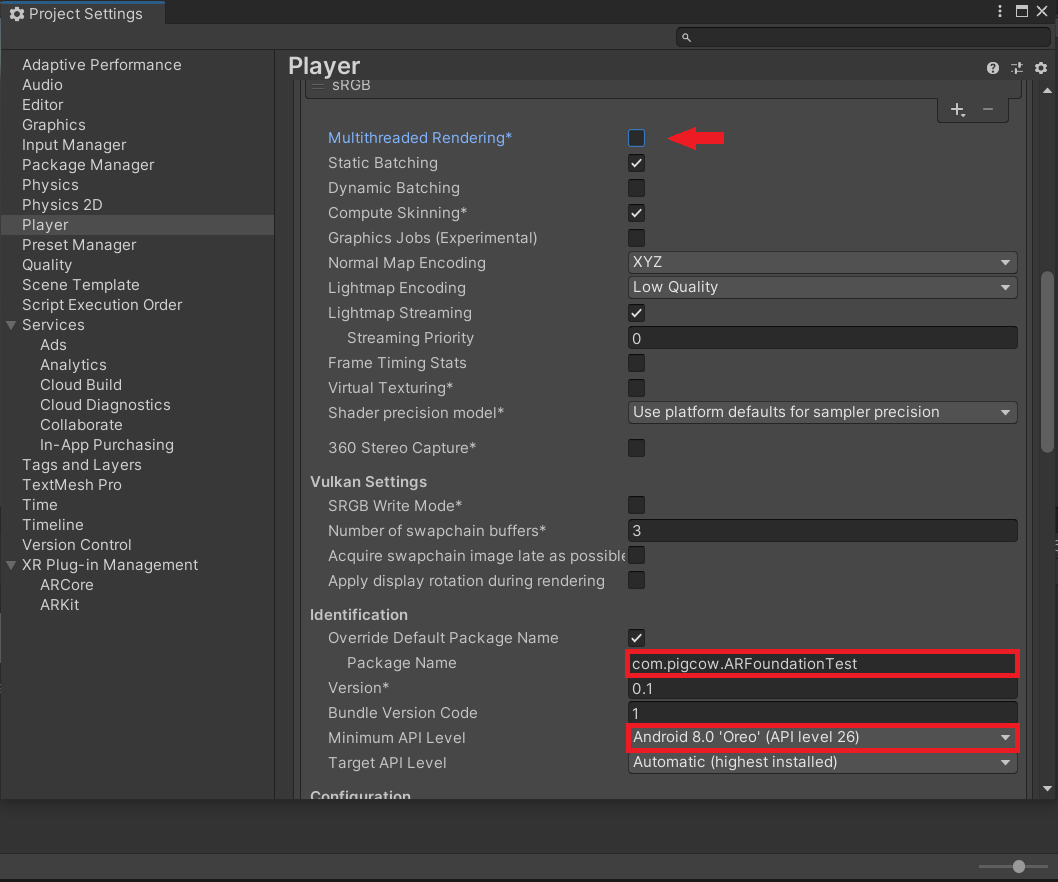
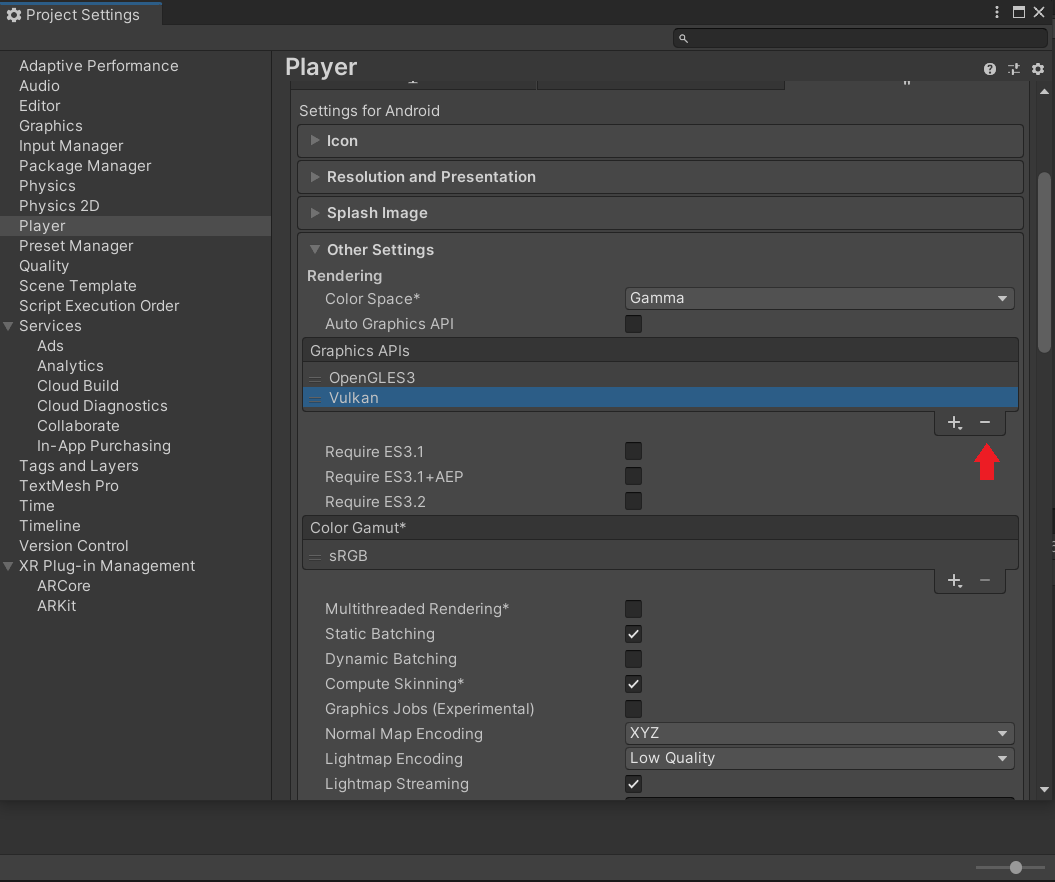
Next, under Graphics APIs, select Vulkan and click on the - button on the bottom right hand corner of the box to remove it.
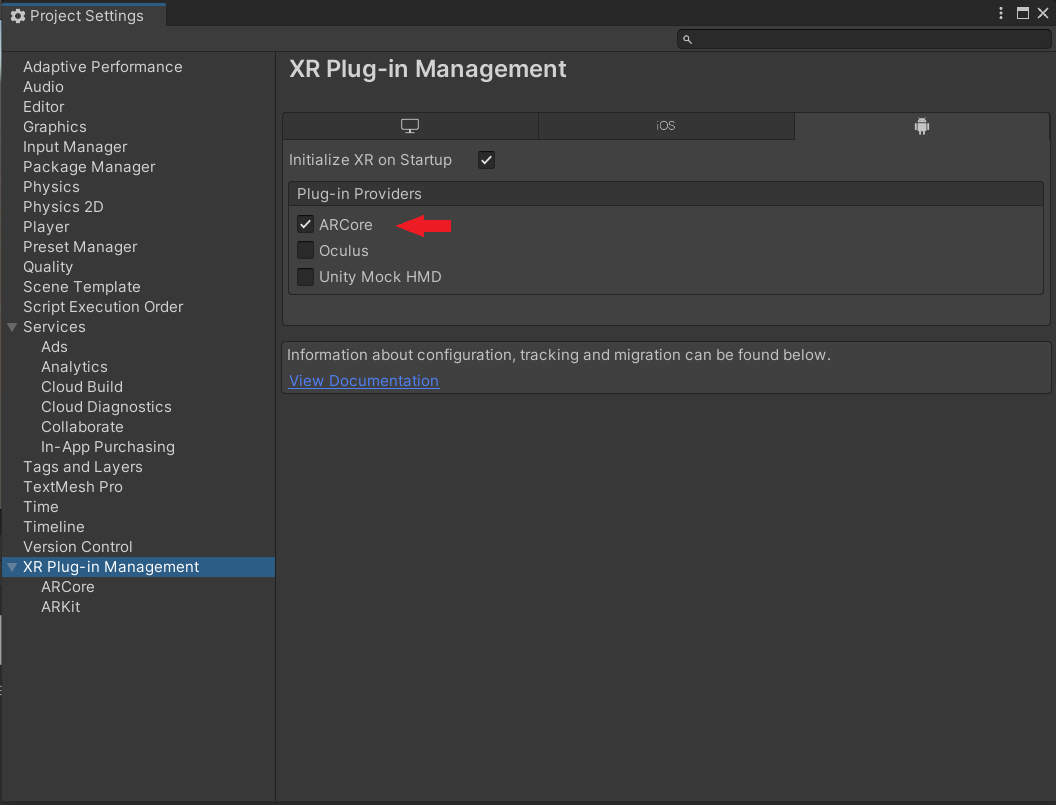
10. Finally, go to Project Settings > XR Plug-in Management. Under the Android tab, make sure that the checkbox next to ARCore is ticked.
11. To preview the app, go to File > Build Settings. If the Unity icon is not already next to Android, select Android and click Switch Platform on the bottom right.
After that, connect your Android device, and ensure that USB Debugging is turned on. Click on the drop down menu next to Run Device and look for your device name. Then, click Build and Run.

Using AR Foundation
12. Now, we can start using AR Foundation. The beauty of it is that since it communicates with both AR Kit and AR Core, the same objects and code can be used in development for both iOS and Android apps.
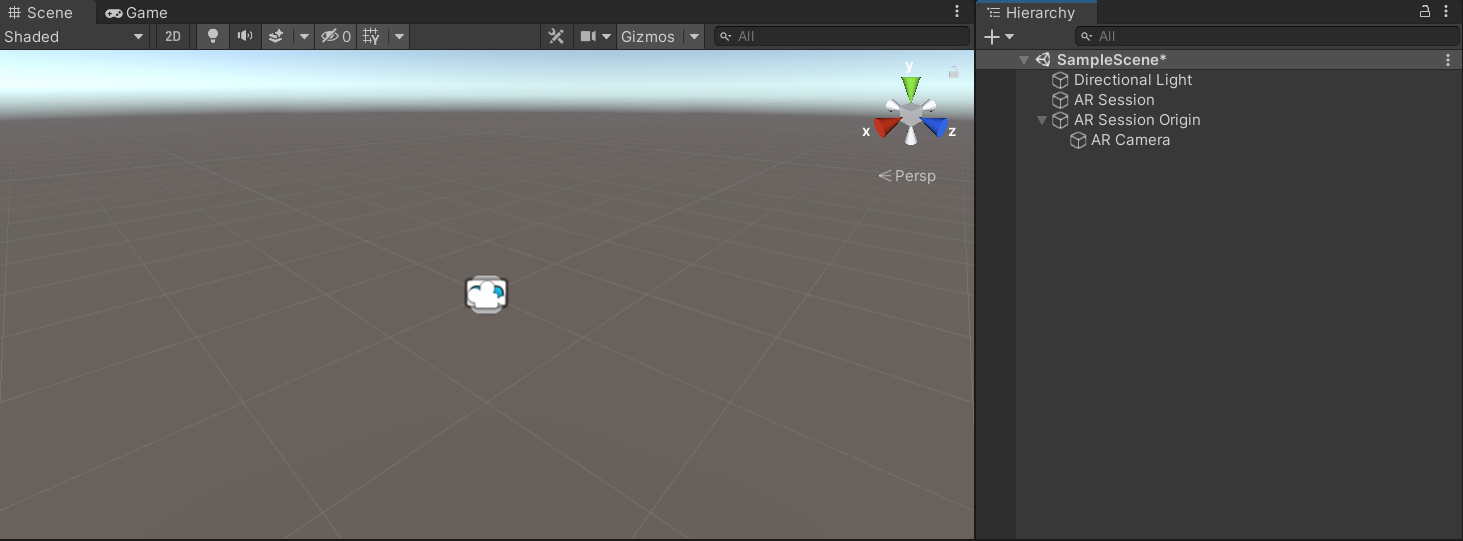
13. Add XR > AR Session and XR > AR Session Origin to the scene. The AR Session Origin gives us a way to query the physical world and manipulate scale of the virtual world. Delete the Main Camera, since the AR Session Origin already contains a camera. Your scene should now look like this.
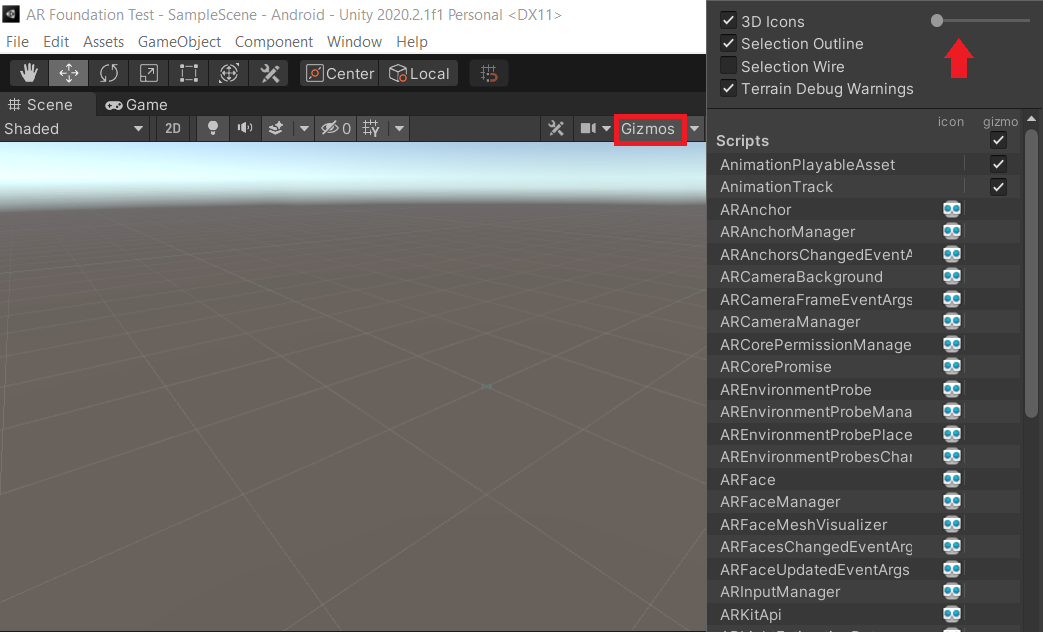
You can see the icons for the new objects in the Scene. If you want, you can click Gizmos and set 3D Icons to 0 to remove those icons.
Next, click on the AR Camera under the AR Session Origin and change its tag to "Main Camera".
14. Now, create a cube. You will notice that its scale is (1, 1, 1). Since each unit in Unity is 1m in the real world, the cube will be 1m on each side. That is a little too big, so shrink it down to (0.1, 0.1, 0.1) and set its position to (0, 0.05, 0) so it is just resting on the origin.
Now build and run the app on whatever device you have. You should see something like this.
However, the cube is always floating at a fixed position, and we want a lot more control over where to place the object.
15. Create an empty game object, name it "ObjectToSpawn" and reset its transform. Set the cube as a child of ObjectToSpawn. Create a Prefabs folder and drag ObjectToSpawn into it to create a prefab. Then, delete ObjectToSpawn.
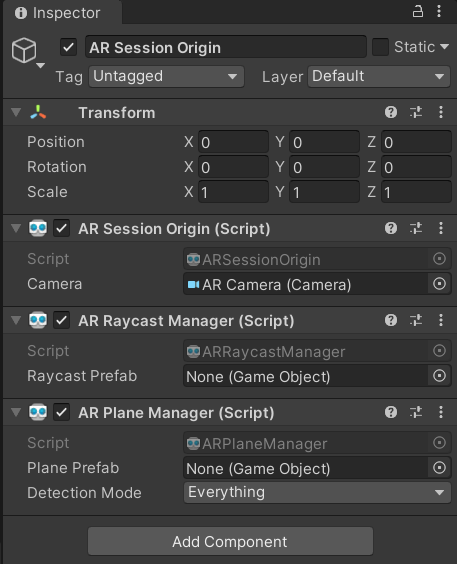
16. Now, what we want to do is to do a raycast and find the first surface hit (imagine shining a ray of light to see which surfaces it collides with). In AR Session Origin, add the components AR Raycast Manager and AR Plane Manager. Your AR Session Manager should now look like this.
17. Download the Lab3.unitypackage file from Canvas -> Files -> Lab Materials. Import all its contents into the project.
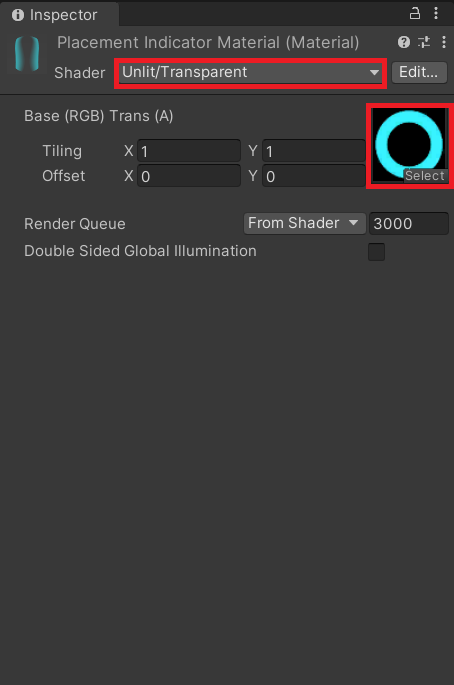
We will now create a placement indicator that will signify when we find a plane with the AR Camera. Create a Materials folder. In it, create a new material and call it "PlacementIndicatorMaterial". Set its shader to Unlit > Transparent. Drag PlacementMarkerBase.png into the texture field.
In the scene, create an empty game object, name it "PlacementIndicator", and reset its transform. Add a plane as a child of PlacementIndicator. Drag PlacementIndicatorMaterial to the plane and remove its mesh collider. Also, set the scale of the plane to (0.1, 0.1, 0.1).
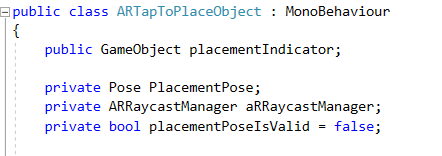
18. Great! Now we have a little circular marker that will tell us where we are spawning our object. But for it to move around as we move our mobile device, we need some scripting. Create an empty game object called "Interaction", and in it create a C# script and name it ARTapToPlaceObject. Add the following lines at the top, before the public class definition.

These are libraries which contain functions that we will need to use.
19. Make the following declarations at the start of the class.
A Pose is a data structure that contains a Vector3 for position and a Quaternion for rotation. This will tell us where to set the placement indicator. ARRaycastManager is one of the components we added to AR Session Origin earlier and will help us handle raycasts. Finally, the bool placementPoseIsValid signifies if there is a valid plane for the placement indicator to be on.
We need to get the AR Raycast Manager component, so add this to the Start function.

20. Create a new function called "UpdatePlacementPose" and write the following code in.
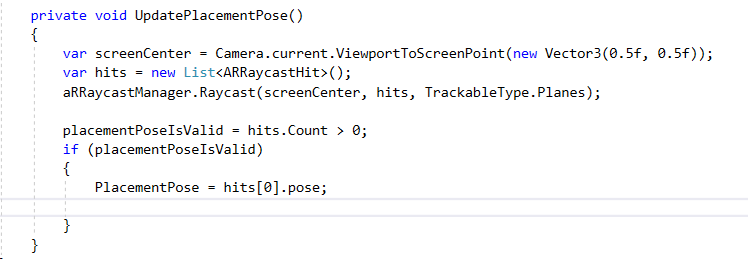
This code does a raycast towards the center of the screen, looks for planes, and stores the results, if any, in the hits List. Then, if there are any hits, placementPoseIsValid is set to true, if not it is set to false. placementPose is then set to that Pose if there is a hit. The
Now we need some code to actually move the placement indicator. Create a new function called "UpdatePlacementIndicator" and write the following code in.
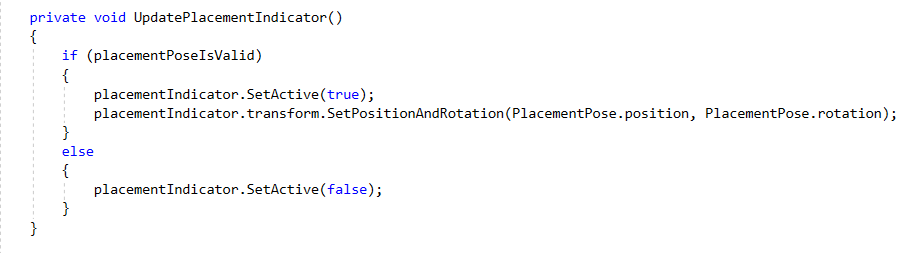
This bit of code is quite simple. If placementPoseIsValid is true, if sets the placement indicator to active and sets the position and rotation according to the placement pose. If not, placement indicator is set to inactive, which means that it will disappear.
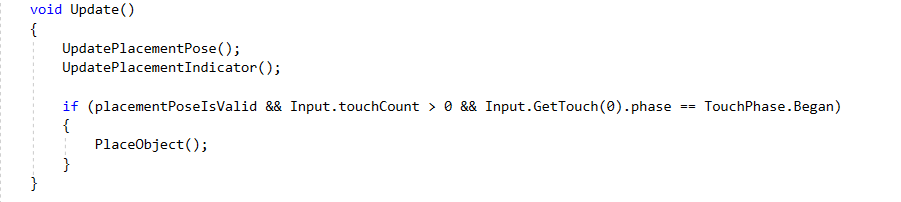
In the Update function, call UpdatePlacementPose and UpdatePlacementIndicator, in that order. Your code should now look like this.

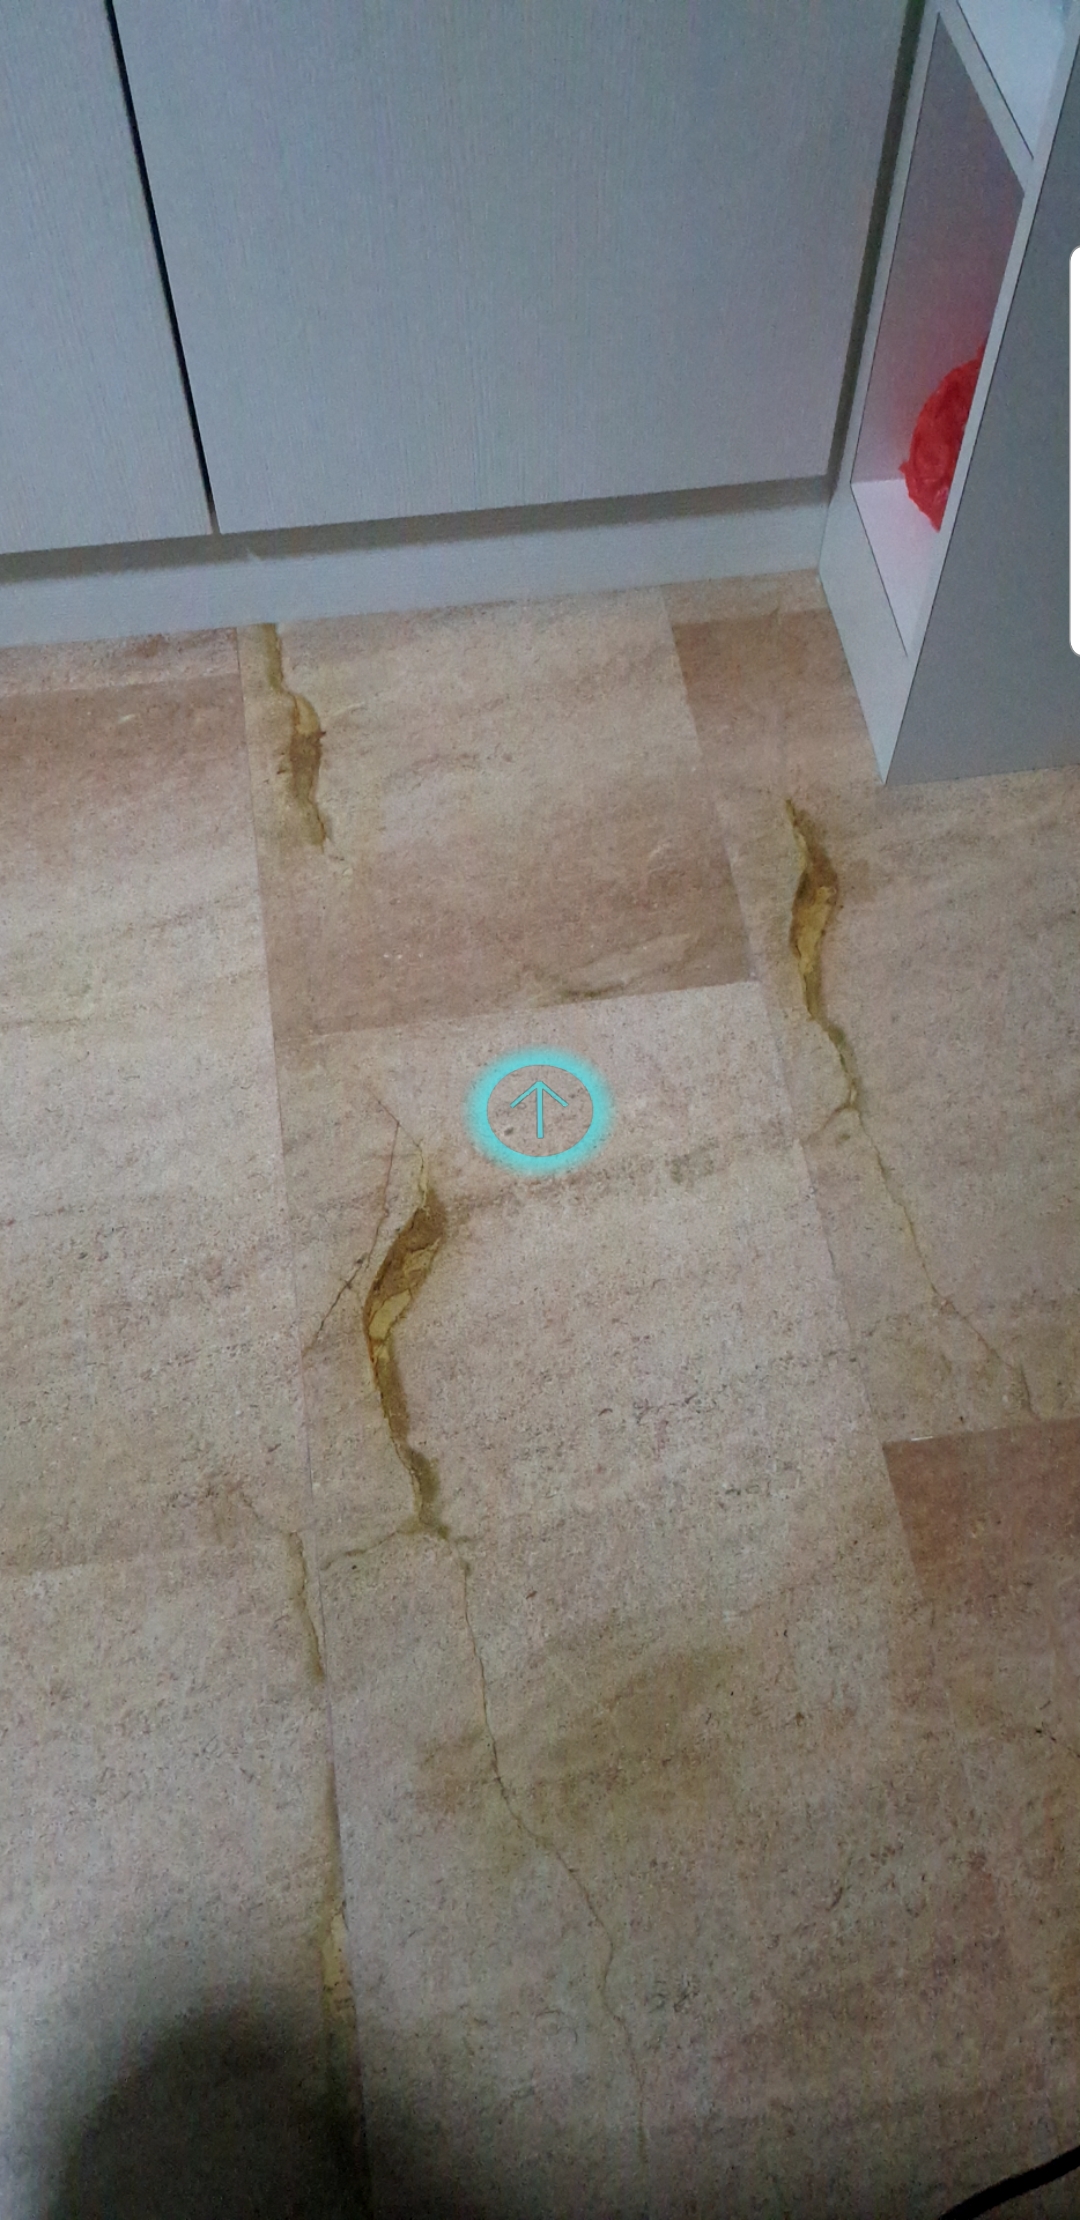
Go back to the Unity Editor. Click on Interaction in the Hierarchy. There should be a field next to Placement Indicator. Drag the PlacementIndicator object from the hierarchy to that field.
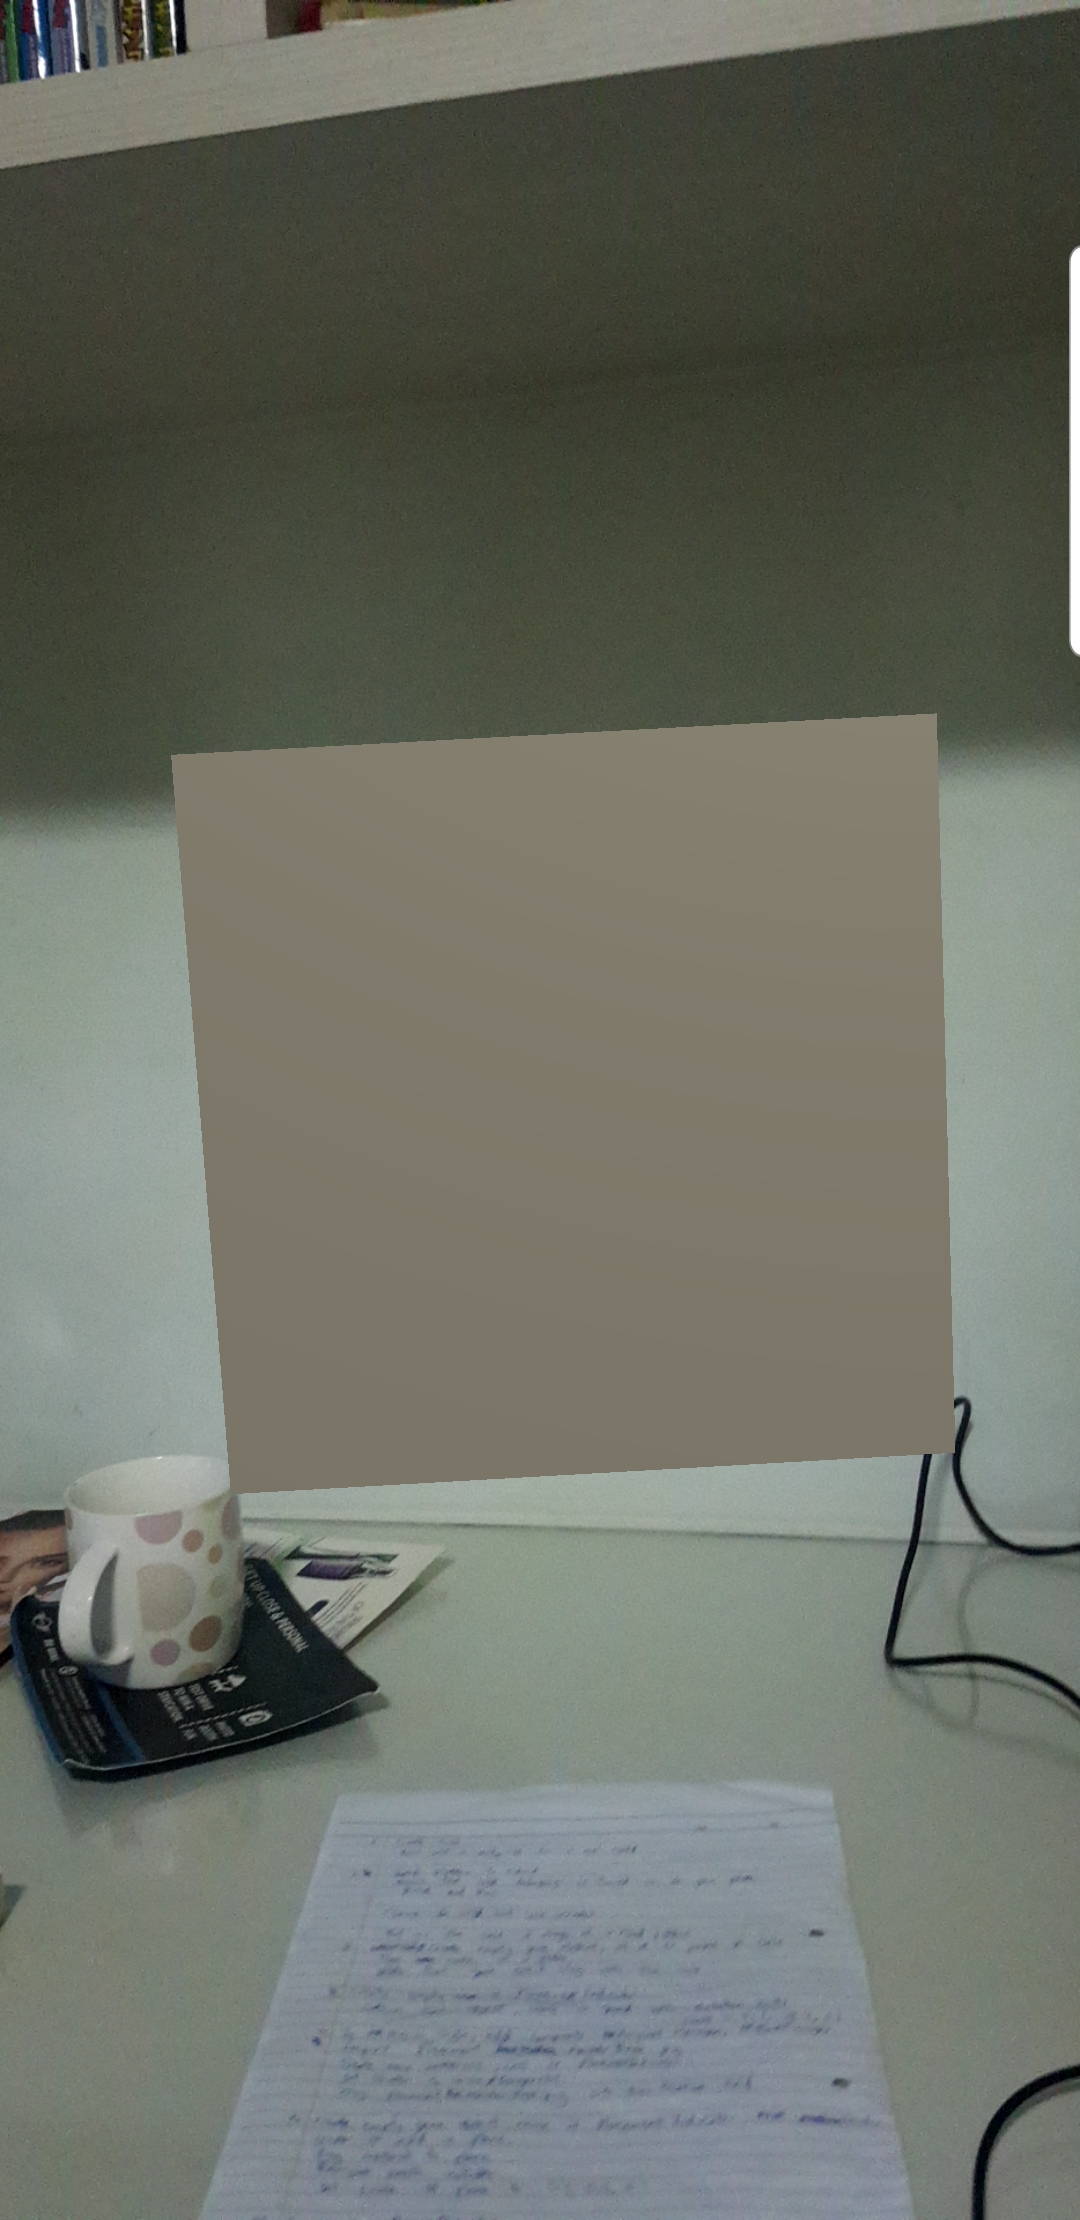
Build the app and test it out! You should be able to see something like this.
21. Now we can work on spawning an object. Declare a public GameObject and name it objectToPlace. Next, create a new function "PlaceObject", like so:

This just spawns the object at the placement pose position and rotation. Next, add a few lines in the update function so it becomes like this.
This makes it such that whenever the screen is tapped, PlaceObject will be called, and an object will be spawned.
However, if you try to run the app now, you will notice that no object will spawn even when you tap the screen. That is because we have not yet set objectToSpawn. We need to give it a GameObject reference. Go back to the Editor and click on the Interaction object. There should be a field for Object To Place. Go to the Prefabs folder and drag ObjectToSpawn prefab into that field.

Build and test the app! You should now be able to spawn cubes by clicking on the screen whenever the placement indicator is active.
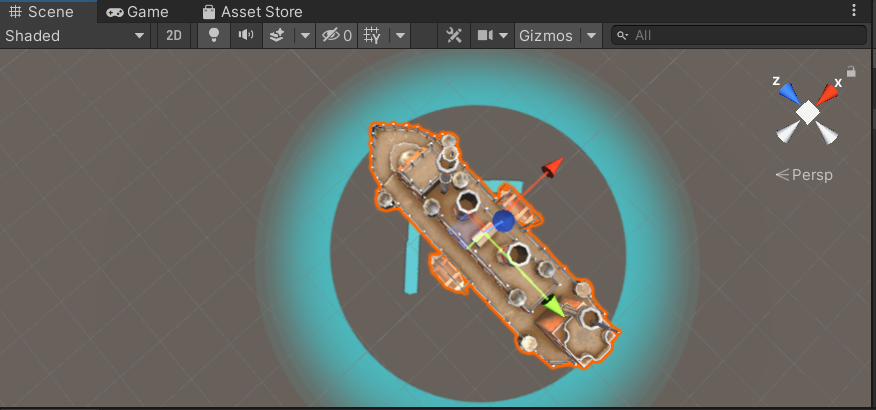
22. However, it is quite boring to just spawn white cubes, so let's use the Stylized Ship imported from the Lab 3 Unity package. Like with the cube, create an empty GameObject and reset its transform. In the Stylized Ship folder, look for Ship_flat_prefab and drag it under the empty GameObject to make it a child. Set the scale of the ship to (1, 1, 1). You will notice that the ship is really big in comparison to the placement indicator, so set the scale of the placement indicator to (1, 1, 1) as well.
To reduce the size of the ship, we could set the scale of the ship like we did with the cube, but that is not always a good idea. Unity is used to working with large meshes, so if you scale your meshes too small, you might get some wonky physics. So, another way to change the scale of the spawned object is to change the scale of the AR Session Origin. Set it to (10, 10, 10). That is equivalent to scaling everything down by 1/10.
We want the ship to spawn on the placement indicator, but its position might be a little off. Use the transform tools to drag the ship object (NOT the parent game object!) so that it is just resting on top of the arrow, and is in the middle of the circle.
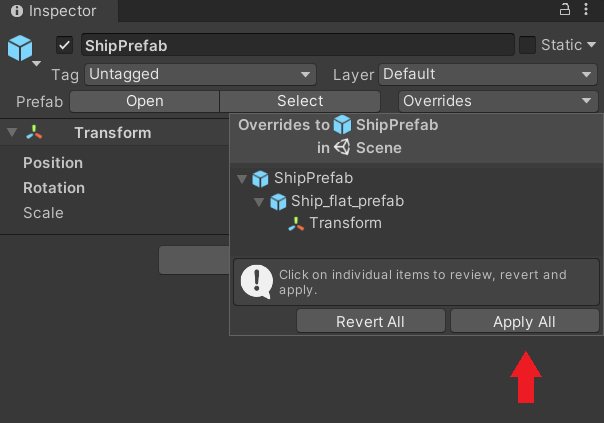
But all these changes are only done to this particular instance of the prefab. To make sure all your ships spawn in the right position, go to the Ship prefab in the scene (the parent GameObject). In the Inspector, you can see a button Overrides. Click on it and it brings up the changes that you have done to this instance of the prefab. Then click Apply All to update the prefab. Delete that instance of the prefab from the scene.
Now, just drag the new ship prefab (with the parent game object) into the Object To Place field in the Interaction GameObject, then build and run the project! You should now be able to spawn ships by tapping on the screen.
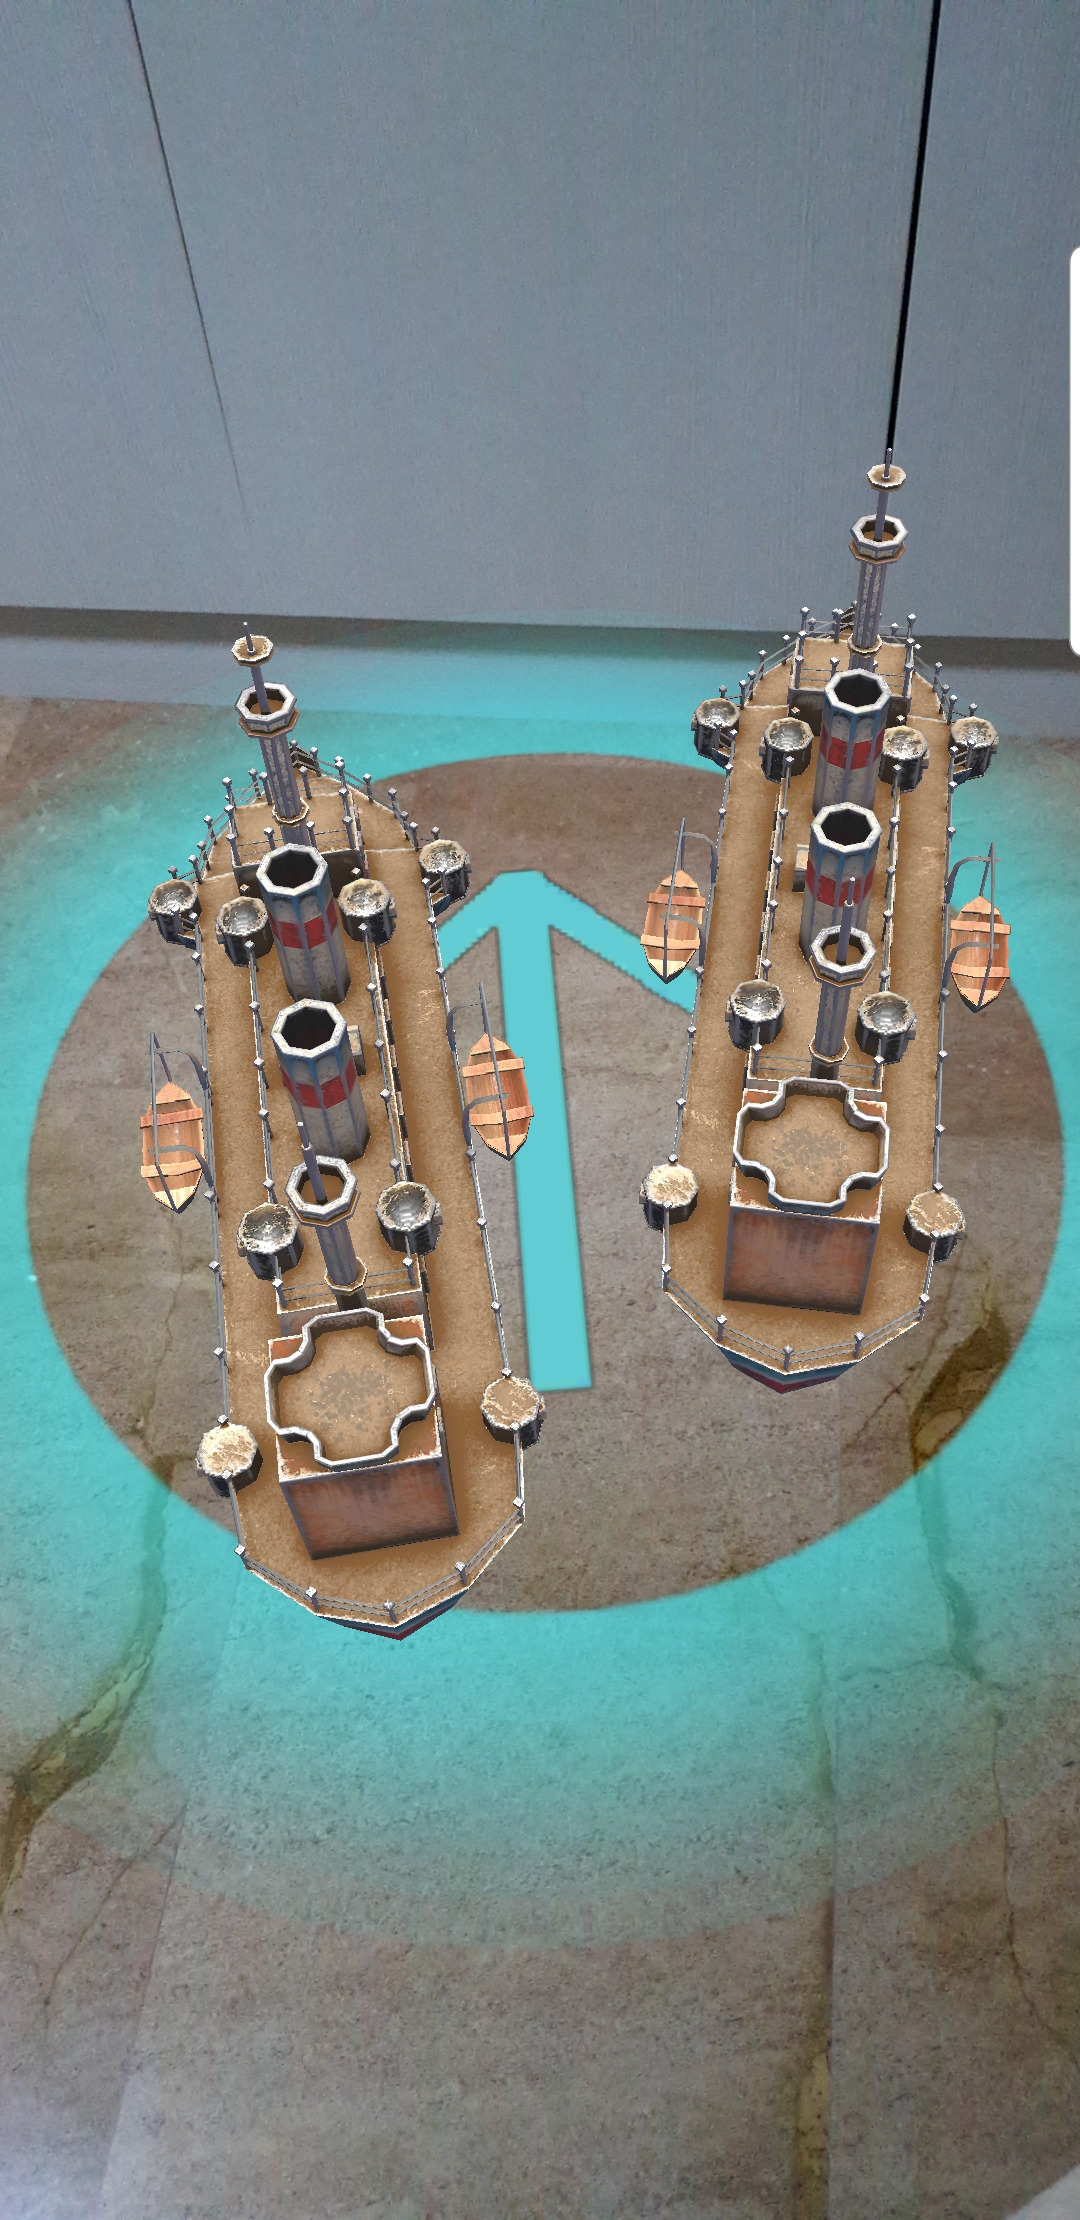
Image Tracking with AR Foundation
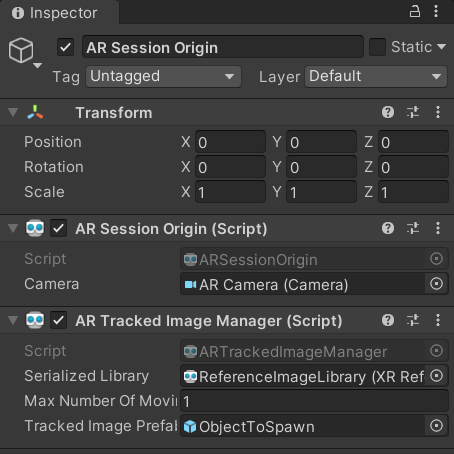
23. One major feature of AR Foundation is image tracking. With this, you can get your app to detect certain images, then do something with it, like spawn an object or play a video. Delete the PlacementIndicator and Interaction GameObjects. Next, in AR Session Origin, add the component AR Tracked Image Manager.
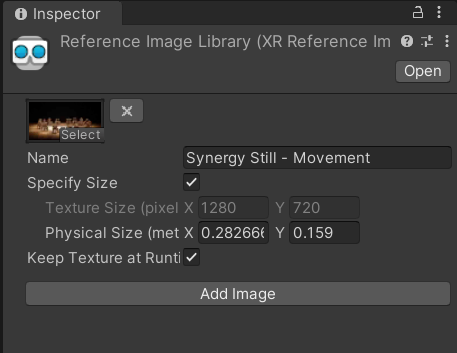
24. Next, navigate to your project panel. Click on Create > XR > Reference Image Library to create a Reference Image Library. This stores the images that you want your AR app to detect. Click on Add Image and drag Synergy Still - Movement.png that was imported from the Lab 3 Unity package. Tick the box next to Keep Texture at Runtime. As for the Specify Size field, it is optional, but it is good to have. If you want to specify size, measure the dimensions of the image in real life and input them in the dimension fields. Remember that 1 unit in Unity is 1 meter in real life!
25. Go back to the AR Tracked Image Manager component in the AR Session Origin. You will notice that there are three fields to fill in. For the first field, which is Serialized Library, drag in the Reference Image Library that you created in the previous step. For Max Number of Moving Images, write 1. For Tracked Image Prefab, drag in the ObjectToSpawn prefab. The AR Session Origin should look like this.
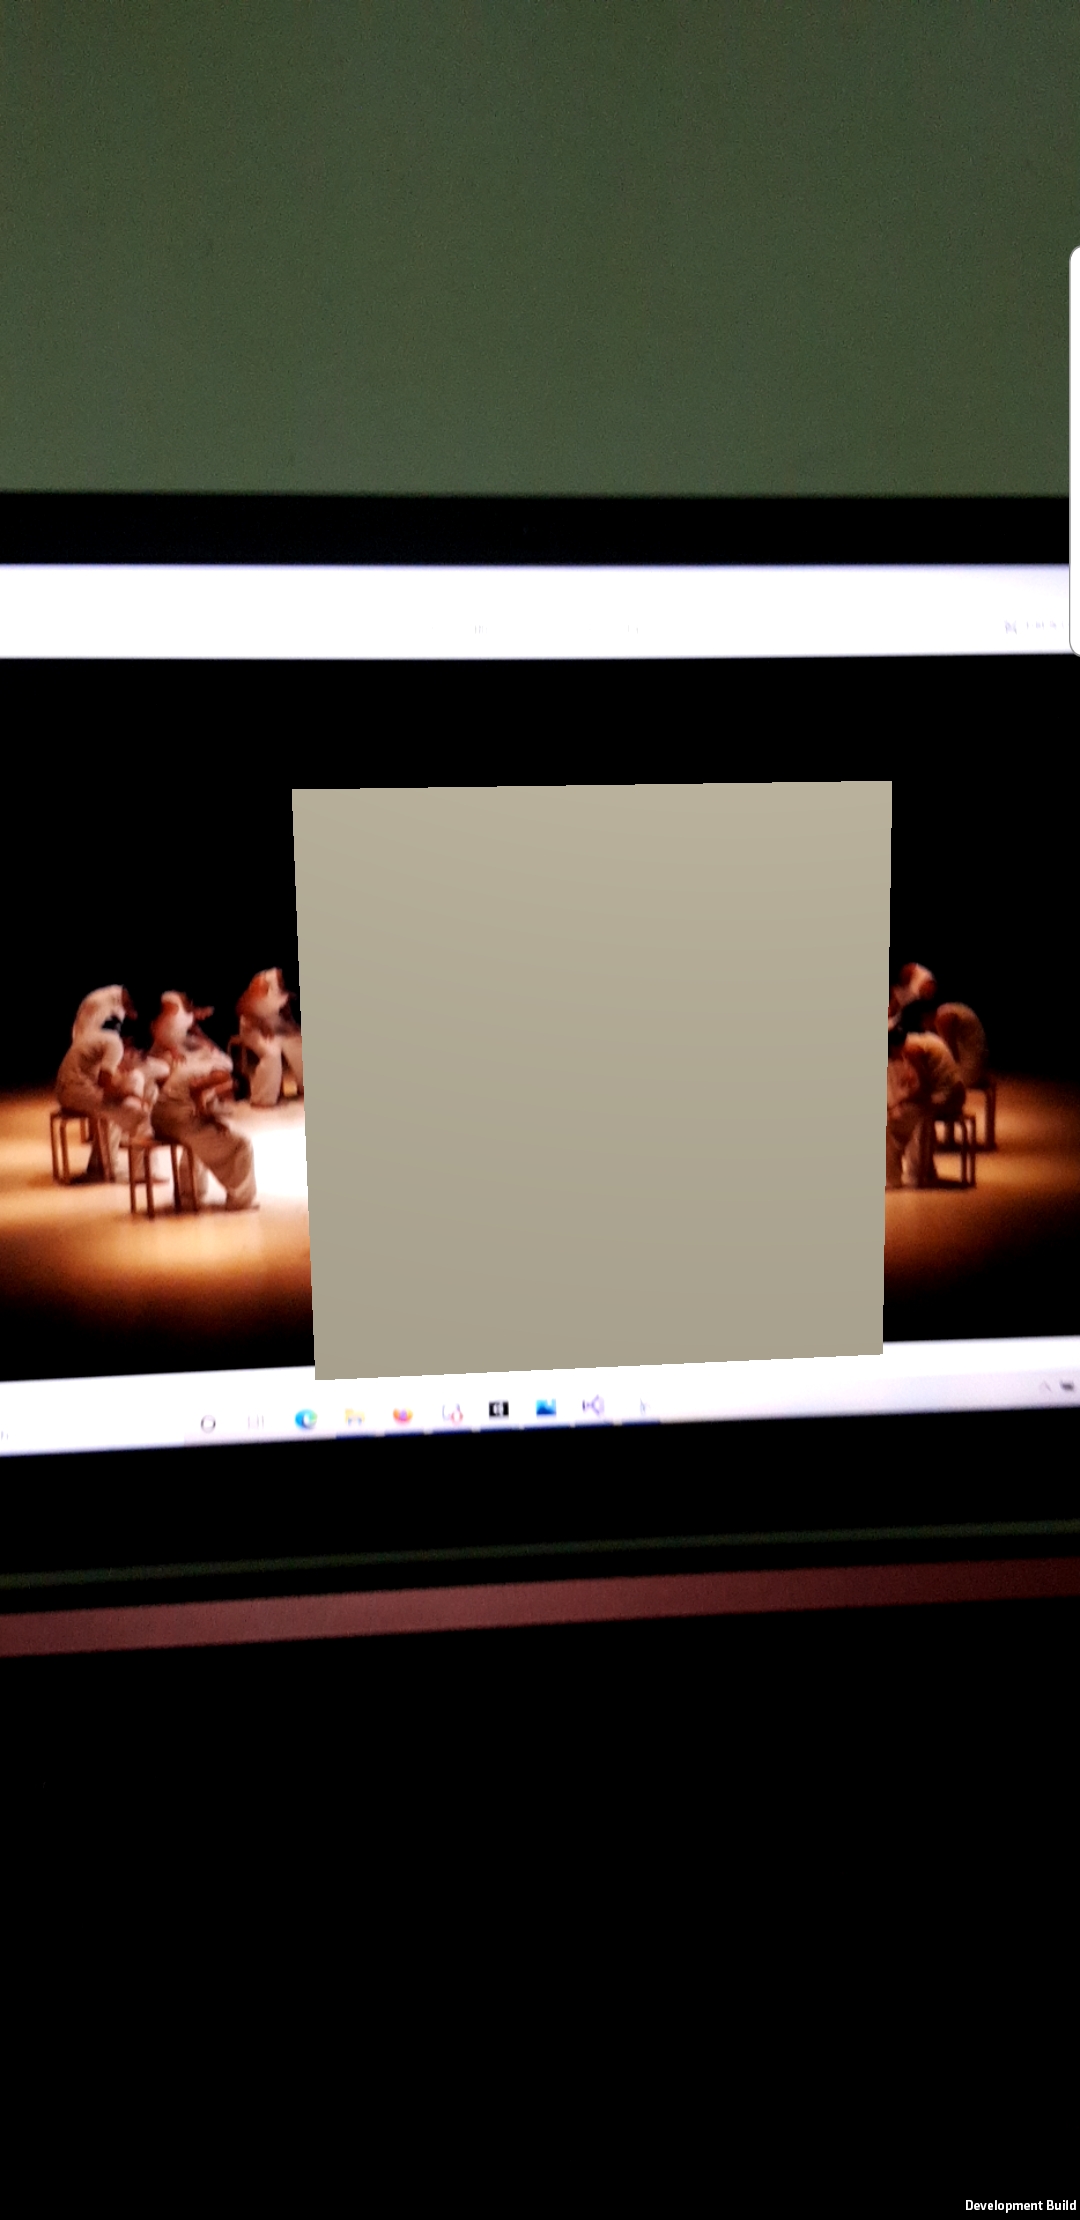
And we are done! Build and run the project, and open up the picture. When your phone detects the picture, a cube should spawn.
Note: If you encounter some problem like "Failed to generate image database", make sure that your project path does not contain any white spaces.
26. Congratulations! You have completed your first AR software! You can read Unity's AR Foundation documentation to find out more. This page is especially useful for augmenting images.
Assignment 3
This assignment 3 is to build a AR software which covers what we have learned until now.
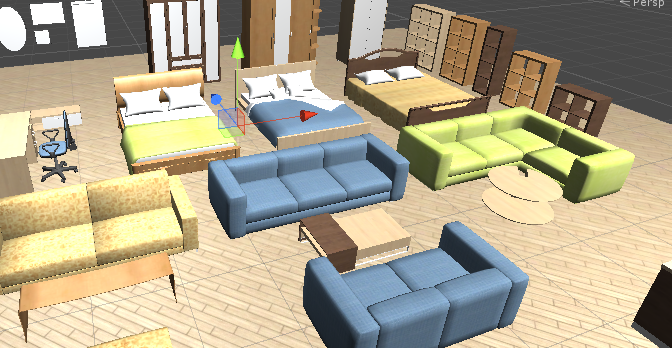
In this assignment, you need to build a furniture planning software. A furniture package is provided in the package Furniture Pack on LumiNUS. You should use this package to build the furniture planning software.
The AR software should fulfill the following requirements:
- 1. You need to have a UI to choose a furniture item from a set of furniture.
- 2. Your software should be able to detect planes in your around environment
- 3. The chosen furniture can be placed into any location in the AR world (on the planes detected).
- 4. Furniture put in the AR world can also be deleted from the AR world.
- 5. Your software should enable users to put multiple furniture in their scene.
- 6. You are allowed to add some assets from the Unity Store, but they should be suitable in your software.
Grading Scheme
- UI (20%): You need to have a UI to choose a furniture item from a set of furniture.
- Detection (20%): Your software should be able to detect planes in your around the environment.
- Placement (20%): The chosen furniture can be placed into any location in the AR world (on the planes detected).
- Relocation (20%): Furniture put in the AR world can also be deleted and relocated from the AR world.
- Multiple Objects (20%): Your software should enable users to put multiple non-collided furniture in their scenes.
After completing your project, you need to select all your objects in Project panel and click Assets > Export Package to export what you used in your project.
You should share the hardware for this assignment within the team. You can work together in lab & help-each other learn.
What to submit:
XXX. unitypackage (Your game package)
README.txt (You need to write how to play your game and what downloaded packages or objects you have used in your project)
Zip these files into Your_Matic_Number.zip and upload it to Canvas->Assignments->Assignment3 Submission folder. Only one person per group need submit the assignment. Due date: Refer to Canvas->Syllabus->Schedule .