Lesson 3 - Getting Started With VR Development
Prepare For VR Development
Upgrade Unity3D Engine
Oculus/Meta has been constantly updating their Unity integrated SDK, which means they may introduce namespaces or functions that are not implemented in older versions of Unity. Typically, they aim to support any LTS (Long Term Support) versions of Unity from 2021 onwards, but in case you don't have any working versions of Unity Editor installed on your PC, it is recommended to install the latest LTS version for long term stability.
Temporary note: the Unity Editor version (Unity 2021.3.16f) mentioned in the introduction section may not be usable in this lesson. You can upgrade to Unity 6 following these steps:
- Open UnityHub, click Installs on the sidebar, click Install Editor. For this and the following lessons, we will be using the LTS version Unity 6000.0.35f.
- (Optional) If you want to install additional modules, select the appropriate modules. Modules can be added later after installation through UnityHub. It is recommended to install "Android Build Support" with both "OpenJDK" and "Android SDK & NDK" Tools.
- Once the installation is complete, click the Projects tab and then the New Project button to create a new project.
- Give your project a name and select a location to save it on your computer. Choose the Universal 3D Template.
- Unity will now open your new project, where you can start creating and editing your game
1. Create a new folder on Desktop and give it a name, say “Lab3”.
2. Create a new project at the position of “Lab3”
3. In this lab, we start to introduce how to develop VR software/game with Unity3D. This lab will be split into Oculus and Vive, so please follow the correct guide for the device you're using.
Meta VR Development
4. To start using VR with Quest, you need to download the Meta Link software from the Meta website and go through the steps to connect your Quest device to your PC. Once that is done, go to Setting > General > Unknown Source. You need to enable Unknown Source, or you cannot preview the project with your Quest Device. You also need to click on the "Set Meta Quest Link as active OpenXR Runtime".
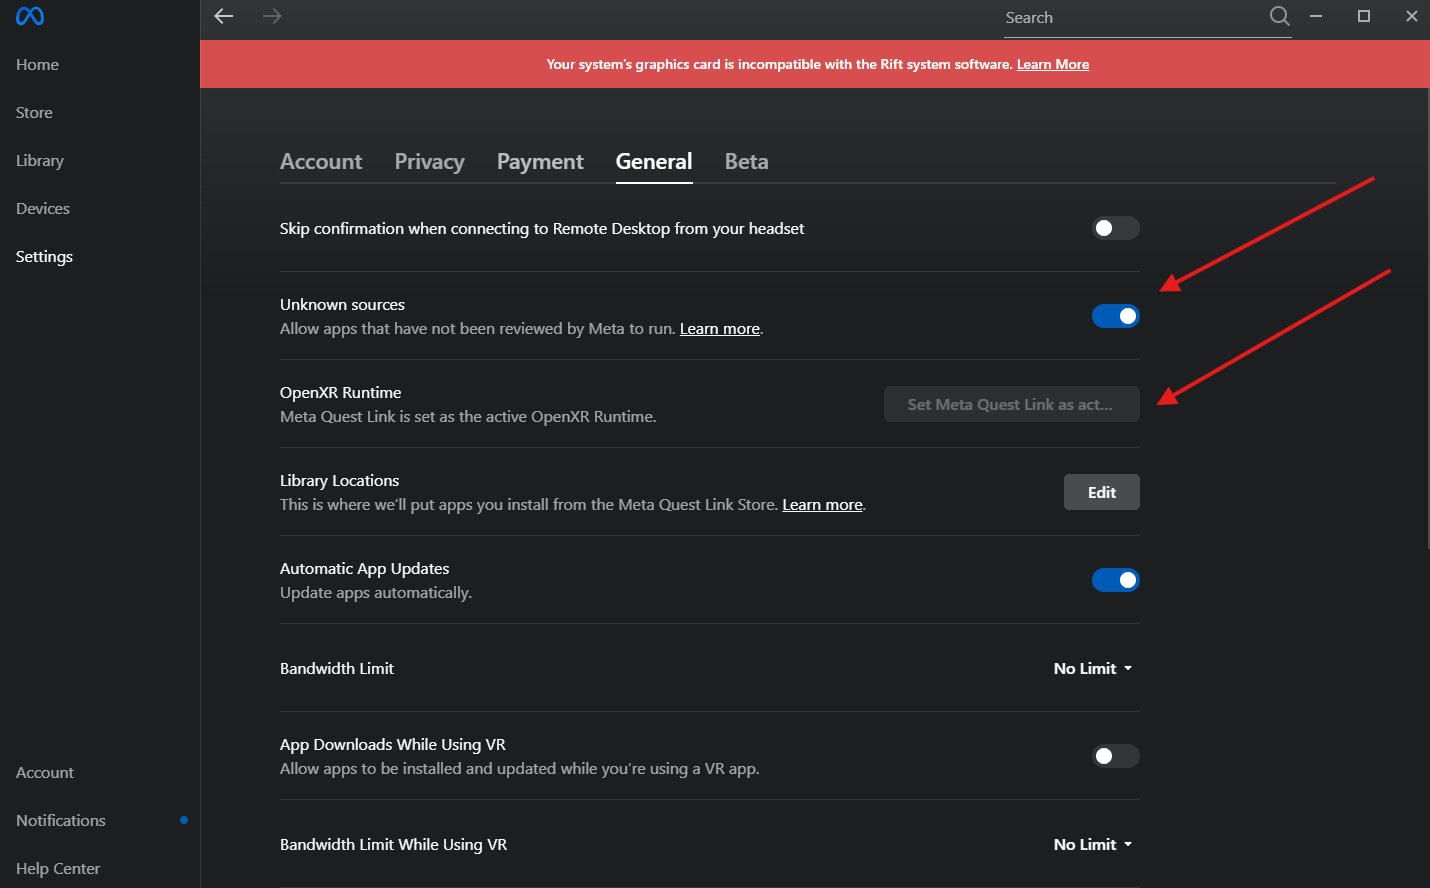
You may see the prompt "Your system's graphic card is incompatible with...". You can check the details of hardware support here. Note that Mac devices are not compatible with Meta Quest Link due to different Graphics API.
5. Next, in your Unity project, go to Edit > Project Settings > XR Plugin Management and click on Install XR Plugin Management.
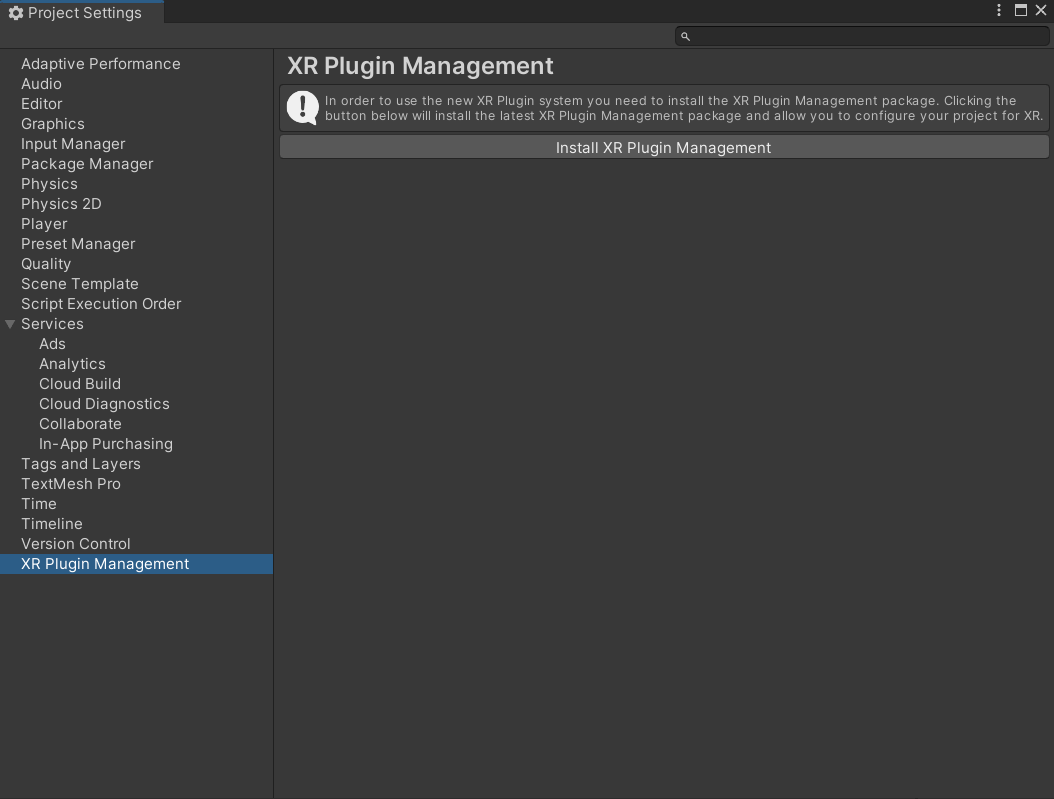
Once that is done, you should see a screen like this.
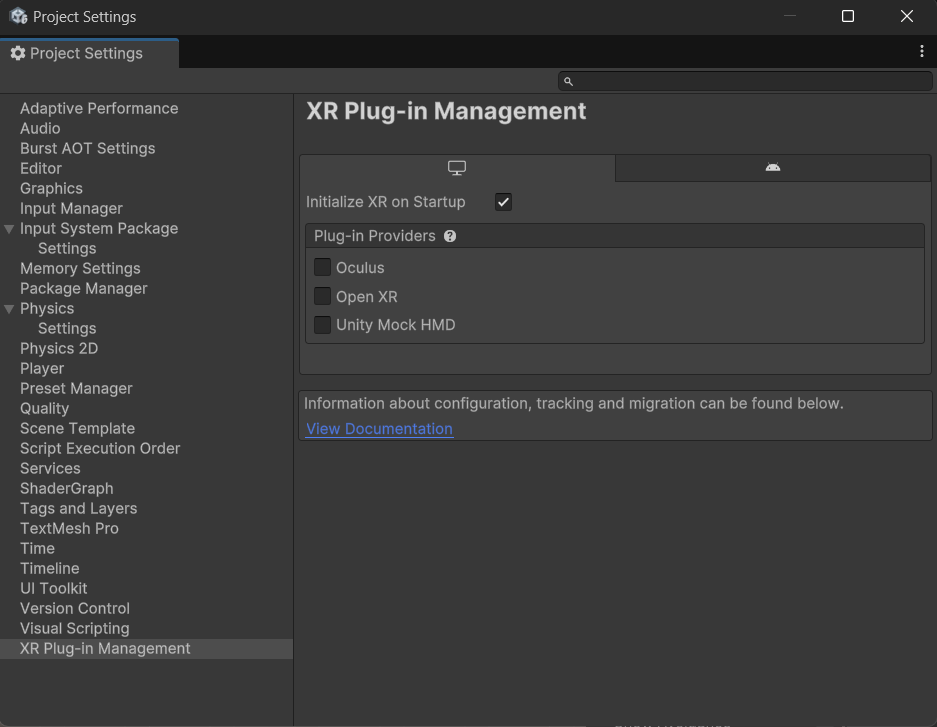
Click on the box next to OpenXR.
No need to install Oculus for now.
6. After the installation, click on "Project Validation" and "Fix Now". Normally, this will automatically fix most issues regarding XR compatibilities. However, notice there is one warning we have to manually fix, which is to add interaction profiles to the OpenXR Plugin.
7. Switch to the OpenXR tab. Under the "Enabled Interaction Profiles", we can add the controller profiles for your specific VR hardware. For better compatibilities with Quest/Oculus devices. You can add "Meta Quest Touch Pro Controller Profile" (For Quest 3), "Meta Quest Touch Plus Controller Profile" (For Quest 2), "Oculus Touch Controller Profile" (For Oculus Rift)
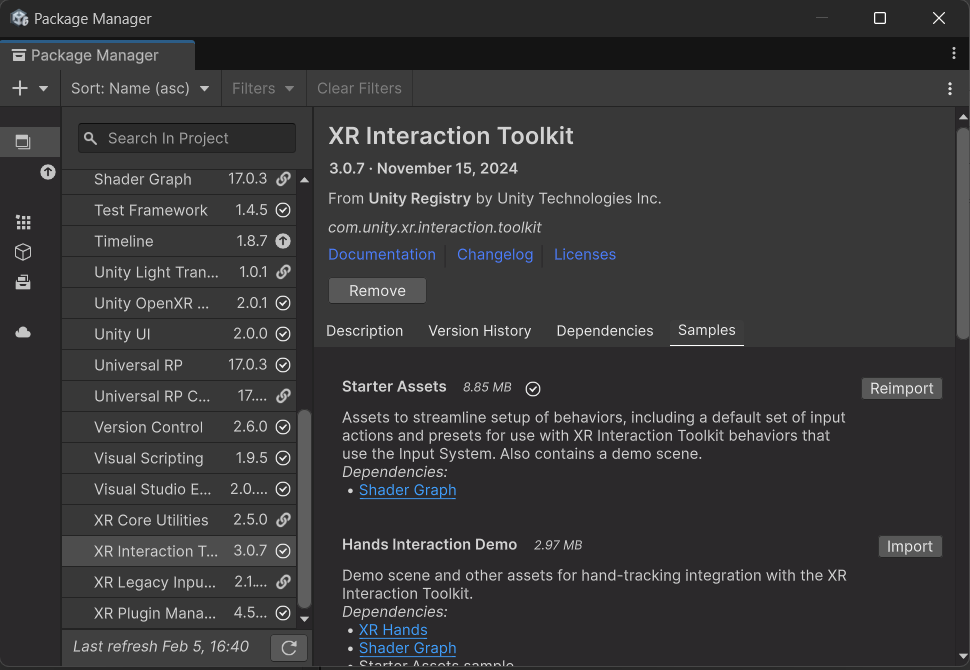
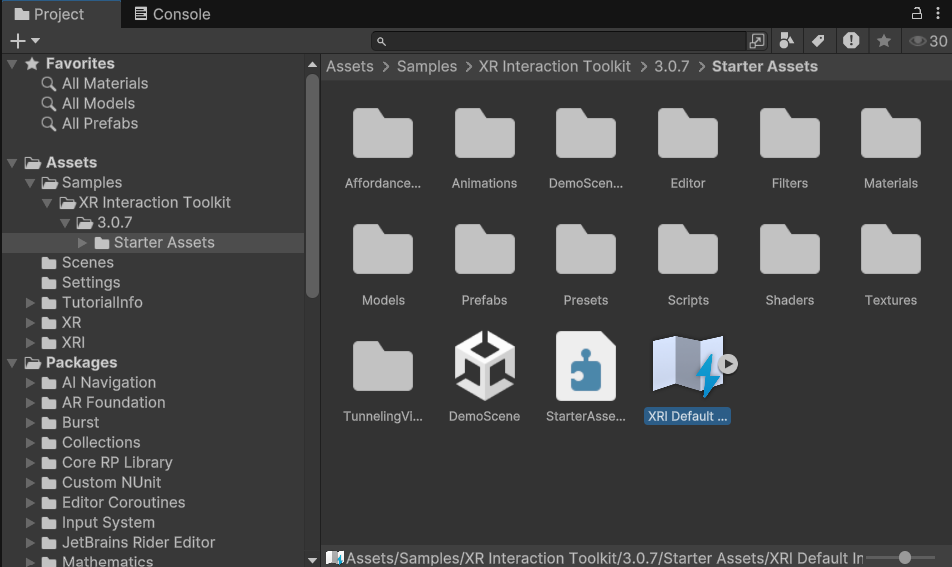
8. To make our VR development easier, we need to rely on the interaction preset designed for XR. Go to Window > Package Manager > Unity Registry. Search for "XR Interaction Toolkit". Install it to your project. After installing the XR Interaction Toolkit, Click on "Sample" Tab, then import the "Starter Assets".
9. A new folder is imported in your project Samples > XR Interaction Toolkit > xx.xx.xx (version) > Starter Assets. The asset we are going to mainly use is called "XRI Default Input Actions".
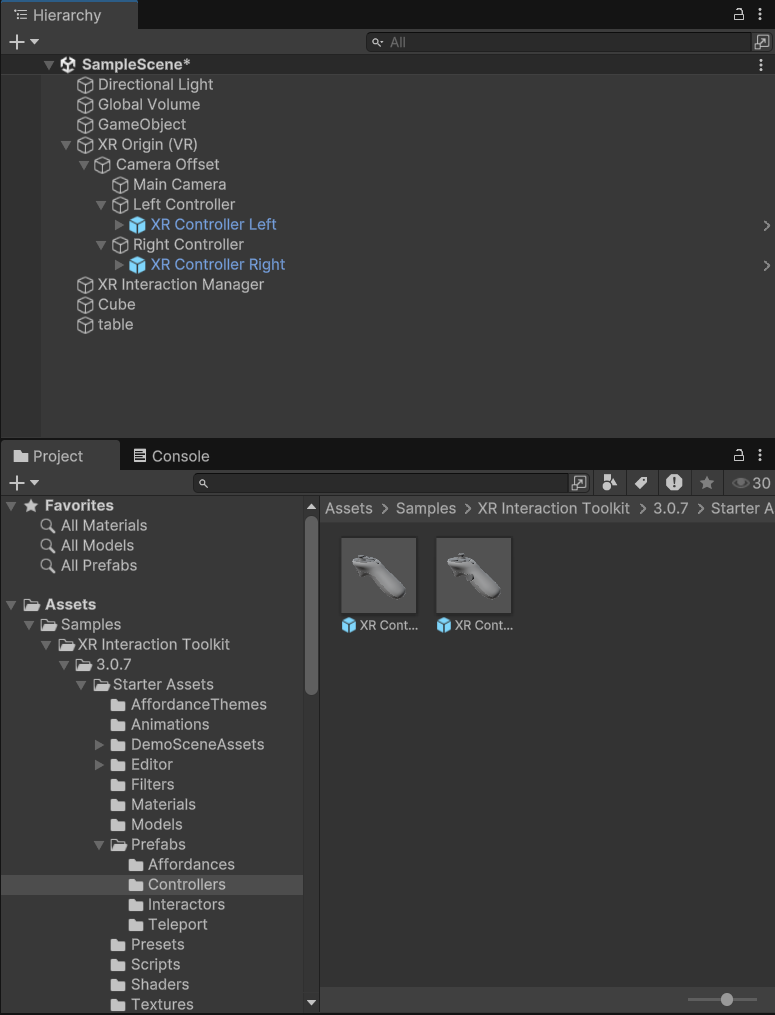
10. Now we have imported everything we need for building a basic VR interactive scene from scratch. To make our scene actually work in VR, we need to first add an XR origin. To do so, delete the existing camera in the scene, then select GameObject > XR > XR Origin (VR). A VR camera with different options of "Tracking Origin Mode" is added to the scene. You can try different tracking modes now to see their differences in user experience.
11. We also need to add two controllers to the scene. To do so, create two gameobjects as the child of "Camera Offset" and name them "Left Controller" and "Right Controller".
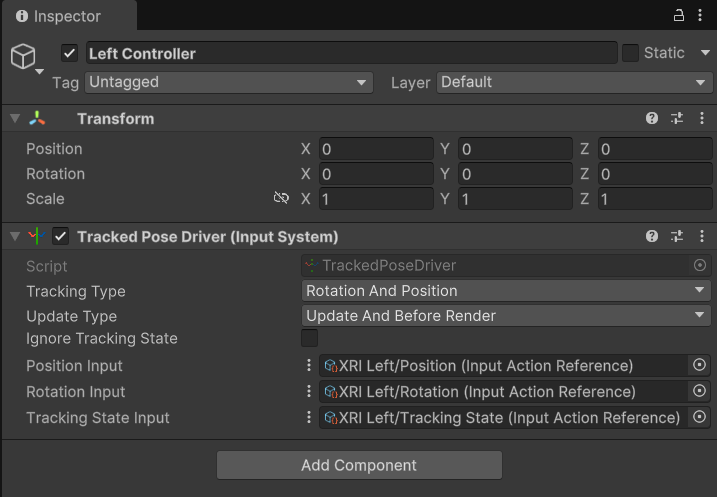
12. To make these gameobjects track your controllers' position, add the Tracked Pose Driver (Input System) component to your left and right controllers.
13. There are several ways to add input to the Tracked Pose Driver. By default, the Position, Rotation and Tracked State Input are set to use action, which means when clicking on the "plus" button, you can directly select the input device with the corresponding action values to track. However, as mentioned above, the "XRI Default Input Actions" has aggregate several input methods, including Meta Quest and Oculus, into one input action reference. Thus, we can use the input action reference instead of manually adding all the possible actions. To do so, click on the 3 dots next to the Position/Rotation/Tracking State Input, select Use Reference. Then, search in your project window for "XRI Right/Position", "XRI Right/Rotation", "XRI Right/Tracking State", and attach them to the corresponding field. Do the same for the left controller.
14. To visualize the controllers, search for "XR Controller Left", "XR Controller Right" in the project windows. Attach the model prefab as child to the left/right controller gameobjects. Now you can test in VR to see if the head and controllers tracking work for you.
15. We will learn how to interact in VR by programming a simple Grab function from scratch. First, create a script named "Grab" and attach it to your left and right controllers.
16. We need to use the following namespaces to implement the grab function: UnityEngine.InputSystem, UnityEngine.XR.OpenXR.Input
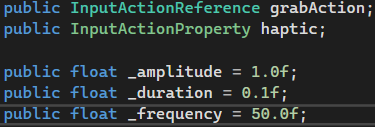
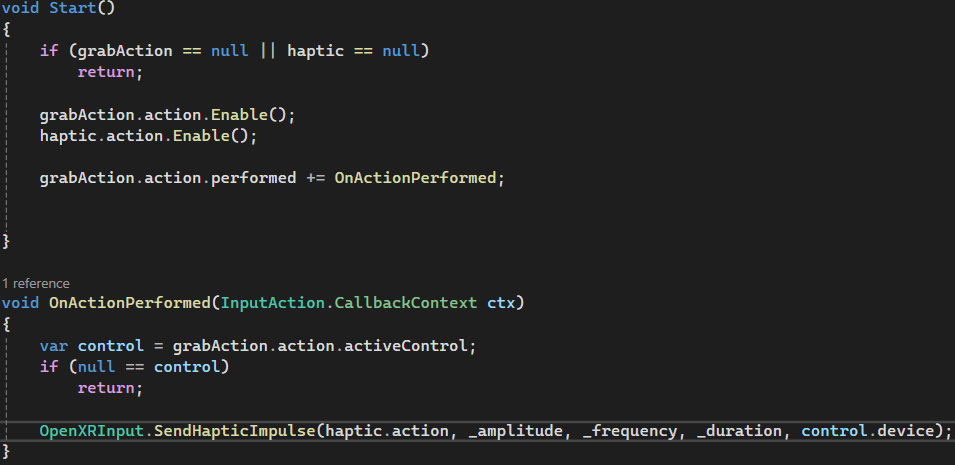
17. We will firstly test whether the button interaction works by adding a haptic feedback when pressing the button. Create the following fields:
18. Then implement the following functions, which will trigger the haptic feedback when the grab action is performed.
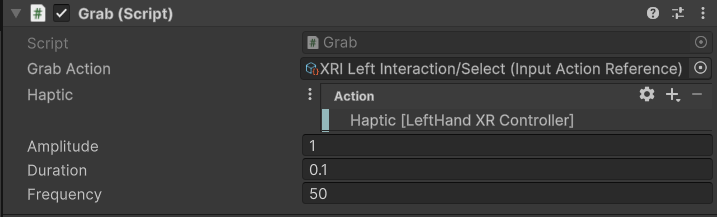
19. Next, in the Unity editor, find the grab component on the left and right controllers. As you can see, the property with InputActionReference type will expose a reference field, while the InputActionProperty allows to choose between "Use Action" and "Use Reference". You can use the following values for your component as a starting point:
20. Now you can test in VR whether the grab action will trigger the haptic feedback. Press the side/grip button on your controller to test.
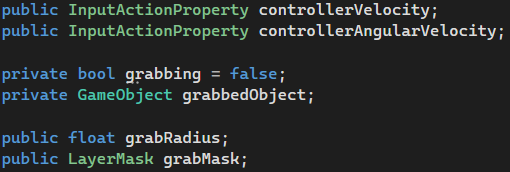
21. Now we can implement the grab function. Create the following fields in your "Grab.cs" script.
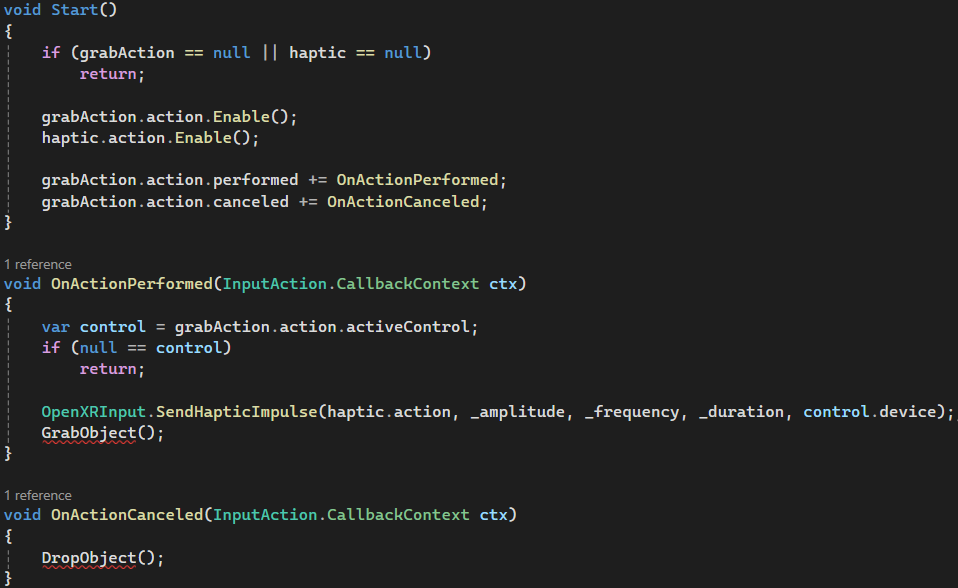
22. Previously, we only trigger a function (haptic) when the action is performed. To properly implement grab, we need to trigger a "GrabObject" function when the action is performed. We also need to trigger a "DropObject" function when the action is cancelled. Thus, modify the Grab.cs script like this:
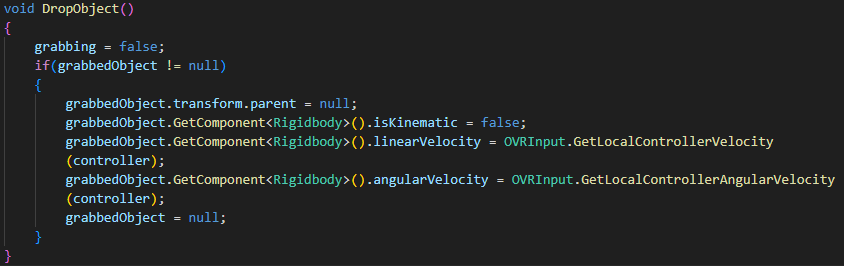
23. Now we want to implement the missing "GrabObject" and "DropObject" Functions. GrabObject() works by using a sphere cast to check for items around the controller in a sphere, then picks up the nearest object.
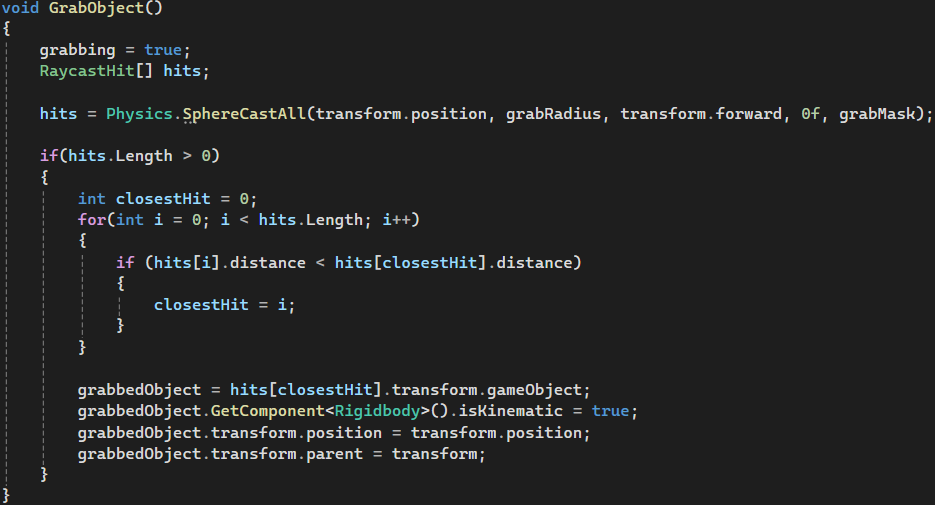
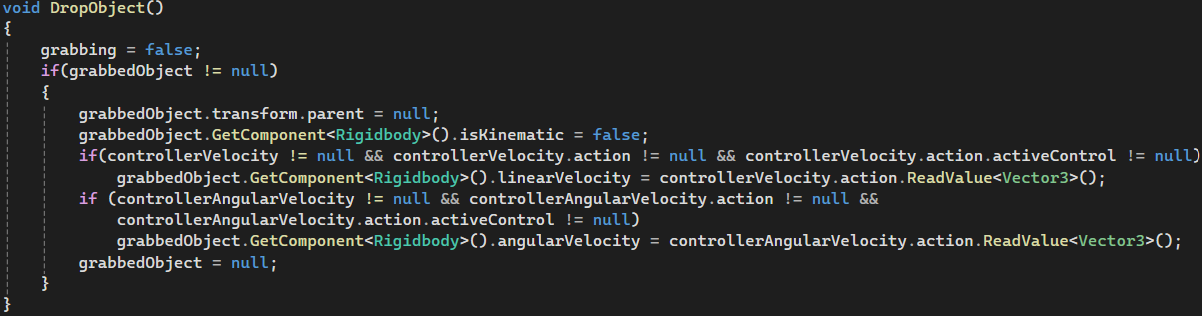
24. In the DropObject() function, we want to reverse everything that is done in the GrabObject() function.
25. Before we can use the script, we need to add a layer called "Grabbable". All objects that we want to be grabbed has to be in that layer.
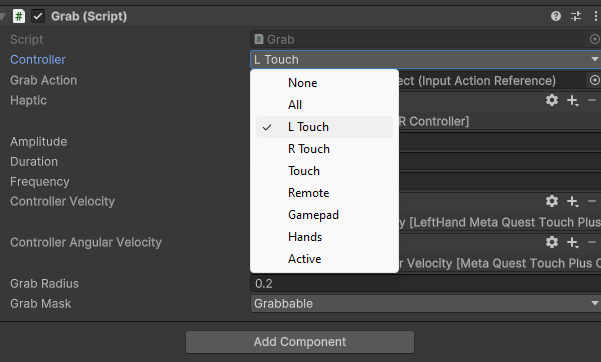
26. Setup the Grab component on your left and right controllers as following:
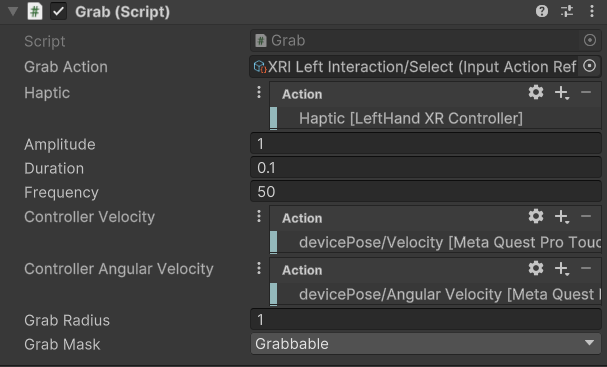
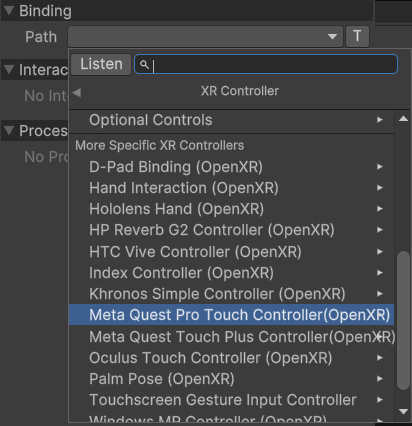
There is no velocity or angular velocity action defined in the XRI Default Input Actions file. These actions can be found in the binding menu.
In case this does not work, there are two solutions:
1. you can calculate the velocity and the angular velocity via position and rotation in real time.
2. you need to install the Meta-all-in-one-sdk from Unity Asset Store.
After importing the sdk, adding the following field to the Grab.cs.
Then modify the DropObject function.
In the inspection, assign the corresponding controller.


27. Now, you can create any object, add a rigidbody, set the layer to "Grabbable", and test it in VR! Do remember to create a ground, if not the objects will just keep falling.
28. Note that this is only one way of implementing grabbing in your VR project. XR Interaction Toolkit provides more systematic way of implementing interaction, including the concept of interactor and interactable, gaze-based interaction, locomotion etc. To learn more about this, this playlist can be used as a starting point.
UI In VR
29. Now, let’s start to set some more UI for your VR game world.
30. The UI of VR is a little bit different from the common UI. The common UI is set on a 2D plane, then players can see them from there screen. However, in VR, we use our headset to view this world, so we need to set these UI objects in 3D world. Then, users can see these UI clearly.
31. To create UI for VR is similar to what we did in creating the reticle.
You need to create a canvas first in your scene. You’d better set its position with some small number and set it with some suitable width and height.
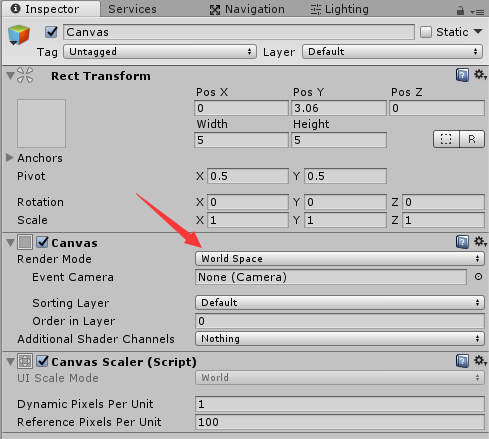
Remember to set the render mode as “World Space”!!!
32. Then you can set some UI component in this canvas. For example, you can set some text in it.
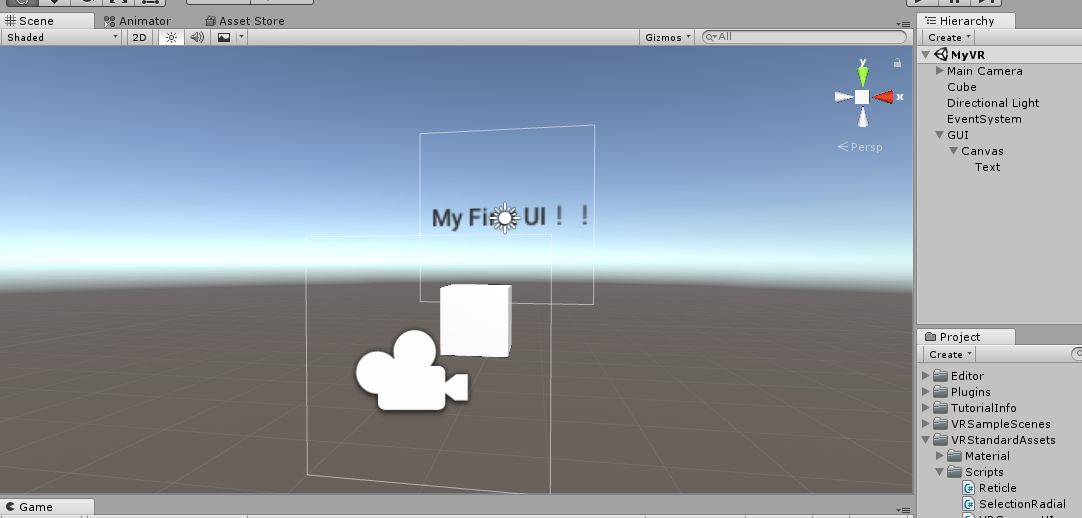
33. You can also add some UI like the reticle which can follow your camera.
HTC Vive VR Development (Old)
Note that this section is only for HTC Vive. If you want to develop on the Oculus Rift or Oculus Rift S, click here.
1. You can also use the HTC Vive instead of the Oculus Rift. The advantage is that you can use trackers to track movement of feet, for example.
2. If you are using Unity version 2020 and above, go here to install the latest release for SteamVR plugin (Do not install from Unity Asset Store)
If you are using Unity version 2019 and below, go to the Asset Store, search for "SteamVR" and download the SteamVR Plugin. Import it into the project.
Now that you have installed the SteamVR Plugin for Unity, you have to install SteamVR and its drivers. It is best to install the necessary software from Viveport, which will help you install Steam, SteamVR and setup the device. Click here to download Viveport. After installing, you should see this Device Setup screen. Choose the device you are using.

After you correctly set up your device, you are good to go!
You might encounter some problems in the above steps. If all else fails, you may choose to install the openXR plugins and SteamVR separately from Steam and https://github.com/ValveSoftware/unity-xr-plugin (Also, try to disable your antivirus or any applications that may require the use of VR if not SteamVR might not run properly)
3. We will use the camera provided by the SteamVR plugin, so delete the Main Camera in the scene. Then, go to the folder SteamVR > Prefabs and find the [CameraRig] and [SteamVR] prefabs. Drag them into the scene. Set the position of the [CameraRig] to [0, 0, -1.1]. Now you can put on the HTC Vive headset, and you should see the controllers in the virtual space.
4. In SteamVR 2.0, you need to define Actions for the headset and controllers. Go to Window > SteamVR Input and you'll see something like this.
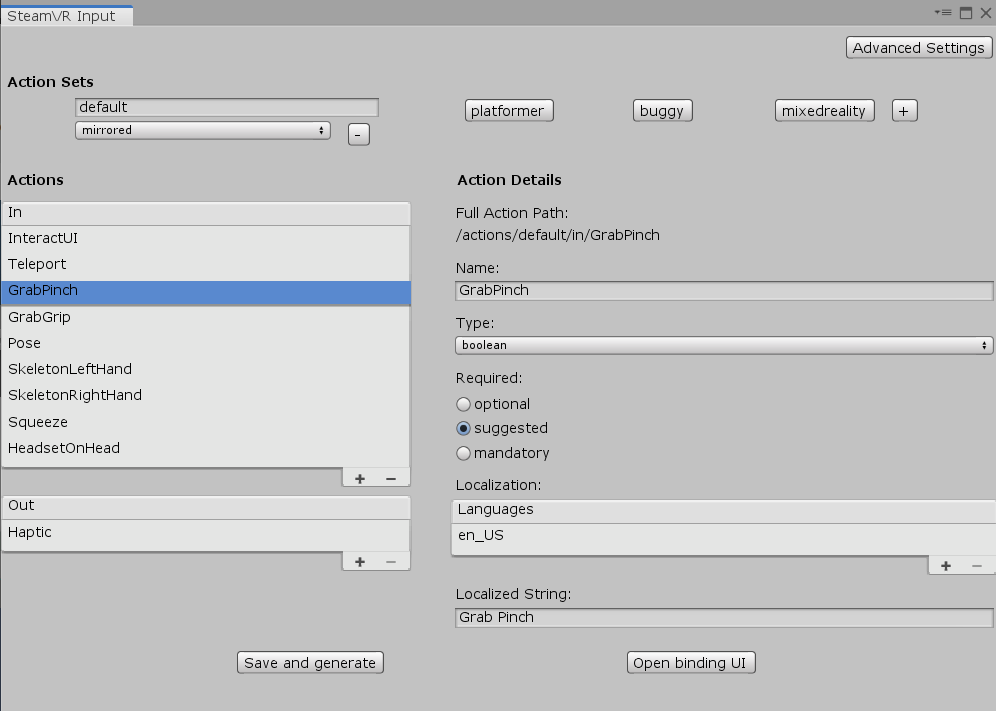
5. Now we will attempt to implment our own function for grabbing objects with the controllers. Under the default Action Set, select the GrabGrip action and rename it to Grab. Then, click Save and Generate.
You will notice that there will be a new SteamVR_Input folder under Assets that includes all the scripts you need.
6. Here is a diagram so you can familiarize yourself with the Vive controller inputs.
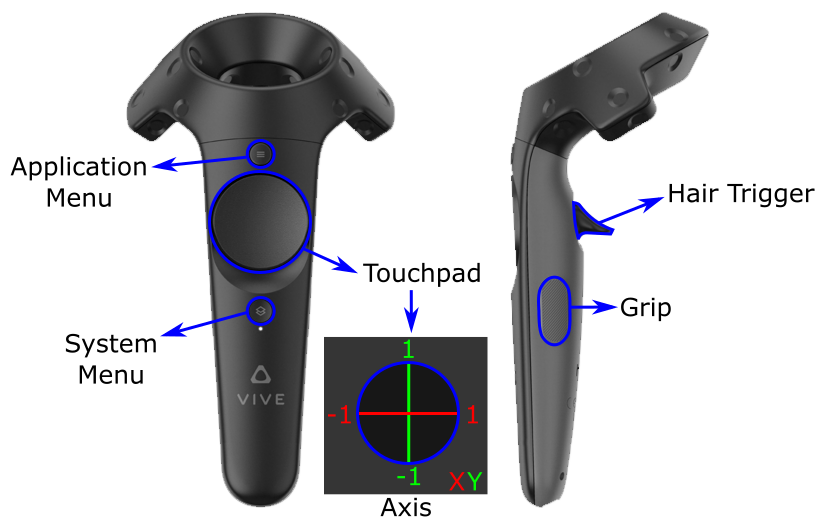
In this tutorial, we will be using the Grip button to grab objects.
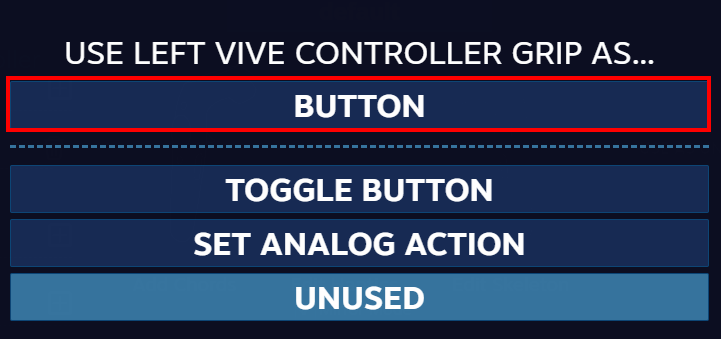
7. Now, we need to bind the action to the hardware. Make sure that SteamVR is open and click Open binding UI in the SteamVR Input window. A web page will open on the default browser. Under Current Controller, make sure that Vive Controller is selected. Then, below Current Binding, click on Edit. You will notice that there are already some default bindings. However, for the sake of the tutorial, delete all these inputs. Next, click the plus sign next to Grip. Select BUTTON in the window that pops up.
Another window will pop up with a list of possible actions. This time, select grab.
Click Apply on the bottom left to save the action set. Since the bindings are mirrored, this will apply to the right hand grip button as well. After that, click on Replace Default Binding to overwrite the default bindings.
8. Before using the grab action, we first need to link the controllers in virtual space to the physical controllers. Select Controller(left) under [CameraRig], then change the Pose Action to \actions\default\in\SkeletonLeftHand. Do the same for Controller(right), but select \actions\default\in\SkeletonLeftHand.
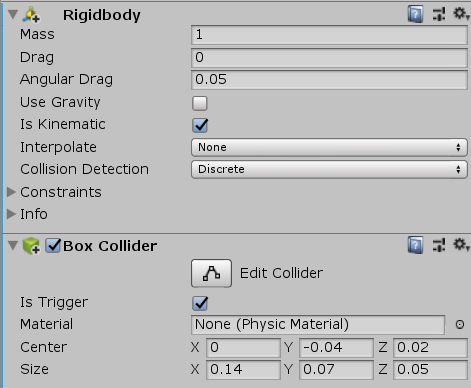
9. We will use collision triggers to hold onto objects. For that, the controllers and objects to be grabbed need rigidbodies and colliders. The balls in the scene already have them, so we can leave them alone. Add Rigidbody to both the left and right controllers. Check Is Kinematic and uncheck Use Gravity for both rigidbodies.
Next, add a Box Collider to both controllers and check Is Trigger. Set the center of the Box Collider to (0, -0.04, 0.02) and the size to (0.14, 0.07, 0.05). If you run the game and look at the controllers in the scene, you will notice that the box colliders are on the top of the controllers.
10. Create a script and name it "ControllerGrabScript" and make the following declarations:
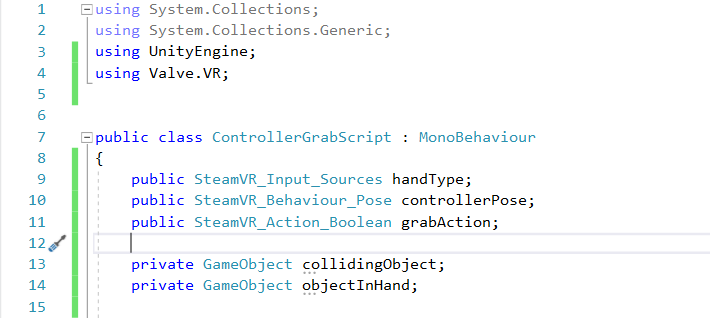
The handType, controllerPose and grabAction store references to the hand type and actions, while collidingObject stores the GameObject the trigger is colliding with, and objectInHand serves as a reference to the object currently being grabbed.
11. Next, add these trigger methods.
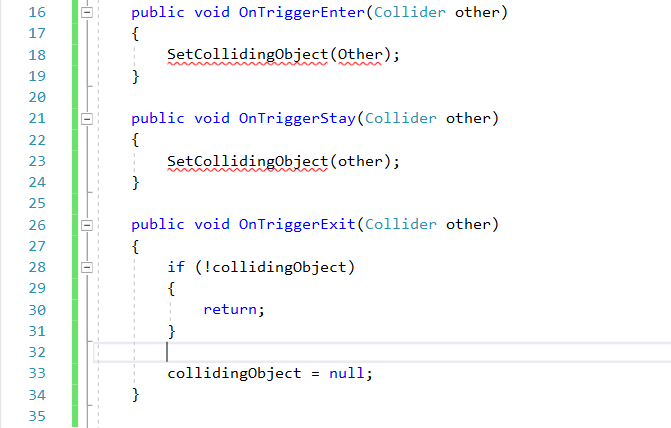
12. Then, we need to define SetCollidingObject.
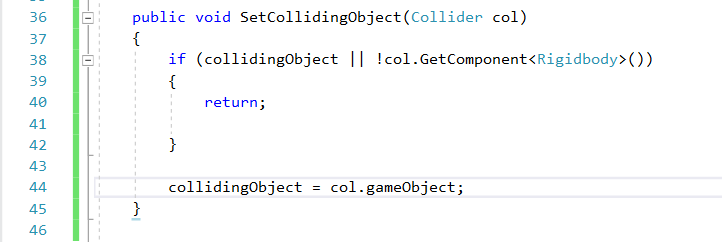
As you can probably tell, this method sets collidingObject unless there is already a collidingObject or if the other collider does not have a Rigidbody.
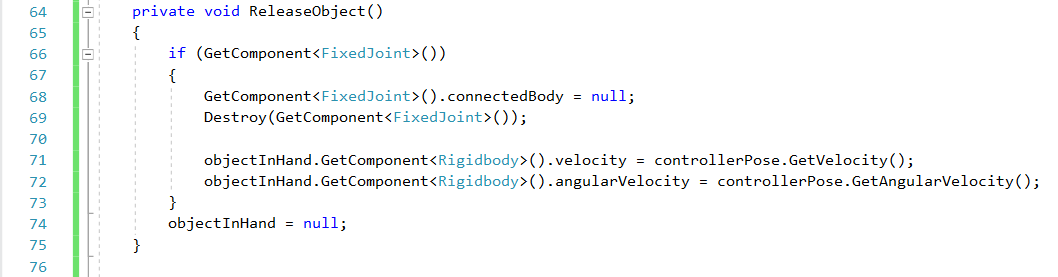
13. Now, we will add methods to grab and release objects.
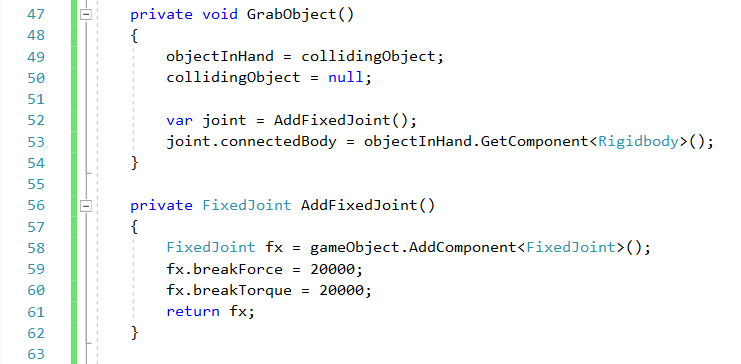
Here, the FixedJoint connects the object to the controller.
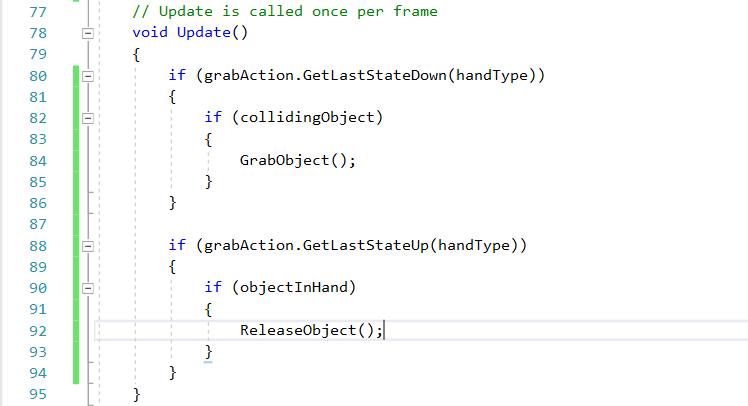
14. Finally, we just need to handle the controller input in Update.
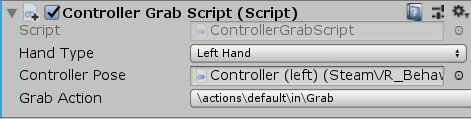
15. Now, go back to the editor and add ControllerGrabScript to each controller. There are some public fields we have to set. For the left controller, set Hand Type to Left Hand, Grab Action to \actions\default\in\Grab. Then, drag the Left Controller to Controller Pose. Repeat this for the Right Controller, but use the Right Hand.
16. Run the game and test it out with the HTC Vive headset and controllers. You should be able to pick up and throw the cubes and balls in the scene.
Now go to the next section to learn about UI in VR.
Useful links
You are encouraged to learn many different VR techniques outside this tutorial, such as teleportation and other forms of movement. Here are some useful links:
- Introduction to VR in Unity Youtube playlist (The XR Toolkit introduced here may be useful for your final project, but please do not use it for the assignment below! The point is to get you to learn how to code your own interaction which may not be present in an existing framework.)
- Vive Input Utility for Unity (This can simulate the VR headset and controllers.)
- How to Teleport in VR - Oculus Unity Tutorial
- Oculus Integration Package Components
- Advanced VR Movement in Unity Tutorial
- Advanced VR Interactions in Unity Tutorial
- HTC Vive Tutorial for Unity
Assignment 2
Assignment 2 - Shooting and Porting
In this assignment, you need to build a shooting game. You can use any assets from the Asset Store, or build your own assets, if you have the know-how.
The game should fulfill the following requirements:
- 1. In your game, one touch controller should take the form of a shooting device (this need not be a gun) in game, while the other touch controller should take the form of a hand. (This is just a guideline to make it easier to refer to each controller. If you can think of some other objects that better fit your theme, use them!)
- 2. With your shooting device, you should be able to pick up projectiles like this (once again, this is just a guideline):
- 3. You should be able to fire these projectiles from your shooting device, following some laws of physics (Use Rigidbody and AddForce)
- 4. There should be some targets in your scene, which are able to interact with the bullet. These targets can be static or moving.
- 5. As your ball hits the targets, there should be some response form the targets, such as disappearance or fragmentation.
- 6. Also, as the targets are hit, there should be a score recorder to record the score. Implement a UI object to show the score.
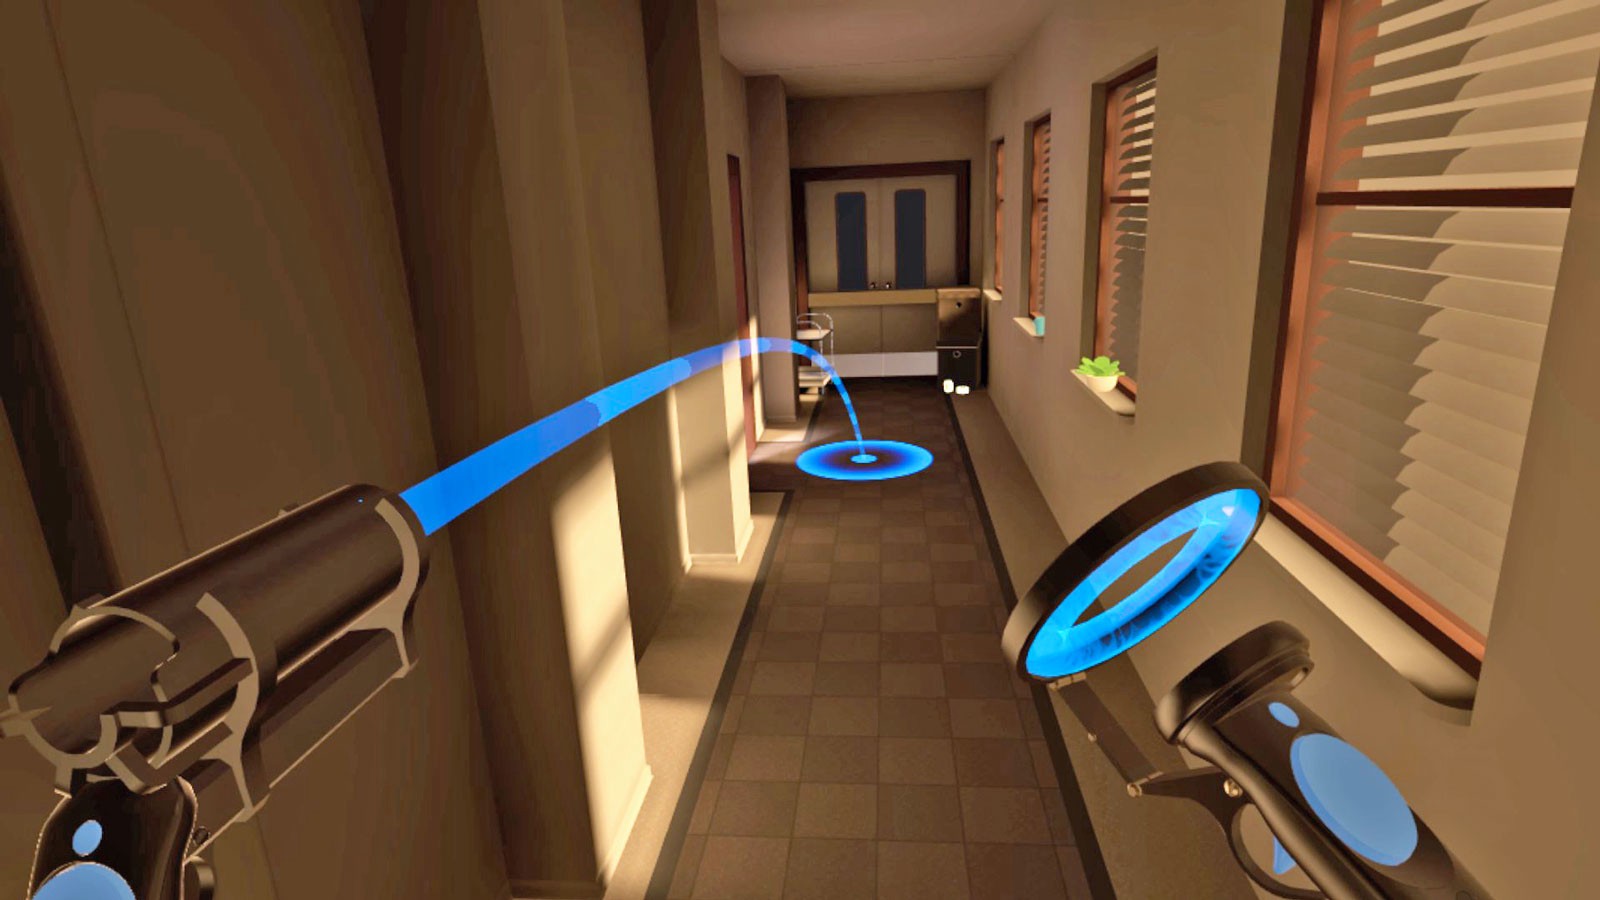
- 7. There should be movement in VR. As you should have learnt in your lectures, smooth locomotion is not ideal because it easily causes nausea. Thus, you should include some kind of teleportation. You can have free teleportation, or have some portals for the player to teleport to. Your other controller (the "hand") should be used for this teleportation. The common way of doing is holding a trigger to let a ray of light appear, with an indicator at the other end (remember raycasts?), then releasing the trigger to teleport to the location of the indicator. Something like this:
- 8. Your grabbing and teleporting script must be coded by you. i.e. No using scripts that may come with assets in the Assets Store.
- 9. Add some audio into this game to improve the sense of reality and immersion. You should at least have sound clips for picking up the ball, shooting, hitting target (target response).
- 10. Also, add immersion by making the shooting and teleporting follow some theme! Basically, think about why the player can do all this! Adding a level background that fits this theme helps a lot.
Grading Criteria
| Grabbing and Shooting (30%) | Player can grab projectiles and shoot them. Projectiles follow the laws of physics. |
| Teleporting (20%) | Player can teleport around the map by pointing and clicking one button. |
| Targets (20%) | There are targets spread around the level, and they provide some response when hit. |
| UI (10%) | Score recorder UI works perfectly and is placed appropriately. It is not difficult for the player to view the score at any time. |
| Audio (10%) | Audio enhances the experience and immersion. |
| Creativity (10%) | Unique and engaging theme that is well thought-out and refreshing. |
Should you need any further clarification, feel free to contact any TA.
Submission Guidelines
After completing your project, you need to select all your objects in Project panel and click Assets > Export Package to export what you used in your project.
This is a group project. Groups members will be same as your final project group. You only need to submit one file.
What to submit:
XXX. unitypackage (Your game package)
InputManager.asset (Found in ProjectSettings folder)
README.txt (You need to write how to play your game and what downloaded packages or objects you have used in your project)
Zip these files into Your_Group_Number.zip and upload it to Canvas->Assignments->Assignment 2 Submission. Due date: Refer to Canvas->Syllabus->Schedule .