Lesson 4 - AR Interaction Development in Unity3D
ARKit - Prepare For ARKit Development
WARNING! The contents of this page is now updated, and most of the libraries used here have been deprecated. Follow this tutorial at your own peril. If you want to learn about the latest AR Development in Unity, click here.
ARKit is Apple's Augmented Reality development platform for iOS mobile devices. If you want to develop on Android mobile devices, head down to the ARCore development section.
1. Create a new folder on Desktop and give it a name, say “Lab4”.
2. Create a new project at the position of “Lab4”
3. In this lab, we start to introduce how to develop AR software/game with Unity3D.
4. In this lab, we will learn how to use Apple ARKit in Unity3D. Therefore, for this lab, you will need some preparation. You need at least a MacBook (Mac), as well as an iPhone 6S(7/8/X) or iPad Pro. If you do not have a MacBook, you can use the Mac in the Mac Lab in SOC (PL1) or the study room of UTown. Also, you need to download XCode in your MacBook/Mac. You need an Apple account as well (do not need to be developer account, a common account is enough).
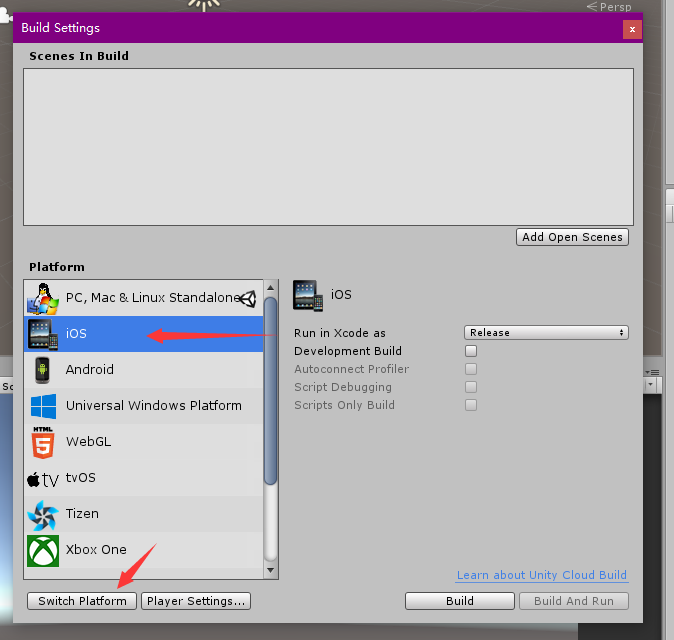
5. Now, let us start our first AR project. To start, you need to change the Build Setting first. You need to switch the platform to IOS.
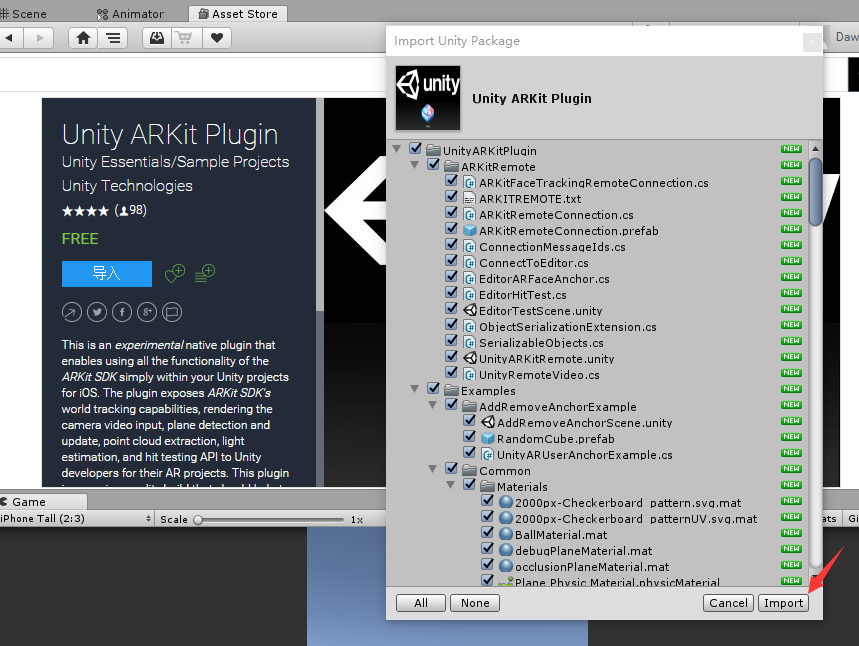
6. Then, download the UnityARKit plugin from the Lab Resources folder in LumiNUS.
7. Import the Unity ARKit Plugin into your project. It is a package prepared by Unity3D for you to develop AR software/game with ARKit. In this lesson, we will be using ARKit 1.5, but the package contains examples for ARKit 2 that you can go through on your own.
ARKit - Install Preview Software To Device
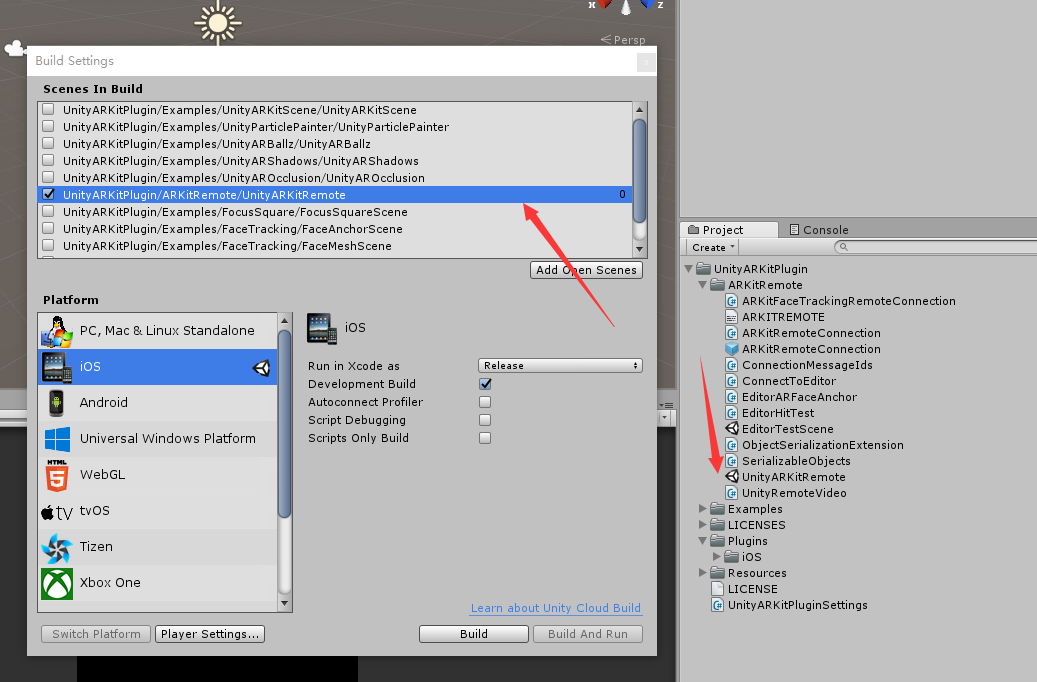
8. Also, we need to build the scene UnityARKitRemote first and copy it to your device, then you can use it to preview your own project.
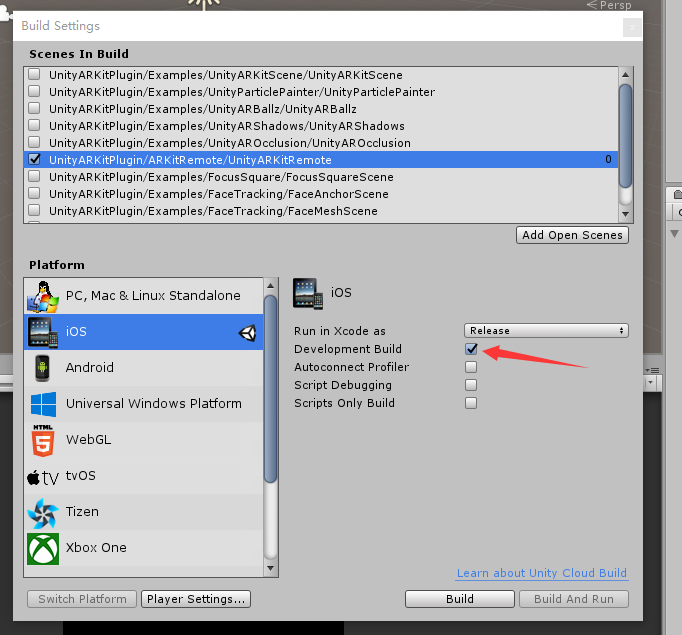
- First, open the Build Setting and drag the scene UnityARKitRemote to it. Remember to select it as scenes in build.
- Then, you need to select is as Development Build.
- Then click the Build button and choose a position for your XCode project. Then copy this XCode project to a MacBook/Mac.
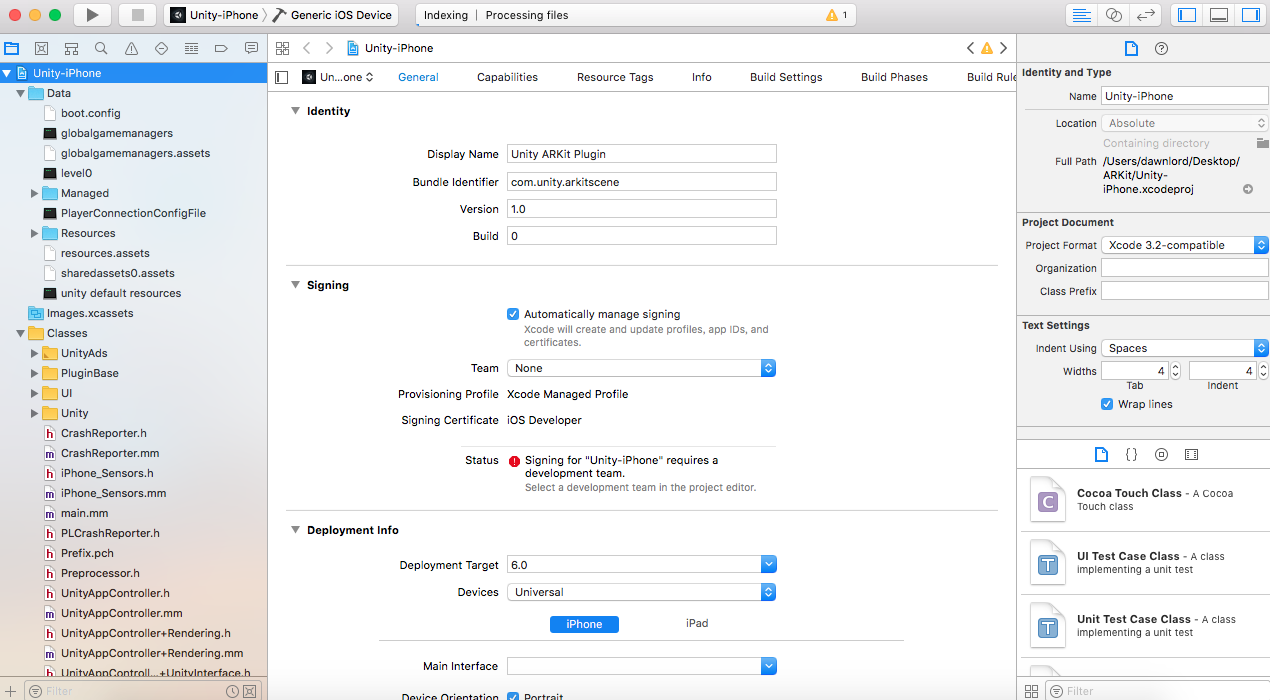
- Open your XCode project in your MacBook. You will see a scene like this.
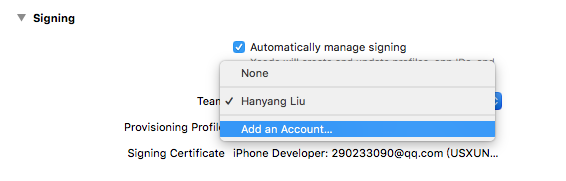
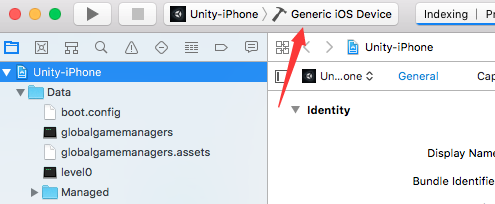
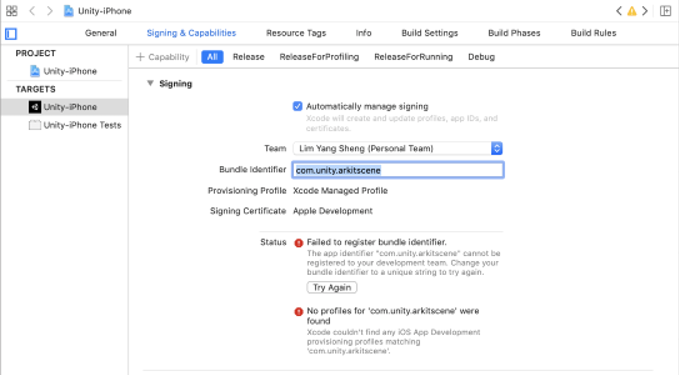
- To copy this project to your device, you need to sign for this project first. Click the Team and add an Apple account for it. If you are unable to add an account, check the "automatically manage signing" checkbox. The option should now appear.
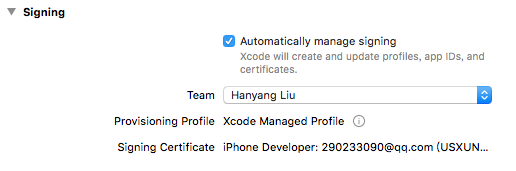
- After adding an account, you need to choose your own account, and this application will be signed automatically.
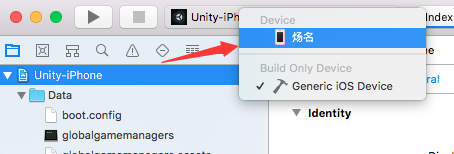
- Then, you should connect your device to your MacBook, and you will see your device from here.
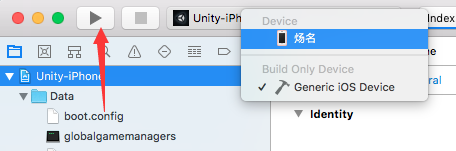
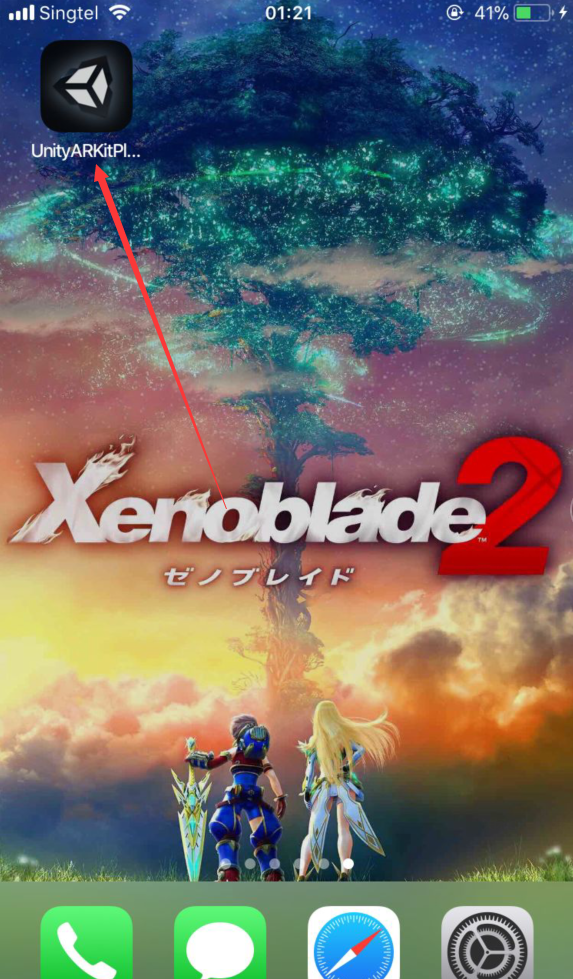
- Then, you should click the Play button, and the project will be complied as well as copied to your device. You should see an app with Unity Icon on your device.
Only this scene needs to be built in Development Build. For your own project, you do not need to select this option.
ARKit - Connect Preview Software To Unity3D
9. Now connect your device to your computer (PC or MacBook) and open this software. You will see it says waiting for editor connection.
To trust the app on the IOS device, do the following: Go to settings -> General -> Device Management -> Developer app -> Trust the app

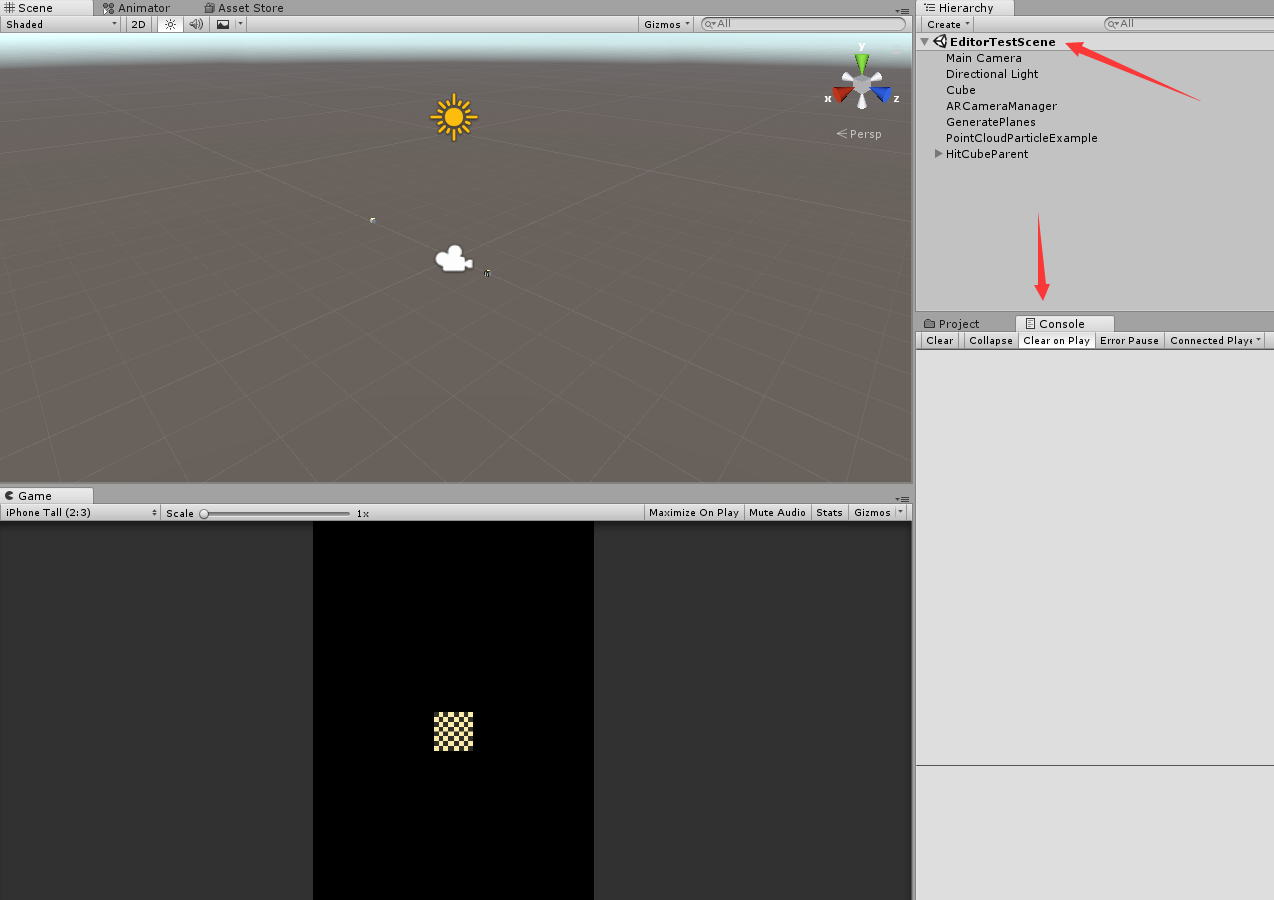
- Then, you can open the scene EditorTestScene and open the console window.
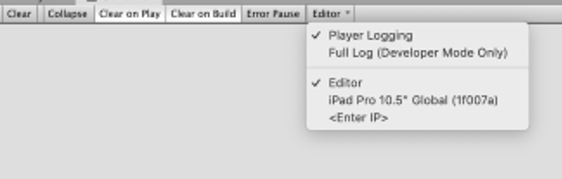
- In the console, click Editor and choose your device.
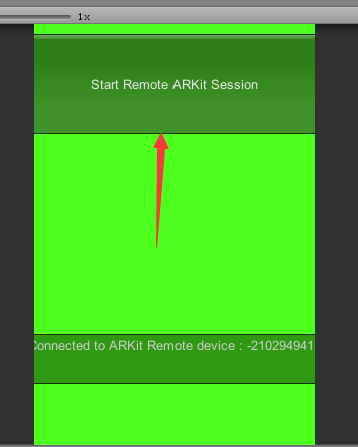
- Then, click Play and click Start Remote ARKit Session.
- Your phone will ask you to open camera right for this software, and you should give it this right. Then, you can preview AR scene on your computer.

Note: If UnityARKitRemote cannot be built onto the iOS device, it might be the imported plugin “UnityARKit” that has an issue. To resolve this, go the to link below and download the “UnityARKit” project. https://bitbucket.org/Unity-Technologies/unity-arkit-plugin/downloads/
Instead of opening a new Unity project, open the downloaded project to build “UnityARKitRemote” directly. The rest of the steps are the same, except at the step of signing where the following Bundle Identifier must be changed. You can use “com.varlabs.lab4” and it should work.
For more information, refer to the link below. https://bitbucket.org/Unity-Technologies/unity-arkit-plugin/download
10. These steps are also used when you copy your own project to your device except the step of selecting development build.
ARKit - Build Your Own AR Software
11. Now, let us see how we can use these plugins in our own project.
12. We can build a scene first, named as “MyFirstAR”
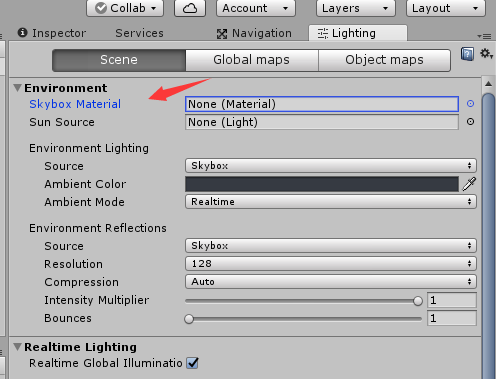
13. Navigate to Lighting Setting and set the Skybox as None.
14. Then create a new game object named as CameraParent and add the main camera as its child. You also need to drag the script UnityARVideo and UnityARCameraNearFar to the main camera.
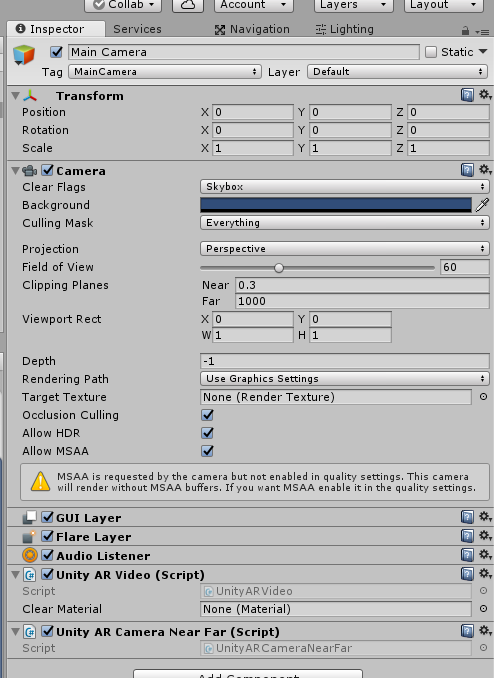
Note: You must set the CameraParent and Main Camera Position as (0, 0, 0).
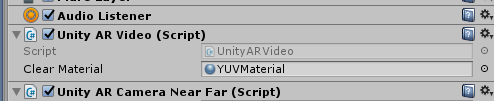
15. Then set the material of UnityARVideo as YUVMaterial. This material is used to play what we record form our phone camera.
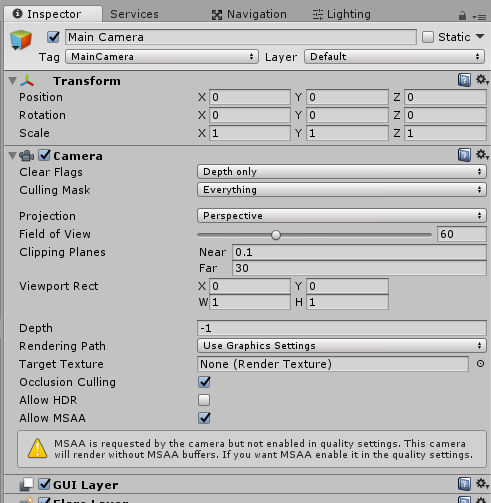
16. Also, you need to set your main camera like this.
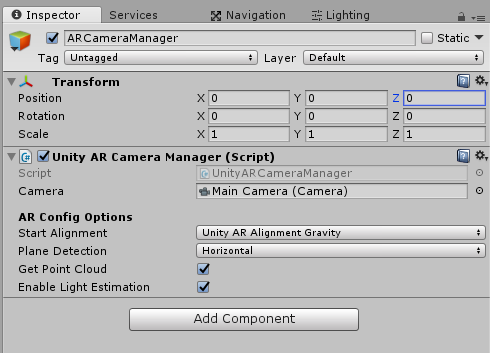
17. Create a new game object named as “ARCameraManager”, and drag the script UnityARCameraManager onto it. Remember to set Main Camera as the camera.
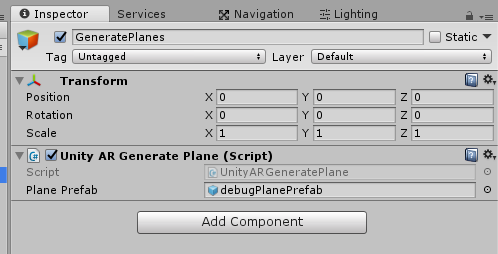
18. Now create a new game object named as “GeneratePlanes” and attach the script UnityARGeneratePlane onto it. You also need to set the debugPlanePrefab as the Plane Prefab. This script is used to recognize the plane around you (in real world) through the camera and generate a plane on the plane recognized.
19. Until now, you have had the basic of an AR software, the camera and the plane recognizer. Now, we need to add what to show in the AR world.
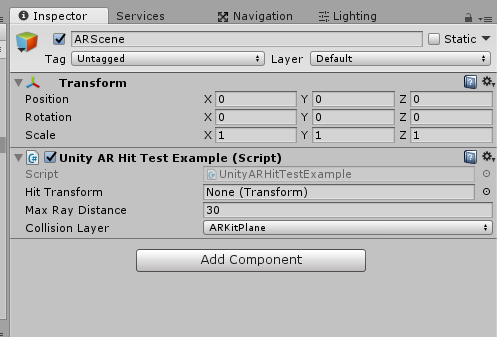
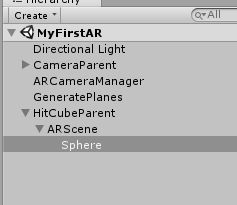
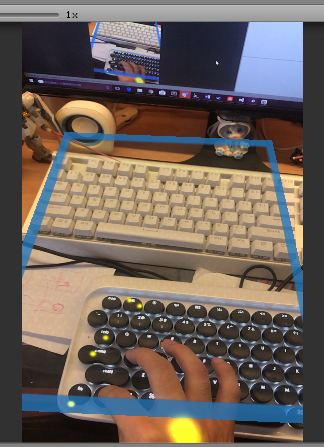
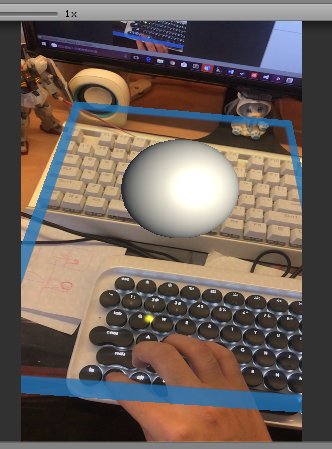
- First, create a game object named as “HitCubeParent” and set its position as (0, 0, -3), scale as (0.1, 0.1, 0.1). You also need to add a child for it named as “ARScene”. Also, you have to drag the script “UnityARHitTestExample” onto it.
- You also need to set the Hit Transform as the HitCubeParent. Then, you can add a child to the ARScene as what you want to show in the AR world. Here we just add a ball in the scene.
20. What’s more, you need to create a game object named as “PointCloudParticle”. Attach the script “PointCloudParticleExample” to this object. Then, set it like this. Note that the ParticlePrefab particle system is found under UnityARKitPlugin > Examples > Common > Prefabs.

This object will be used as your programme recognizing your surrounding environment. It will generate points around you to judge the depth of the environment.
21. Now, connect your device to your computer, and test playing it. You will find your software is recognizing your surrounding environment and generate a plan after a while. Then you can click on this plan, and the ball will be moved to where you have clicked.
22. Now, you have completed your first AR software. For further development, you can try to modify UnityARHitTestExample to improve the interaction. Also, you can read Apple ARKit documentation to find more about this plugin!
ARCore
ARCore - Prepare for ARCore development
Note: ARCore has been deprecated and in order to use it "xr legacy input helpers" and "multiplayer HLAPI" should be installed from the Package Manager. However, you may still experience camera issues. Hence, you are recommended to use either ARkit or Vuforia.
1. To develop an AR app for an Android device, you need to download the "Lab 4 ARCore" zip file from the Lab Resources folder in LumiNUS. There should be two Unity packages inside. Also, you need to download ARCore on your Android device (if it is supported).
2. Create a new folder on Desktop and give it a name, say “Lab4” and create a new project. Name the new scene as "ARScene".
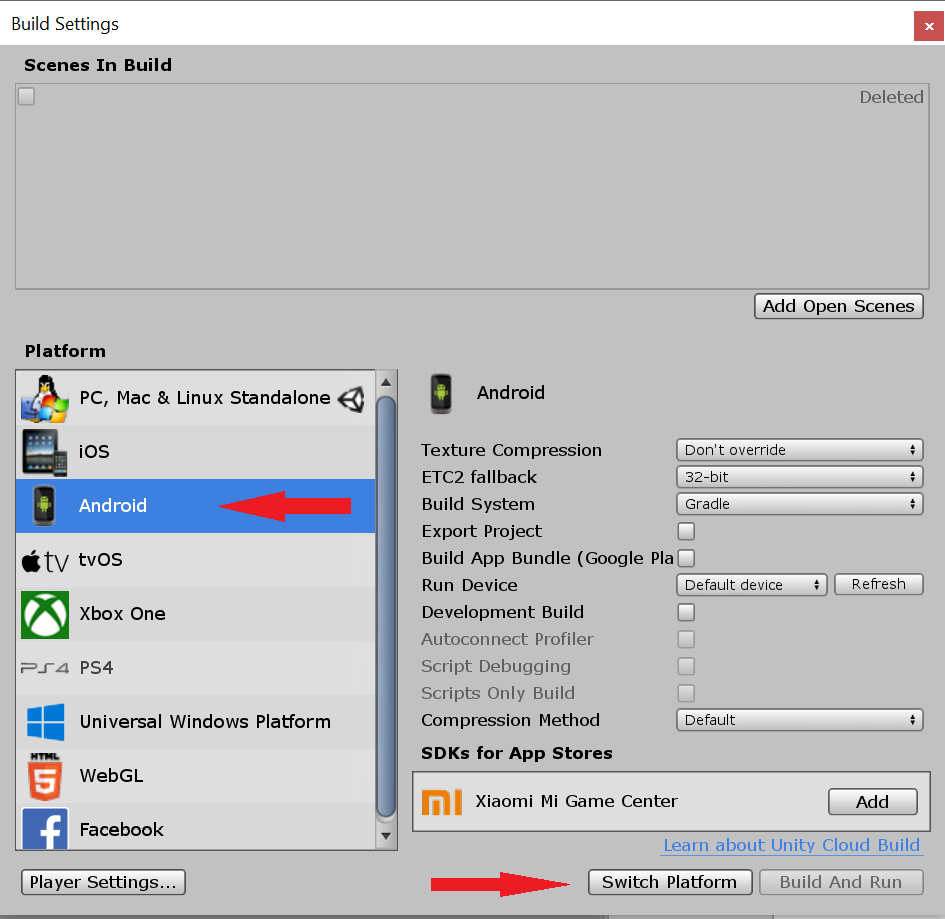
3. Next, go to Build Settings and switch platform to Android.
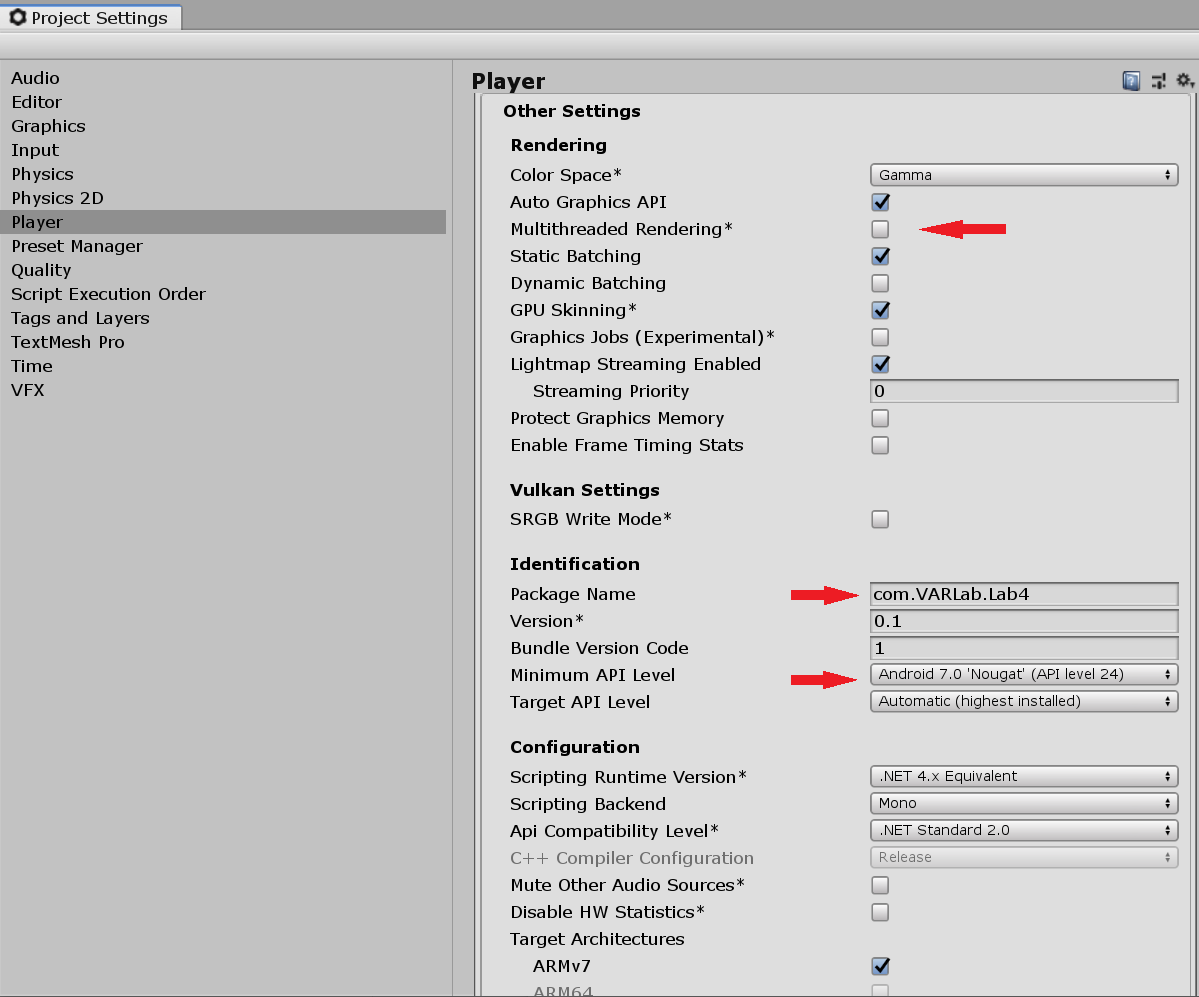
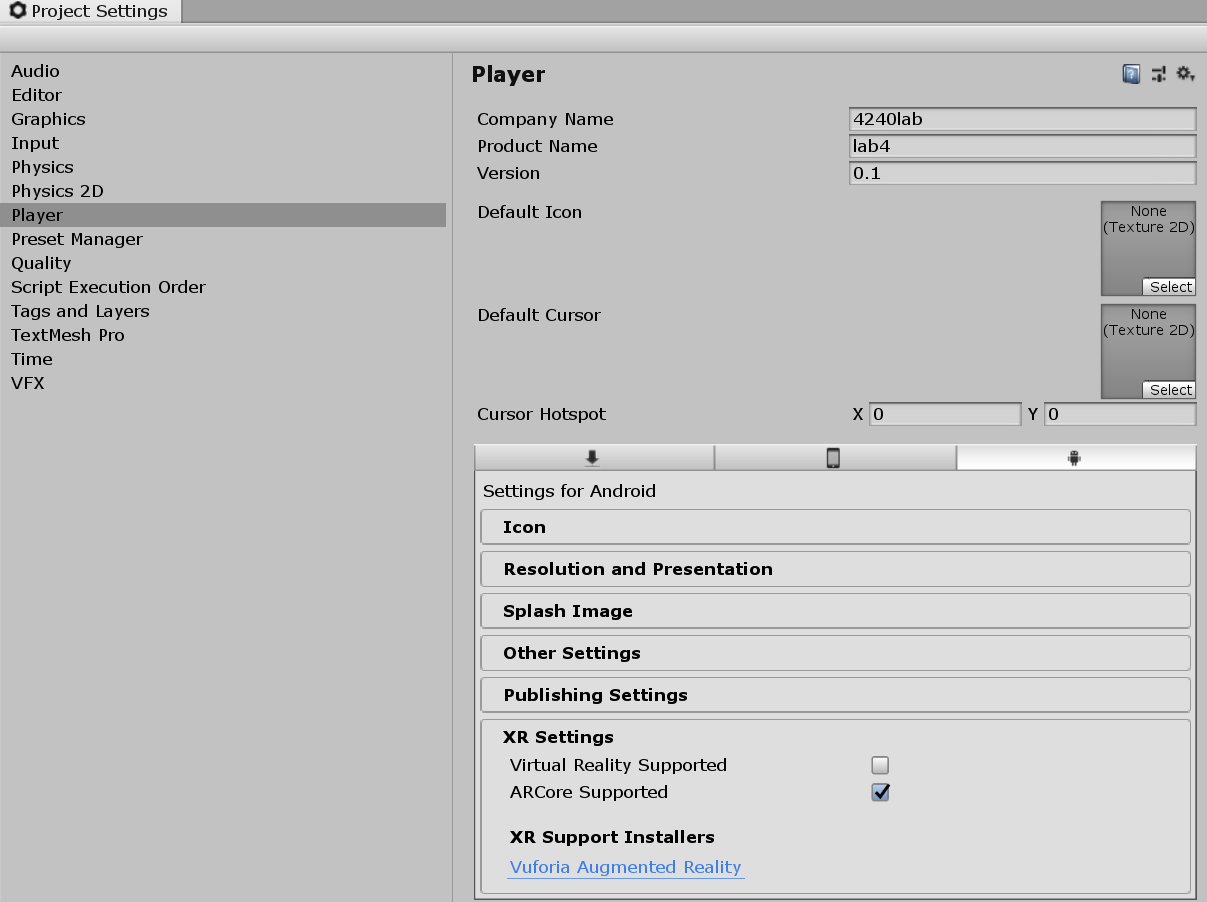
4. Now go to Edit > Project Settings. Under the Player tab, go to Other Settings and uncheck Multithreaded Rendering. Set Package Name to a unique name and set the Minimum API Level to 7.0 (Nougat) API Level 24 or higher.
In XR Settings, check AR Core Supported.
5. Import both packages found in the ZIP file. These contain the plugins for developing in Unity3D with ARCore, as well as some example scenes, which you can go through in your free time.
ARCore - Setting the Scene elements
6. Delete the Main Camera and Directional Light.
7. Find the ARCore Device prefab under Assets > GoogleARCore > Prefabs and add it into the scene. Set the position to (0, 0, 0). In the same folder, find Environmental Light and add it to the scene as well.
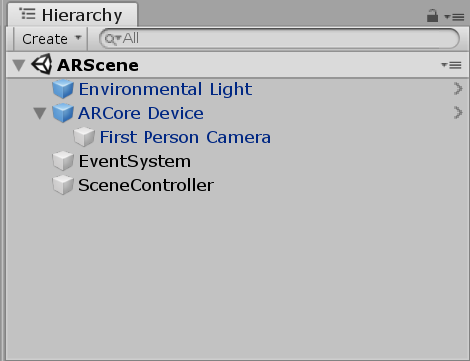
8. Add an EventSystem (from the UI tab). Then create an empty 3D object and name it "SceneController". Your scene hierarchy should now look like this:
9. In the SceneController object, add a new C# script called "SceneController". Open the script.
10. First, at the beginning of the script, add the using statement to use the ARCore classes and methods.

11. Next, add this method to the script.

This method checks if permission to the camera is granted, and if the ARCore library can connect to ARCore Services. Both conditions must be true to be able to run ARCore. Add a call to QuitOnConnectionErrors() in the Start() method.

12. Add the code below to the Update() method. This checks if ARCore is tracking, and if it is, sets the device to never sleep while tracking.

13. Build and run the sample app. If everything is working, you should be prompted for permission to take pictures and record video, after which you'll start seeing a preview of the camera image. Once you see the preview image, you're ready to use ARCore!
ARCore - Creating Plane Detection
14. ARCore detects horizontal and vertical planes, and uses a class called DetectedPlane to represent them. For each plane object, we will create a game object to render that plane.
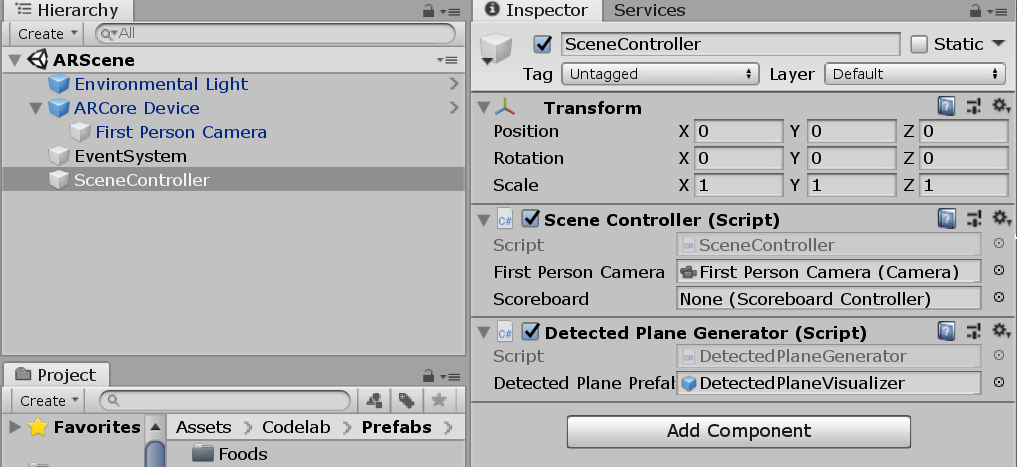
15. Add DetectedPlaneGenerator as a component to the SceneController object. Then set the value of the Detected Plane prefab to DetectedPlaneVisualizer.
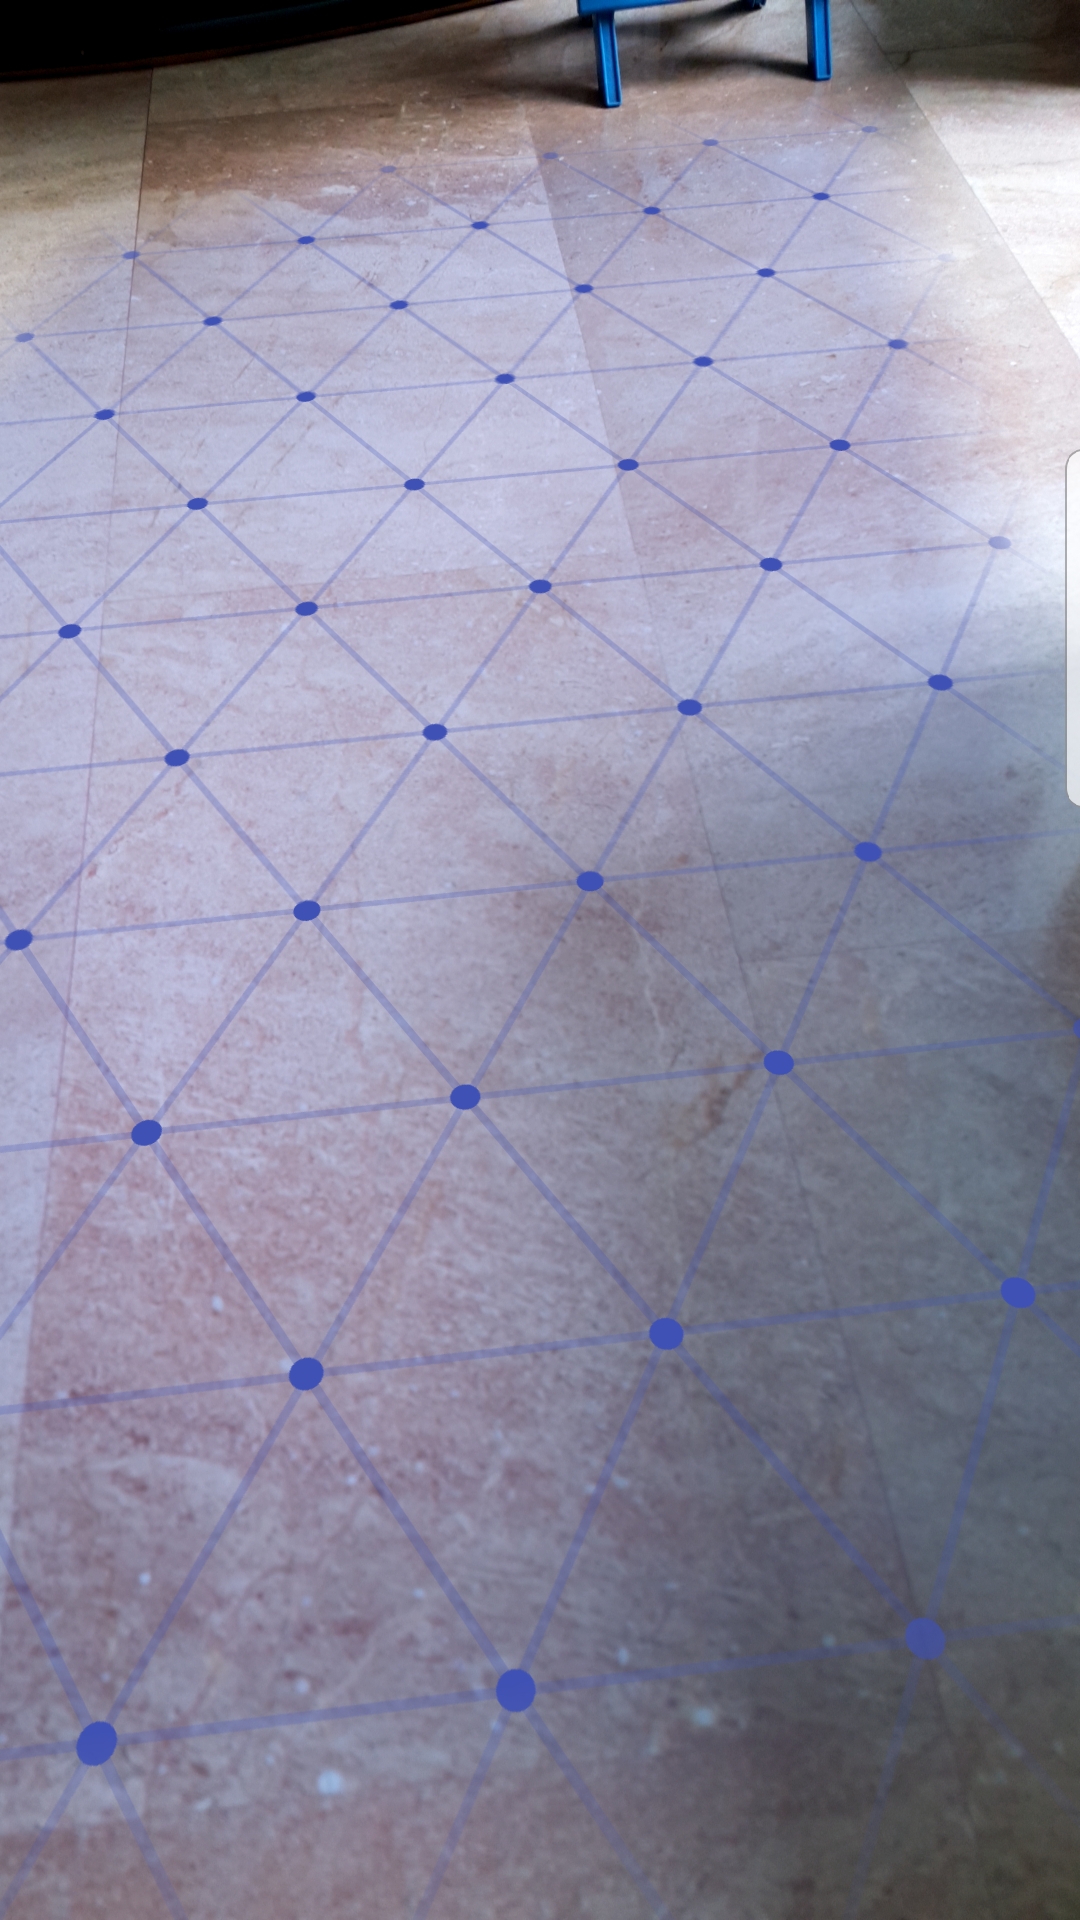
16. Save, build and run again. ARCore should detect planes and render them using a random color. As ARCore detects more about the scene, the plane will change shape and merge with, or subsume other planes. You should see something like this.
17. Now we will add the function of selecting a plane by tapping it. Since we will be communicating with the camera, add a public Camera variable to the SceneController script.

Save the script, switch to the scene editor, and set this variable to First Person Camera from the scene hierarchy.
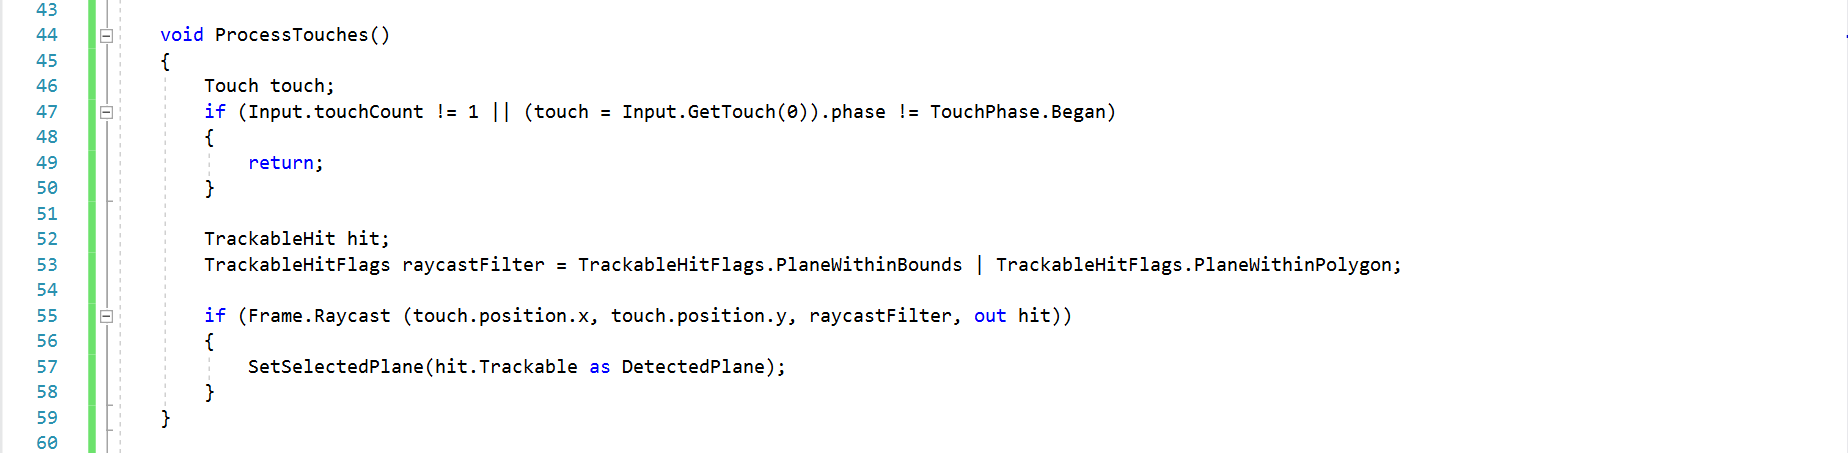
18. Next, create the ProcessTouches() method in the SceneController script. This method will use raycasting to check if the user is tapping on a plane.
19. Define the SetSelectedPlane method. For now, we will have it print a log in the console.

ARCore - Adding Object to Plane
20. First, go to the SceneController object and add a GlobalScalable script. This script allows the user to stretch and pinch objects to resize them. Check "Handle Scale Input" and uncheck "Adjust Scale".

21. In ARCore, objects that maintain a constant position as you move around are positioned by using an Anchor. Let's create an Anchor to hold a floating scoreboard.
Create an empty game object named "Scoreboard". Set its scale to (0.3, 0.3, 0.3). Then add a ScoreboardDisplay prefab as a child to the Scoreboard object. Next, add a new script and name it "ScoreboardController".
22. Initialize the following variables.

Save the script, switch to the scene editor, and set this variable to First Person Camera from the scene hierarchy.
23. Add the following code to the Start() method. This hides the scoreboard until it is anchored.

24. Create a SetSelectedPlane() method. This is called from the scene controller when the user taps a plane.

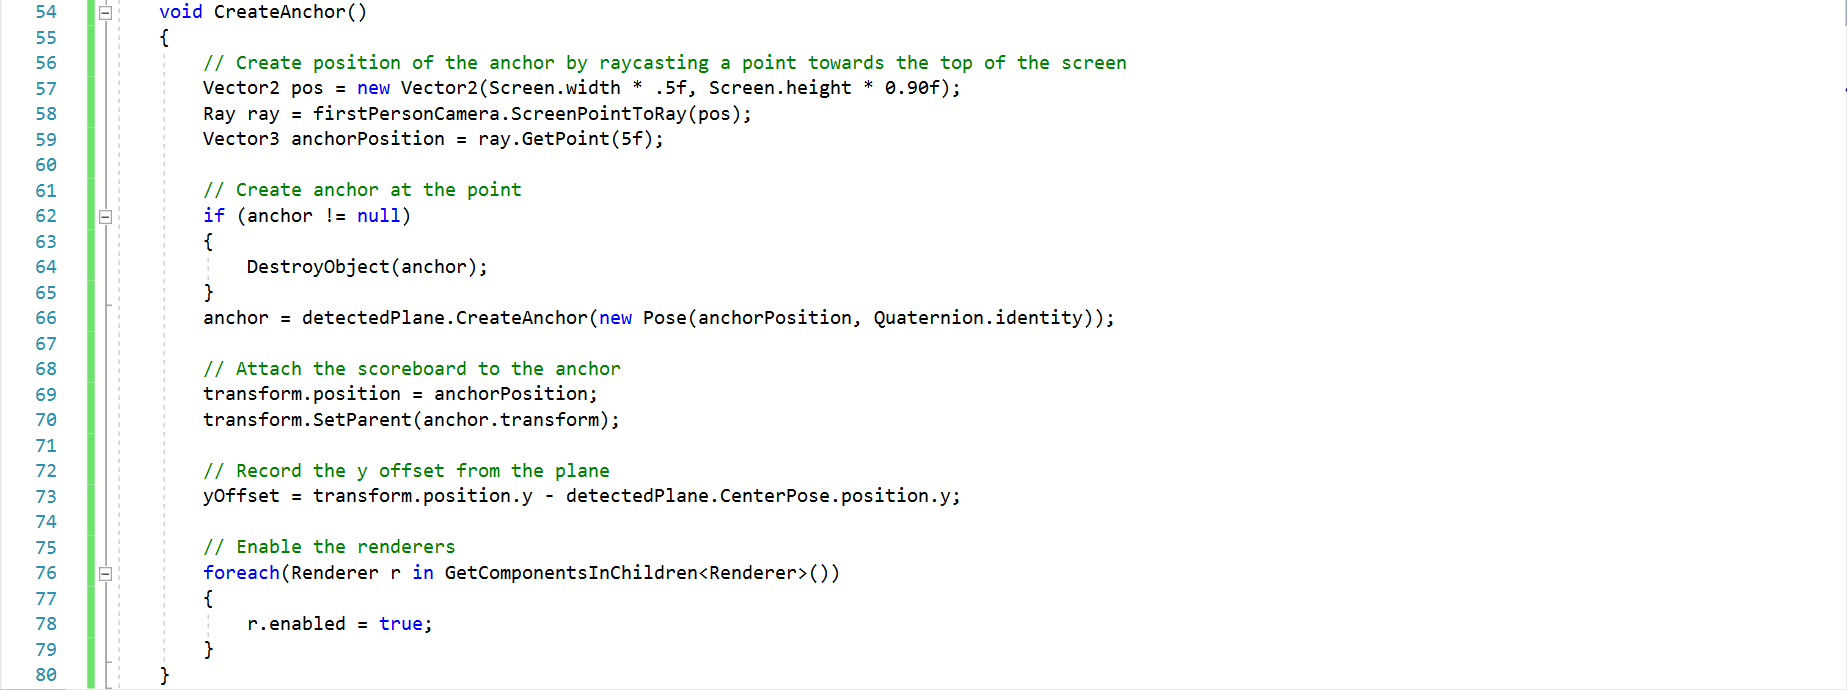
25. Next, create a CreateAnchor() method. What this method does is explained in the comments.
26. Add the following code to the Update() method in ScoreboardController.
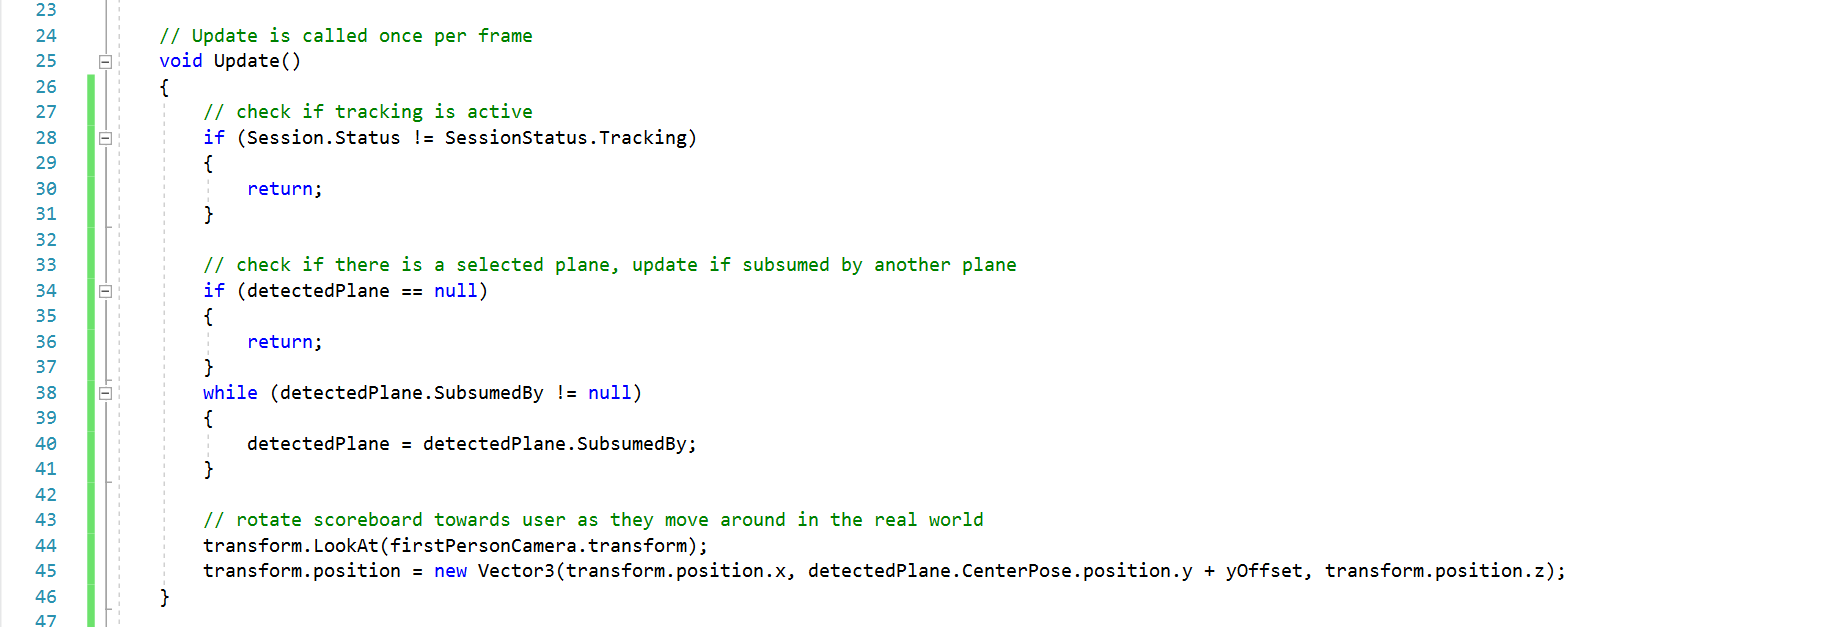
This code first checks if tracking is active, then checks if there is a selected plane and updates it if it was subsumed by another plane. It then rotates the scoreboard towards the user as they move around in the real world.
27. We are now done with the code in ScoreboardController. Switch to the SceneController script and add a reference to ScoreboardController.

Save the script, switch to the scene editor, and set this variable to Scoreboard object from the scene hierarchy.
28. Add a line of code to the SetSelectedPlane() method to pass the selected plane to the ScoreboardController script.

29. Save, build and run. You should see something like this.

You have now completed your first AR software using ARCore. For further development, you can try to modify ARScene to improve the interaction. Also, you can read Google's ARCore documentation to find more about this plugin!
Vuforia
Vuforia - Prepare for Vuforia development
Note: Point 1 and 2 below are no longer needed, as Vuforia is pre-installed in newer versions of Unity.
1. Vuforia is yet another Augmented Reality SDK that can be used with Unity and supports a wide range of platforms, including iOS and Android. It is especially useful for image tracking.
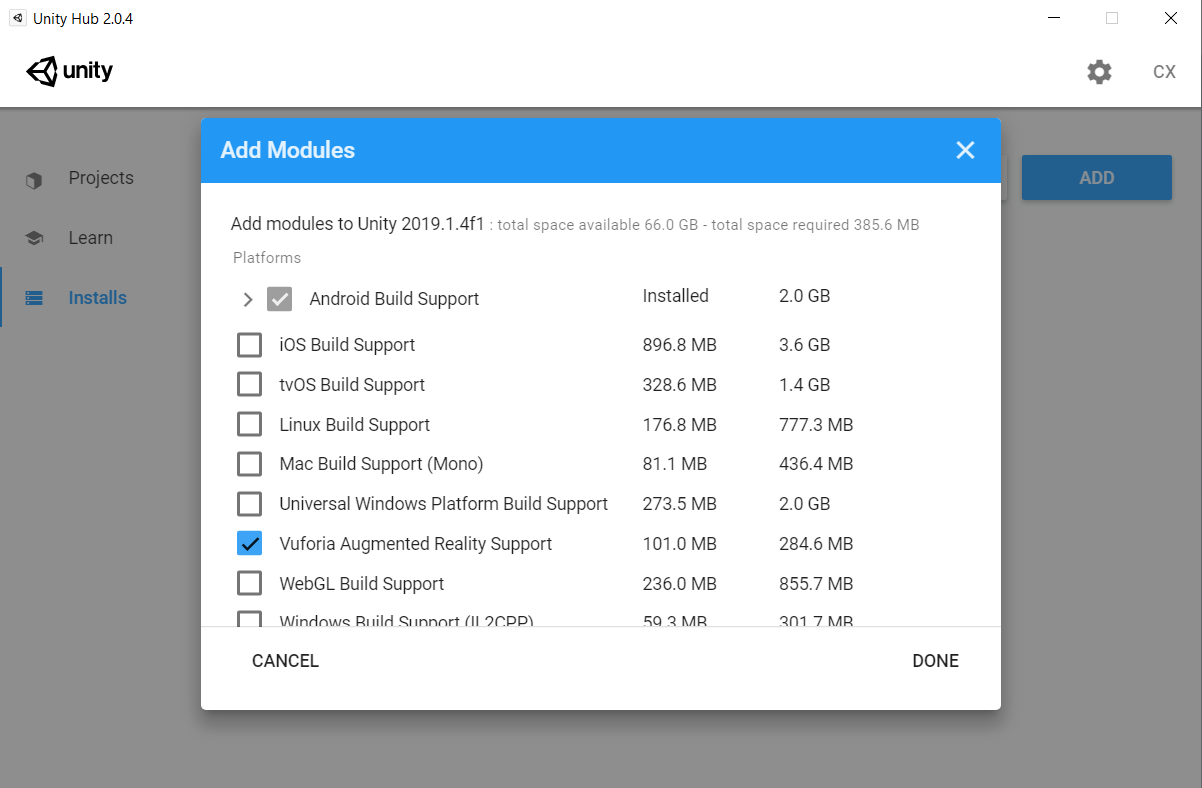
2. To begin using Vuforia, you first have to install the Unity component. In Unity Hub, go to Installs, click the menu on the top right corner of the Unity version you want to use, then click Add Modules. Find "Vuforia Augmented Reality Support", click on the checkbox and then click Done. Wait as Unity installs the component for you.
3. Once that is complete, create a new project. Go to build settings and change the platform to iOS or Android, depending on which one you prefer. For convenience, this tutorial will be done on Android.
4. Next, click on Edit > Project Settings, go to the player tab, and under XR Settings, check the box next to "Vuforia Augmented Reality Supported".
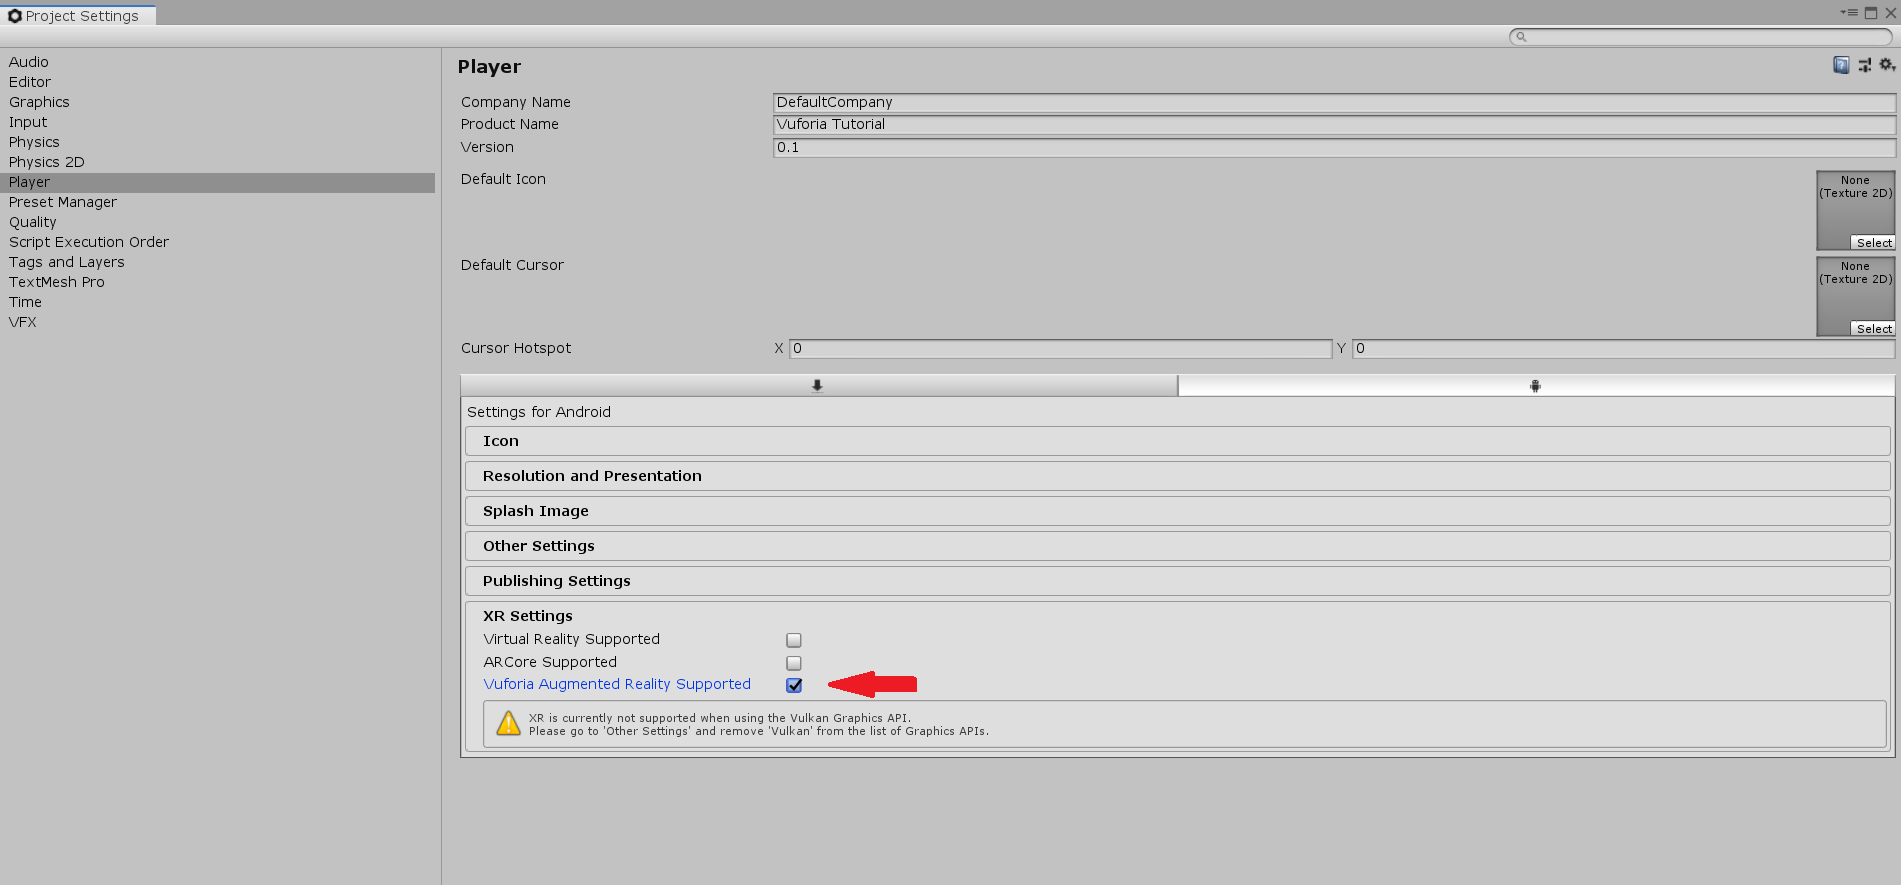
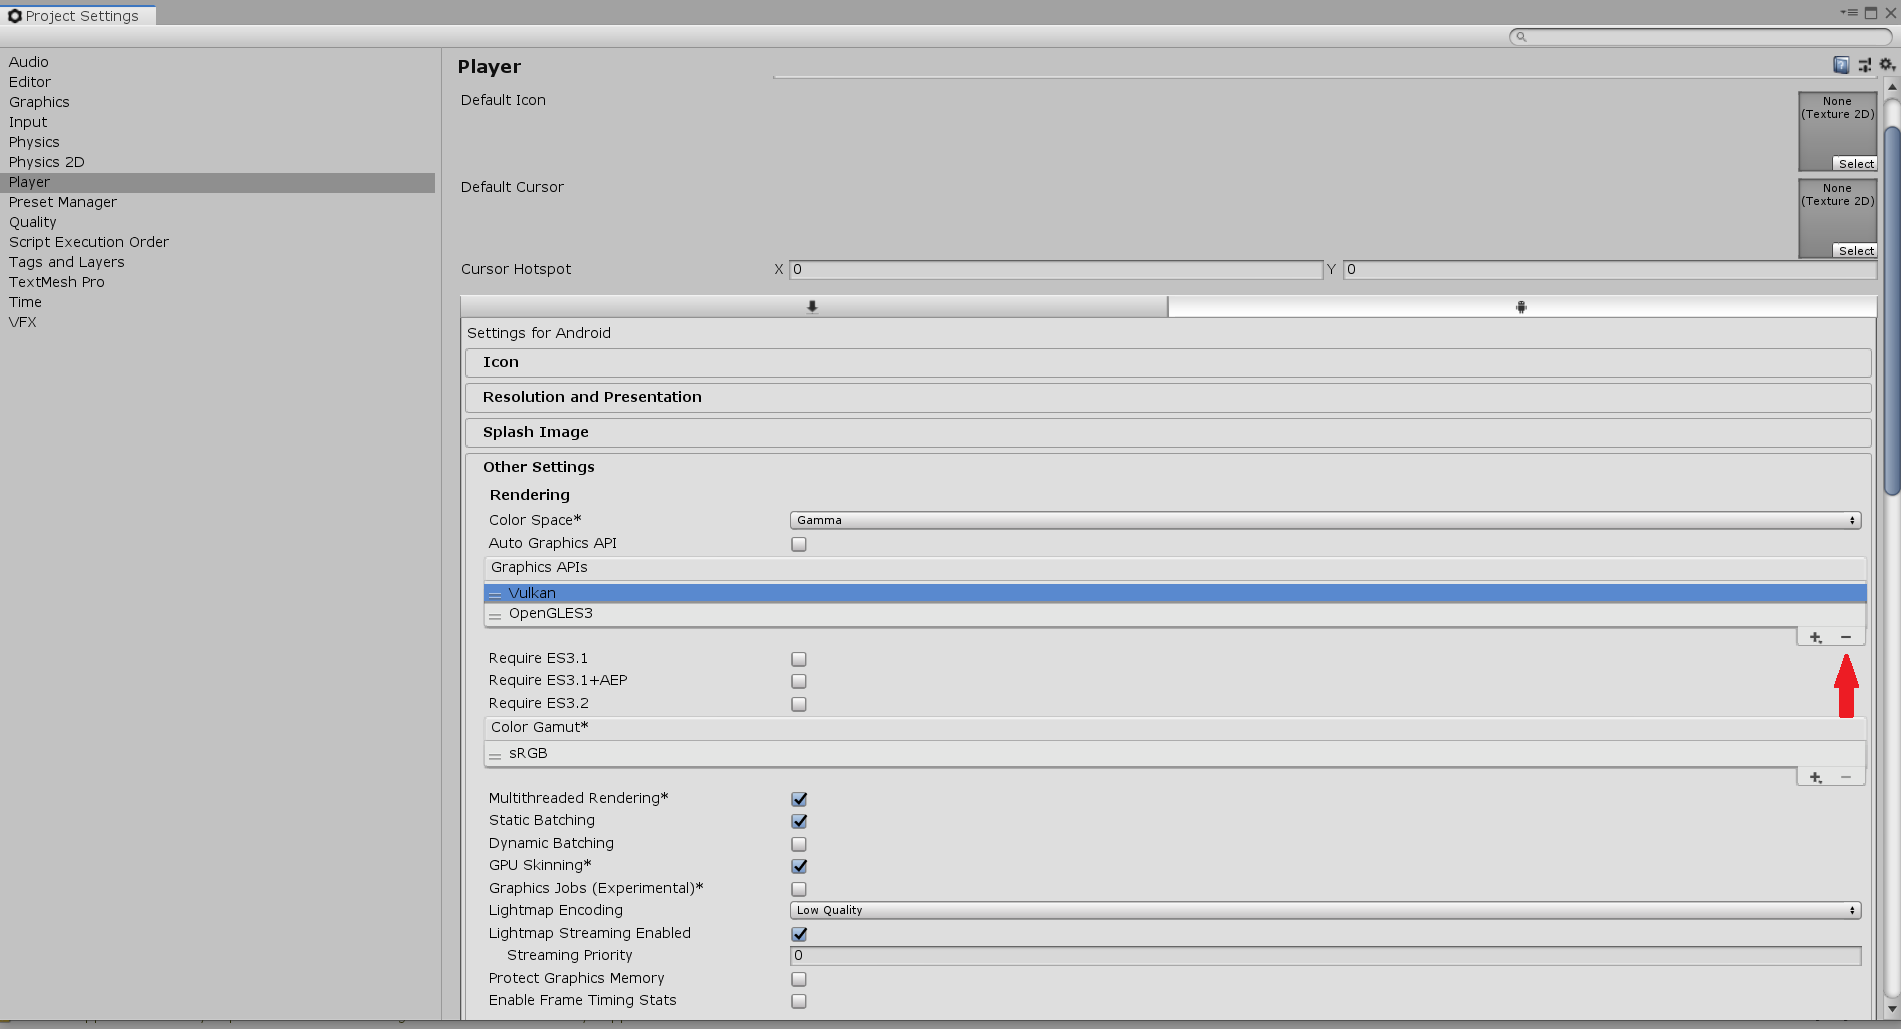
If you encounter a warning stating that XR isn't supported when using the Vulkan Graphics API, go to Other Settings, click on Vulkan under Graphics APIs, and click the minus button on the bottom right.
5. The setting up is now complete, and you should be able to see a menu option for Vuforia Engine when you click on Create in the Editor.
Vuforia - Image Tracking
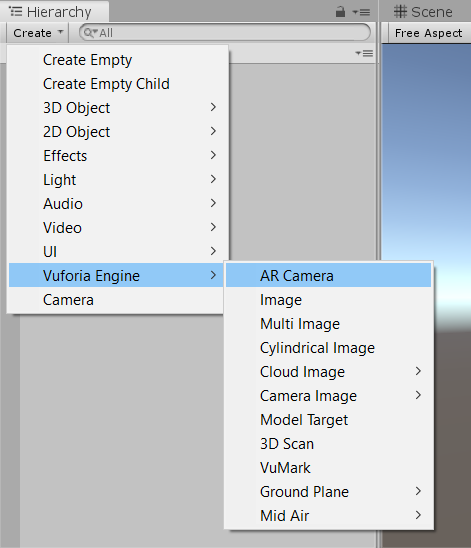
6. Now, we move on to creating the scene for Vuforia. In the scene, delete the main camera. Then, click Create > Vuforia Engine > AR Camera to add an AR Camera to the scene.
Now, if you click play in the editor, you should see yourself (or whatever your computer's camera is pointing at) in the game screen.
7. Next, click Create > Vuforia Engine > Image. Click Import when Unity prompts you to import a default Image database.
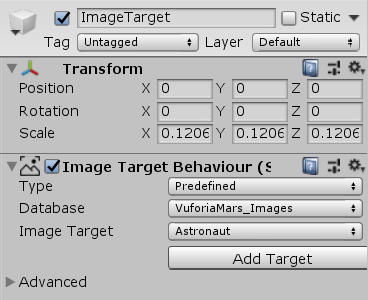
8. Notice that the Image contains a Image Target Behaviour component. The Image Target in this component is the image that Vuforia will track. In this project, we will use "Astronaut", an image provided by Vuforia in the default image database.

9. You can choose to print the above image, or you can open it in a mobile device. If you point the image at the camera, making sure that the camera can see the image, and then move it around, you will notice that the ImageTarget also moves around in the Scene.
10. Note that not all images can be tracked well. Before development, you should upload your image to the developer portal, which will give your image a rating and show you its feature points. A good image for tracking will have densely spread feature points with no noticeable pattern.
Vuforia - Handling Events
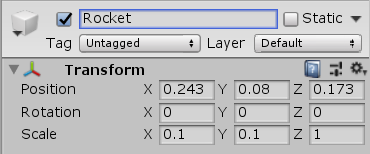
11. Now, we can try adding a GameObject to the image target. Create a capsule and make it a child of ImageTarget. Then, change its position to (0.243, 0.08, 0.173) and its scale to (0.1, 0.1, 0). That will act as the "rocket" for the astronaut.
12. Next, add a Default Trackable Event Handler script to the ImageTarget. Open it up to see how it works.
13. The important methods to take note of here are OnTrackableStateChanged, OnTrackingFound and OnTrackingLost. We will go through each one and explain how they work.
14. OnTrackableStateChanged is fairly simple. When the image is detected (handled by the Image Target Behaviour component), it calls OnTrackingFound, but when the image cannot be detected anymore, it calls OnTrackingLost.
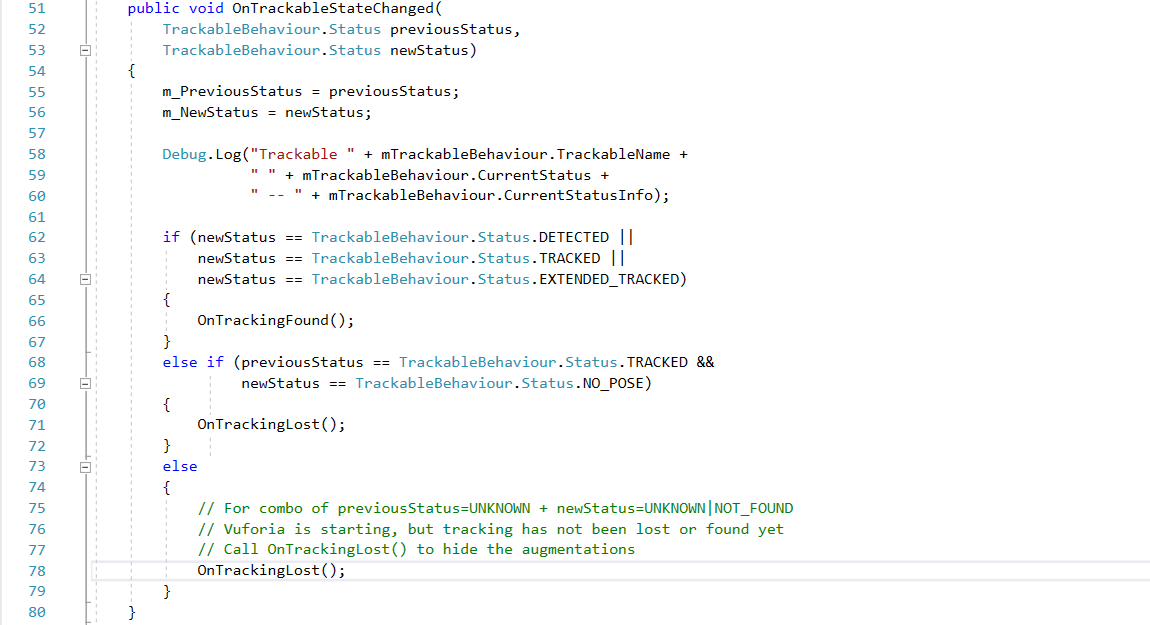
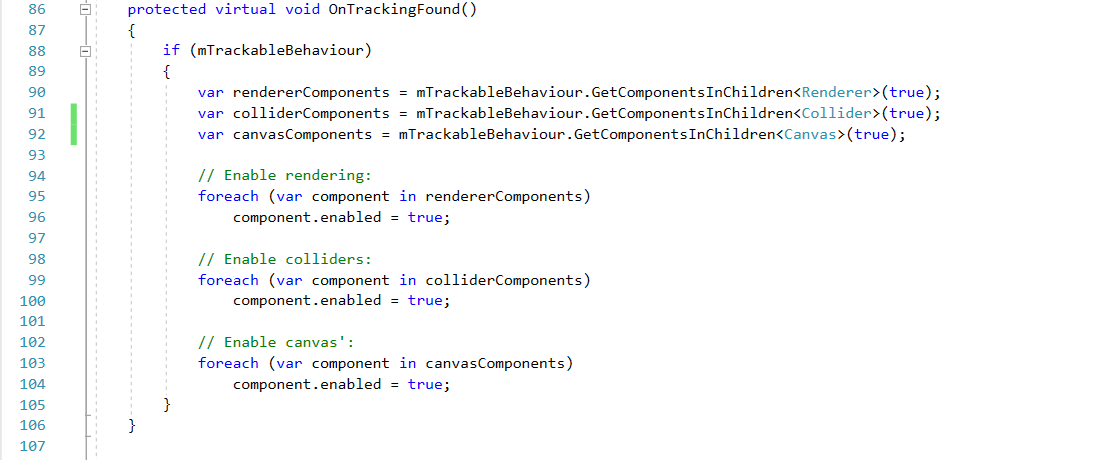
15. OnTrackingFound gets all Renderer, Collider and Canvas components of all children under ImageTarget, then sets them all to active. In our case, it will make the rocket appear when the astronaut image can be detected.
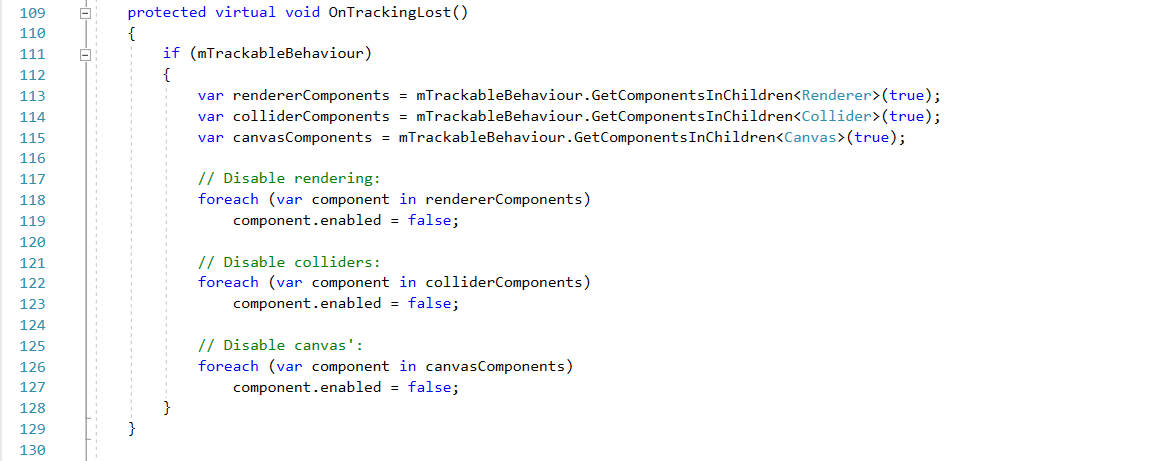
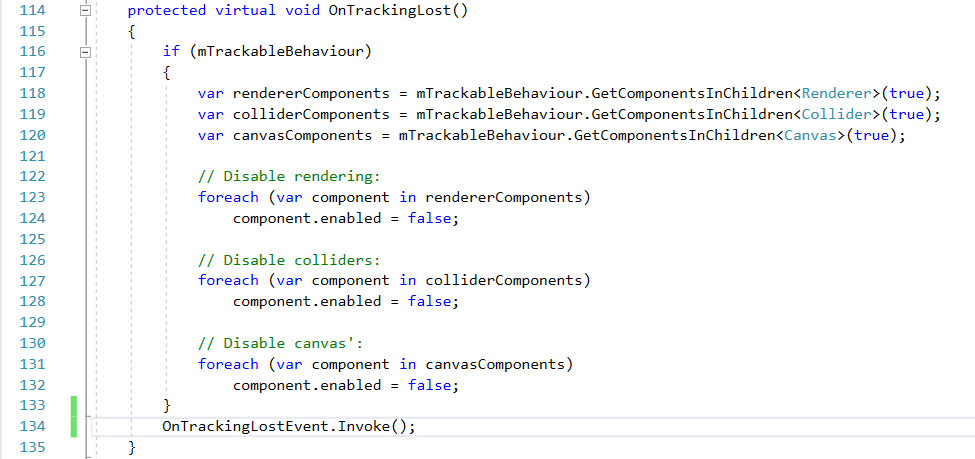
16. OnTrackingLost gets all Renderer, Collider and Canvas components of all children under ImageTarget, then sets them all to inactive. In our case, it will make the rocket disappear when the astronaut image cannnot be detected.
17. Press Play on the Editor. You will notice that the camera can see the astronaut image, the rocket appears on the Game screen, but when you turn it away, the rocket disappears.
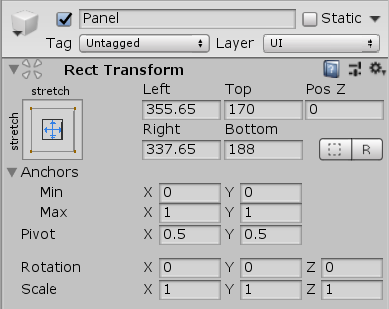
18. Now, we will attempt to make some text appear on the screen when the rocket disappears. Create a UI Panel, set the rect transform as shown below:

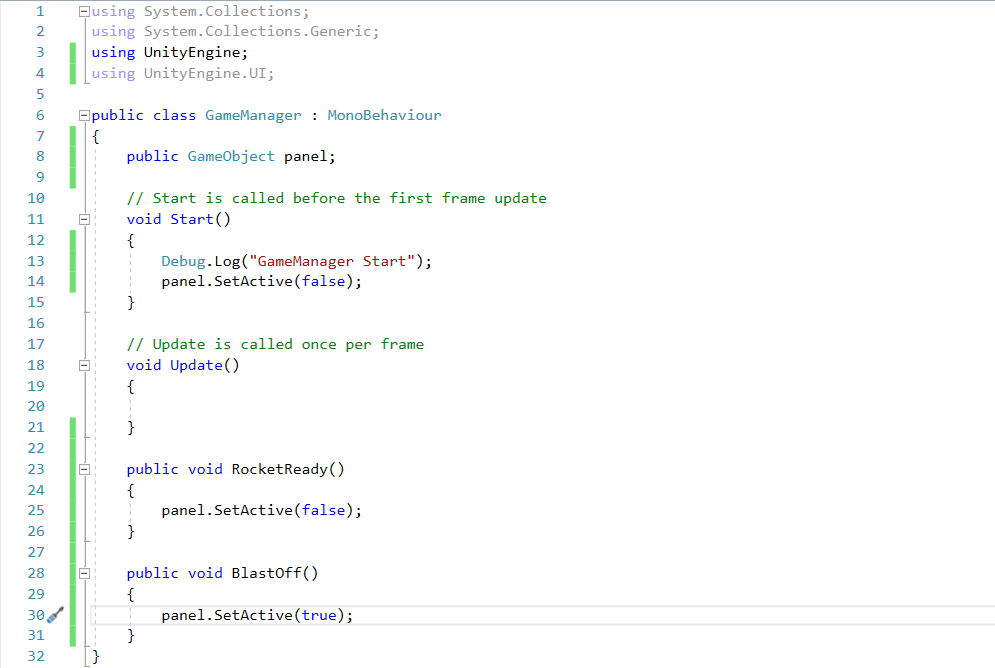
19. Next, create an empty GameObject and name it "GameManager". Create a script named "GameManager" and attach it onto the object. Write the script like this:
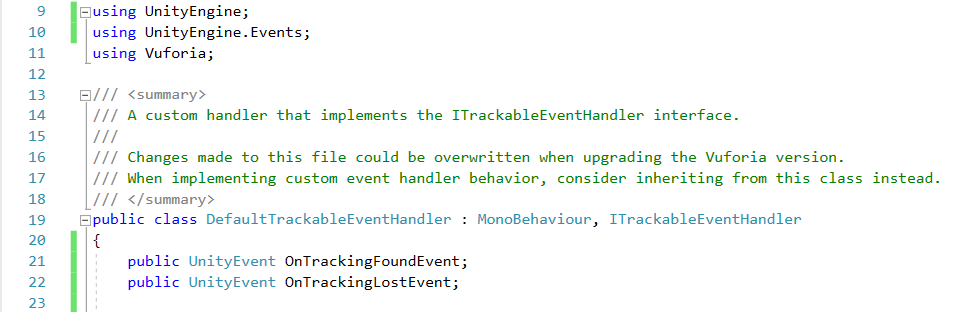
20. Now, open the Default Trackable Event Handler script. Add a using UnityEngine.Events; line at the top, and declare two Events, OnTrackingFoundEvent and OnTrackingLostEvent. The script should look like this:
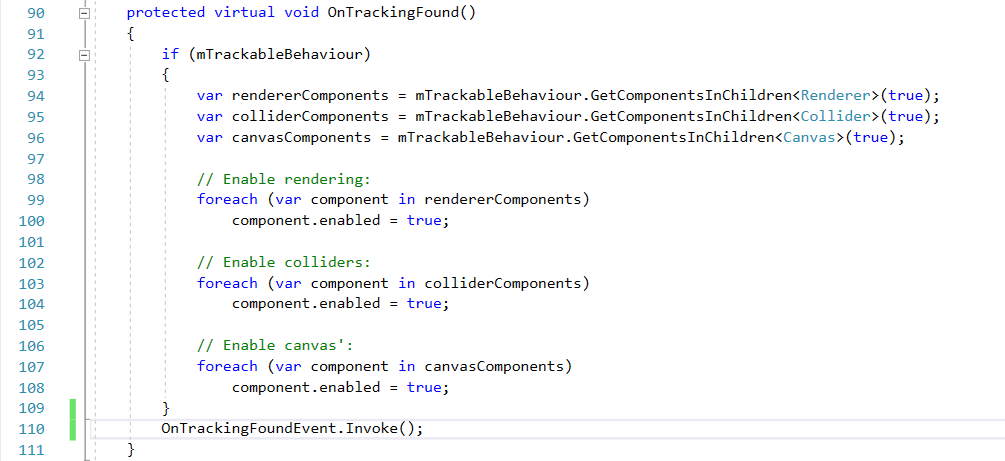
In the OnTrackingFound event, add the line OnTrackingFoundEvent.Invoke(); at the bottom. Do the same for OnTrackingLost and OnTrackingLostEvent. The two methods should now look like this:
21. Just a couple of things left to do! Go to the GameManager object in the Editor and drag the UI Panel to the panel variable. Next, go to ImageTarget. Click the + under On Tracking Found Event (), then drag the GameManager object into the slot, then click on the dropdown menu and select GameManager > RocketReady(). Do the same for On Tracking Lost Event (), but select GameManager > BlastingOff().

22. And we are done! Now, if you remove the tracked image away from the camera, the words "Rocket is Blasting Off!" will appear on the screen.
There are still many more things that can be done with Vuforia, however. If you still want to learn more, you can check out the Vuforia API.
Assignment 3
This assignment 3 is to build a AR software which covers what we have learned until now.
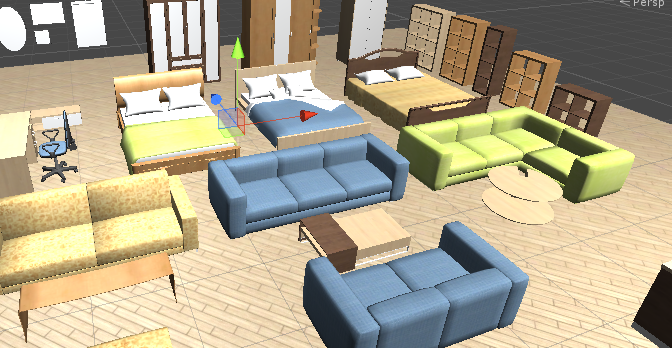
In this assignment, you need to build a furniture planning software. A furniture package is provided in the package Furniture Pack on LumiNUS. You should use this package to build the furniture planning software.
The AR software should fulfill the following requirements:
- 1. You need to have a UI to choose a furniture item from a set of furniture.
- 2. Your software should be able to detect planes in your around environment
- 3. The chosen furniture can be placed into any location in the AR world (on the planes detected).
- 4. Furniture put in the AR world can also be deleted from the AR world.
- 5. Your software should enable users to put multiple furniture in their scene.
- 6. You are allowed to add some assets from the Unity Store, but they should be suitable in your software.
Grading Scheme
- UI (20%): You need to have a UI to choose a furniture item from a set of furniture.
- Detection (20%): Your software should be able to detect planes in your around the environment.
- Placement (20%): The chosen furniture can be placed into any location in the AR world (on the planes detected).
- Relocation (20%): Furniture put in the AR world can also be deleted and relocated from the AR world.
- Multiple Objects (20%): Your software should enable users to put multiple non-collided furniture in their scenes.
After completing your project, you need to select all your objects in Project panel and click Assets > Export Package to export what you used in your project.
You should share the hardware for this assignment. You can work together in lab, help-each other (within the group), but each one should implement a unique VR scene/ideas/objects.
What to submit:
XXX. unitypackage (Your game package)
README.txt (You need to write how to play your game and what downloaded packages or objects you have used in your project)
Zip these files into Your_Matic_Number.zip and upload it to LumiNUS->Assignments->Unity Assignment3 Submission folder. The deadline is 09-Mar-2020 extended to 15-Mar-2020, 11:55pm.